
Three out of four car seats are installed incorrectly, putting children at serious risk during collisions. If you’ve ever struggled with confusing straps or wondered whether your LATCH car seat is truly secure, you’re not alone. The LATCH system—mandatory in all vehicles manufactured after September 1, 2002—solves this problem by providing dedicated anchor points that eliminate seat belt installation errors. This guide delivers the exact steps to properly install any LATCH-compatible car seat in under 10 minutes, verified by child safety experts. You’ll learn how to locate anchors, avoid critical mistakes, and perform the essential 1-inch safety test that confirms your installation is crash-ready.
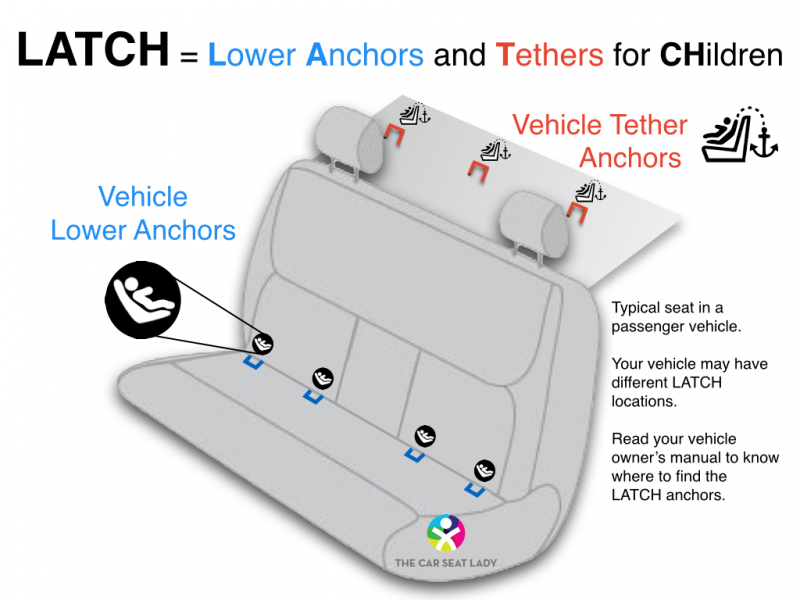
Stop Guessing: Locate Your Vehicle’s LATCH Anchors in Seconds
Finding your vehicle’s anchor points shouldn’t require detective work. Lower anchors always appear as two small horizontal bars where your rear seat back meets the cushion. Look for molded symbols or tags marked “LATCH” on the seat itself—never in the center seating position for most vehicles. These anchors only exist in specific locations, typically the two window seats.
Identify Top Tether Anchor by Vehicle Type
Your top tether anchor location varies dramatically based on your vehicle:
– Sedans: Check the rear deck behind headrests
– SUVs: Inspect floor panels, ceiling areas, or under seats
– Minivans: Look along floor tracks or integrated into seat backs
– Hatchbacks: Examine cargo area side panels
Never assume convertible vehicles have tether anchors—they’re exempt from this requirement. Always verify locations using your owner’s manual, as misidentifying anchors (like using cargo hooks) creates dangerous installation failures.
Avoid Anchor Location Mistakes
Approximately 40% of installation errors stem from attaching to improper anchor points. Critical red flags include:
– Trim pieces that move when pressed (real anchors are rigid metal)
– Non-standard symbols like luggage icons instead of child-seat markings
– Center seating positions in vehicles without center LATCH certification
If your vehicle manual doesn’t specify LATCH locations for your chosen seating position, move to another seat—never guess.
Match Your Car Seat to LATCH Anchors (Compatibility Guide)
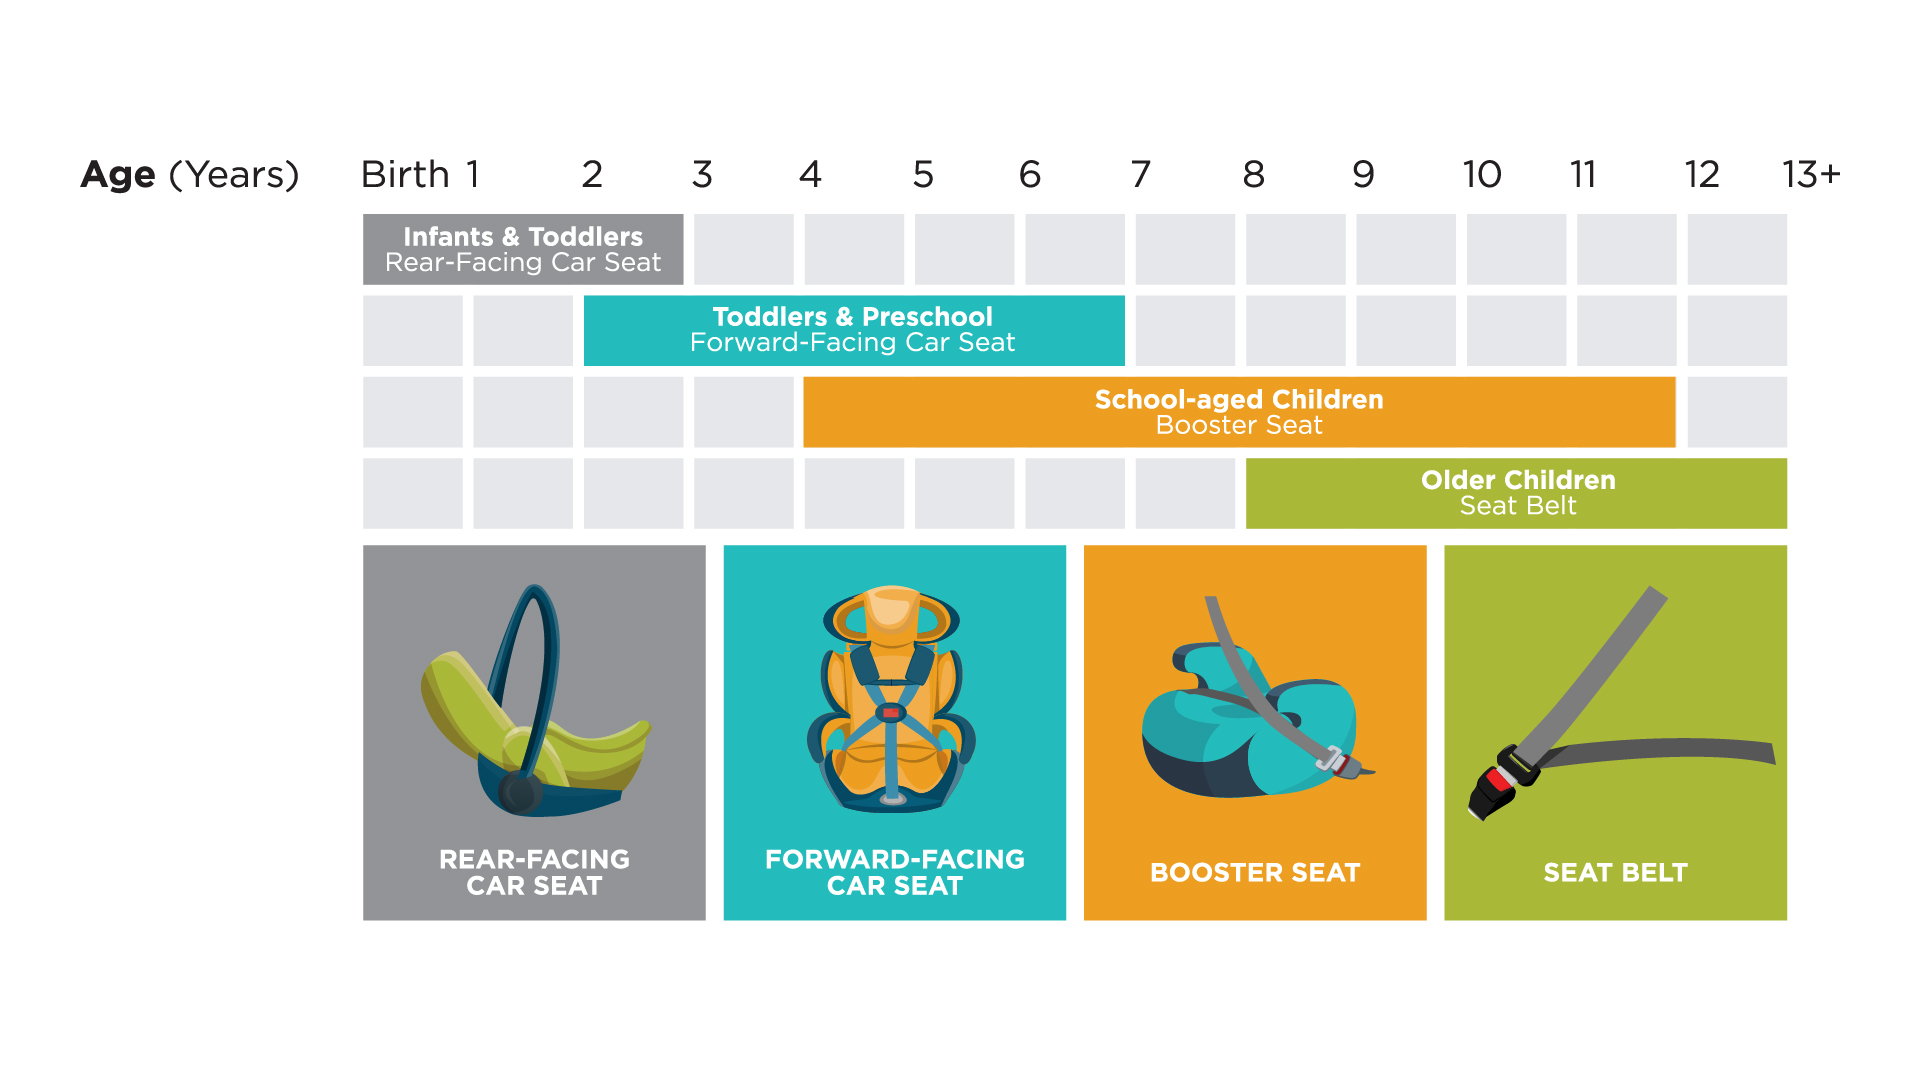
Not all car seats work with LATCH in every configuration. Your seat’s compatibility depends entirely on its type and orientation. This matrix eliminates confusion by showing exactly which components connect to anchors.
| Car Seat Type | Uses Lower Anchors? | Uses Top Tether? | Critical Notes |
|---|---|---|---|
| Rear-facing carrier (with base) | ❌ No | ❌ No | Base uses lower anchors; carrier never does |
| Rear-facing convertible | ✅ Yes | ✅ Rarely | Only use tether if manual explicitly allows rear-facing |
| Forward-facing harness | ✅ Yes | ✅ Always | Tether is mandatory for forward-facing seats |
| High-back booster | ✅ Some models | ✅ Some models | Check both manuals for booster-mode compatibility |
| Backless booster | ❌ No | ❌ No | Never uses LATCH system |
Verify Before You Install
Always cross-reference two sources before installation:
1. Your vehicle owner’s manual (LATCH section)
2. Your car seat instruction manual (installation chapter)
If either manual states “do not use LATCH” for your specific setup, switch to seat belt installation immediately. Never force connections that aren’t explicitly approved.
Prep Your Vehicle in 30 Seconds
Skipping preparation causes 30% of installation failures. Complete these critical steps before touching your car seat:
- Park on level ground—sloped surfaces alter seat angles and tension
- Move front seats forward 6+ inches to create knee space for tightening
- Lock unused seat belts by pulling them fully out to prevent interference
- Adjust vehicle seat to most upright position that still fits your car seat base
Pro tip: Place a rolled towel between the vehicle seat back and cushion if your car seat requires specific recline angles for rear-facing installation.
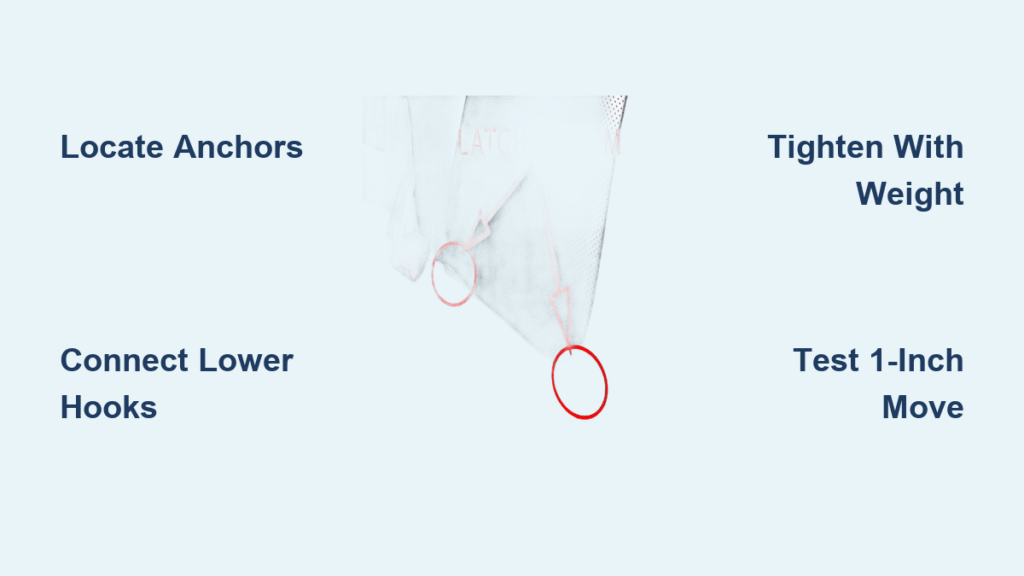
Secure Rear-Facing Car Seat Using Lower Anchors
Rear-facing seats only use lower anchors—never top tethers unless your manual specifically permits it. This two-step process ensures maximum security.
Connect Lower Anchors Correctly
Locate the two metal bars under rear seat cushions. Attach each hook from your car seat base to its corresponding anchor bar until you hear/feel a distinct click. If hooks don’t engage smoothly:
– Don’t force them—you’re likely misaligned
– Reposition the car seat base slightly forward/backward
– Check for seat belt interference (tuck belts completely out of the way)
Achieve Crash-Ready Tightness
Place your knee firmly in the car seat base and press down with full body weight. While maintaining pressure, pull the adjustment strap until:
– The base cannot move more than 1 inch side-to-side
– You feel significant resistance in the strap
– The base sits flush against the vehicle seat
Warning: If you can fit more than two fingers between the seat and vehicle seat at the belt path, it’s dangerously loose.
Connect Top Tether for Forward-Facing Car Seats
Forward-facing installations require both lower anchors AND top tether for maximum protection. The tether reduces head movement by up to 6 inches in frontal crashes.
Attach Top Tether Without Errors
Locate your vehicle’s tether anchor using the owner’s manual—never guess. Connect the tether strap hook to this anchor point, ensuring:
– The strap runs over the car seat (not around it)
– No twists exist in the tether webbing
– The strap forms a straight line from seat top to anchor
Critical step: Pull the tether strap tight while keeping the car seat flush against the vehicle seat back. Any slack here compromises safety.
Remove All Tether Slack
After initial connection, grasp the tether strap near the car seat and pull downward with firm pressure. Most seats require 40-50 pounds of force to eliminate slack. Recheck tightness by:
– Pushing the car seat forward at the top
– Verifying no visible gap appears between seat and vehicle back
Avoid 3 Critical LATCH Installation Mistakes
These common errors create false confidence in installations:
Anchor Misidentification Dangers
- Using cargo hooks (common in SUVs) instead of true LATCH anchors
- Connecting to seat frame rails that aren’t certified for child restraints
- Doubling up—attaching two car seats to the same anchor
Visual test: True LATCH anchors are rigid metal bars that don’t move when pressed. If the “anchor” compresses or bends, it’s not legitimate.
Tether Attachment Failures
- Running tether around headrests instead of over the seat
- Connecting to luggage anchors in cargo areas
- Skipping tether use on forward-facing seats (required by all manufacturers)
Weight Limit Violations
Exceeding LATCH weight limits (child + car seat) is a silent danger. Most systems max out at 65 lbs total. When approaching this limit:
– Switch to seat belt installation
– Consult both manuals for exact thresholds
– Never assume “more anchors = safer”—exceeding limits is dangerous
Install Car Seats in Non-LATCH Vehicles and Special Situations
Vehicles manufactured before 2002 require different approaches, but safety remains achievable.
Pre-2002 Vehicle Installation
If your car lacks LATCH anchors:
1. Install using the vehicle’s seat belt following car seat manual instructions
2. Never use LATCH straps without proper anchors—they won’t secure properly
3. Ensure seat belt locks automatically during installation
Critical check: Verify the seat belt remains locked throughout the ride by tugging it after installation.
Booster Seat Exceptions
Most boosters don’t require LATCH, but exceptions exist:
– High-back boosters may use lower anchors to prevent becoming projectiles when empty
– Some models allow tether use in booster mode (check both manuals)
– Backless boosters never use LATCH systems
Verify Installation with the 1-Inch Rule Test
This single test confirms installation safety. Grasp the car seat at the belt path (where LATCH straps enter the seat) and attempt to move it:
– Side-to-side: Maximum 1 inch movement
– Front-to-back: Maximum 1 inch movement
Test correctly: Use firm pressure but don’t jerk the seat. If movement exceeds 1 inch:
– Re-tighten lower anchors first
– Re-check tether tension for forward-facing seats
– Re-verify anchor connections
Warning: Testing at the top of the car seat gives false readings—always test at the belt path.
Monthly Maintenance Checks for LATCH Car Seat Security
Installations loosen over time. Perform these checks monthly:
- Tightness verification: Repeat the 1-inch test at belt path
- Anchor inspection: Ensure metal bars haven’t shifted position
- Strap condition: Check for fraying or damage on LATCH straps
- Tether tension: Re-pull tether strap on forward-facing seats
Critical trigger: Always re-verify installation after any vehicle service involving seats or upholstery work. Technicians often dislodge anchors during maintenance.
Quick Reference: LATCH Installation Checklist
Follow this sequence for foolproof installation:
- Read both manuals completely before starting
- Confirm compatibility using the car seat/vehicle matrix
- Locate anchors using vehicle manual—not guesswork
- Connect lower anchors first with audible click confirmation
- Tighten with full body weight until <1 inch movement
- Attach top tether (forward-facing only) with zero slack
- Perform 1-inch test at belt path—not seat top
- Schedule professional inspection via SafeKids.org
Final safety tip: Combined weight limits (child + car seat) often max out at 65 lbs for LATCH systems. When approaching this threshold, switch to seat belt installation—check both manuals for exact limits. A properly installed car seat reduces fatal injury risk by 71% for infants. Take 10 minutes now to ensure your child’s safety on every journey—because when seconds count, your installation could save a life. Locate free inspection stations through SafeKids.org or contact your local fire department for certified technician checks.


