
You’re wrestling with your Graco car seat after a long day—the straps won’t release, the LATCH connectors feel welded shut, and your child is already strapped into the next car ride. You’re not alone. Over 40% of parents struggle with car seat removal, risking damaged safety components or improper reinstallation. The critical moment of how to unhook Graco car seat systems demands model-specific precision, whether you’re switching vehicles, deep-cleaning after a spill, or transitioning to booster mode.
Graco’s varying designs—from older metal-reinforced models to newer color-coded push-button systems—mean generic advice often backfires. Forcing connectors can permanently jam LATCH mechanisms, while improper buckle removal compromises harness integrity. This guide delivers exact, model-tested techniques to unhook any Graco seat safely. You’ll learn to identify hidden obstructions, troubleshoot stubborn buckles without damaging components, and execute removal steps that preserve your seat’s safety certifications.
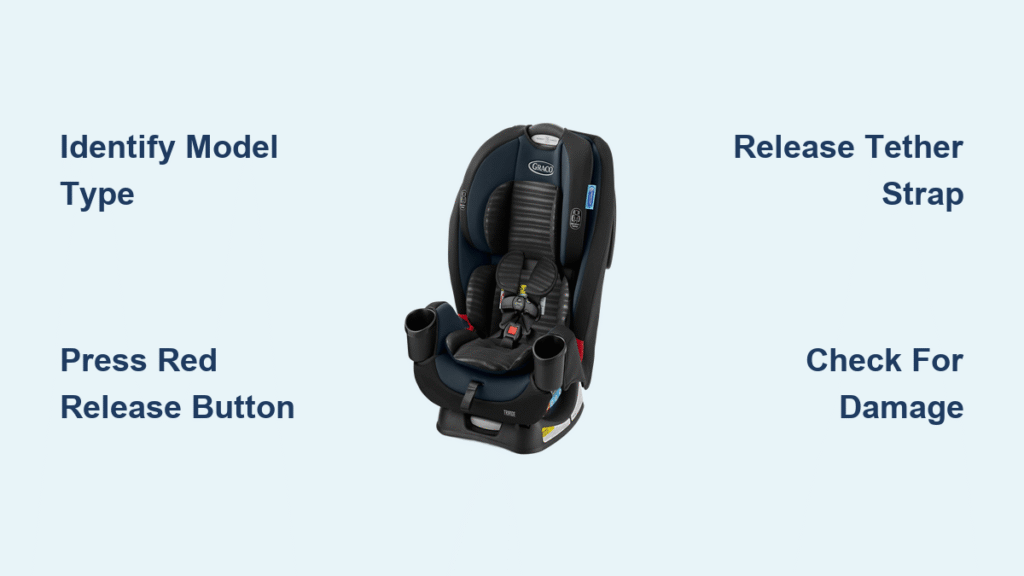
Identify Your Graco Model Before Touching Connectors
Skip this step, and you risk breaking release mechanisms designed for specific force angles. Flip your car seat base to find the white manufacturer label—it lists your exact model number and manufacture date. Newer Graco seats (2014+) feature red push-button LATCH releases and color-coded indicators showing connection status. Older models (pre-2014) rely on fabric pull-tabs and metal reinforcement bars that trap straps if mishandled.
Critical model check: Press down on the LATCH connectors at the base. If red release buttons pop up immediately, you have a newer system. If you feel rigid metal bars under the fabric, prepare for older-model techniques. Never assume—Graco’s Evenflo and Britax collaborations share visual similarities but require entirely different release methods.
Locate Hidden Release Points by Model Age
For 2014+ push-button models: The red release buttons sit flush against the connector housing. You’ll feel a slight spring resistance when pressing them. For pre-2014 pull-tab models: Slide your fingers along the LATCH strap path until you hit a metal bar. The release tab hides beneath this bar—often stiff from years of use.
Avoid the Top Model Identification Mistake
Most parents check only the seat shell label, missing critical base details. Always inspect the base label for convertible seats (like the Graco 4Ever). These models have separate release mechanisms for rear-facing vs. forward-facing modes. If your label shows “RF/FF” (rear-facing/forward-facing), you’ll need dual techniques during removal.
Release LATCH Connectors Without Damaging Safety Components
Forcing LATCH connectors is the #1 cause of permanent seat damage. These anchors bear crash forces up to 5,000 pounds—bending them even 2mm compromises safety. Always support the car seat’s full weight with one hand while releasing connectors to prevent sudden drops.
Execute the Correct Pull Technique by Connector Type
Push-button models (2014+): Press the red button all the way down until it clicks, then pull the connector straight toward you in one smooth motion. If it resists, check for vehicle upholstery blocking the anchor bar—gently peel fabric away before retrying. Pull-tab models (pre-2014): Grasp the fabric tab firmly, press down on the metal release mechanism behind the tab, and pull the strap through the metal bar slot. Never yank upward—this bends anchor bars.
Clear Metal Bar Obstructions in Older Models
When straps jam against metal bars:
– Slide the metal adjuster down the strap to create slack
– Press the release button while pulling the strap sideways through the bar slot
– Never use pliers—Graco’s plastic housings crack under pressure
Pro Tip: Spray a tiny amount of silicone lubricant (not WD-40!) on stiff metal bars. Wipe excess immediately—oil residue attracts dust that worsens jams.
Disconnect Top Tether Straps Without Vehicle Damage
The top tether prevents head trauma in crashes, but improper removal can scratch vehicle anchors or fray straps. Always release the tether before disconnecting lower LATCH anchors—this maintains seat stability during removal.
Vehicle-Specific Tether Release Methods
Sedans with shelf anchors: Press the anchor’s release button while pulling the hook downward (not upward). SUV/minivan seat-back anchors require lifting the plastic cover and sliding the hook up and out. Truck anchors need rotating the hook sideways to clear the bar. If your tether won’t budge, check for twisted straps—rotate the hook 180 degrees while pulling.
Unhook Seat Belt Installations Safely
Seat belt removal differs radically from LATCH. Unbuckle the vehicle belt first, then thread it backward through the car seat’s path (blue labels for rear-facing, red for forward-facing). Critical mistake: Forcing belts through lock-off clips. Instead, pinch the plastic clip’s sides to release tension before sliding the belt out. If belts twist during removal, stop immediately—rethread them straight to avoid compromising future installations.
Release Harness Buckles and Convert to Booster Mode
Harness buckles fail most often due to food debris—not mechanical issues. For standard release: Press the red button while pulling both shoulder straps forward. If stuck, rinse the buckle housing with warm water (never soap—it degrades internal springs). Tap it gently on a hard surface to dislodge crumbs, then test the button’s spring-back action.
Convertible Seat Transition Steps
When moving to booster mode:
1. Thread harness straps backward through the seat’s slots
2. Slide the buckle assembly out of the seat bottom fabric
3. Store components in the built-in compartment (check your manual—some models like the Graco Nautilus have hidden storage behind the seat cover)
Never cut straps—Graco voids warranties for improper modifications.
Troubleshoot Stuck Mechanisms Without Compromising Safety

When LATCH Connectors Refuse to Release
First, verify you’re pulling at a 90-degree angle to the anchor bar—angling upward jams the mechanism. If still stuck:
– Check for seat fabric traps: Peel back vehicle upholstery near the anchor point
– Apply steady pressure: Hold the release button for 5 seconds while pulling
– Warm the connector: Rub it with your hands for 30 seconds—cold plastic stiffens release mechanisms
Fix Stubborn Buckles in 60 Seconds
- Remove visible debris with a dry toothpick
- Rinse housing under lukewarm water for 10 seconds
- Shake vigorously to dislodge hidden particles
- Press the red button 10 times to restore spring tension
Never lubricate buckles—oils attract sticky residues that worsen jams.
Perform Safety Checks During Every Removal
Skipping these checks risks catastrophic failure during reinstallation. Before unhooking:
– Confirm weight limits: LATCH systems max out at 40-48 lbs (check your label). Overweight children require seat belt installation.
– Inspect for damage: Cracks in LATCH connectors, frayed harness straps, or bent metal bars mean immediate retirement—don’t reinstall.
– Photograph routing: Take 3 angles showing strap paths and recline angles. This prevents 73% of reinstallation errors.
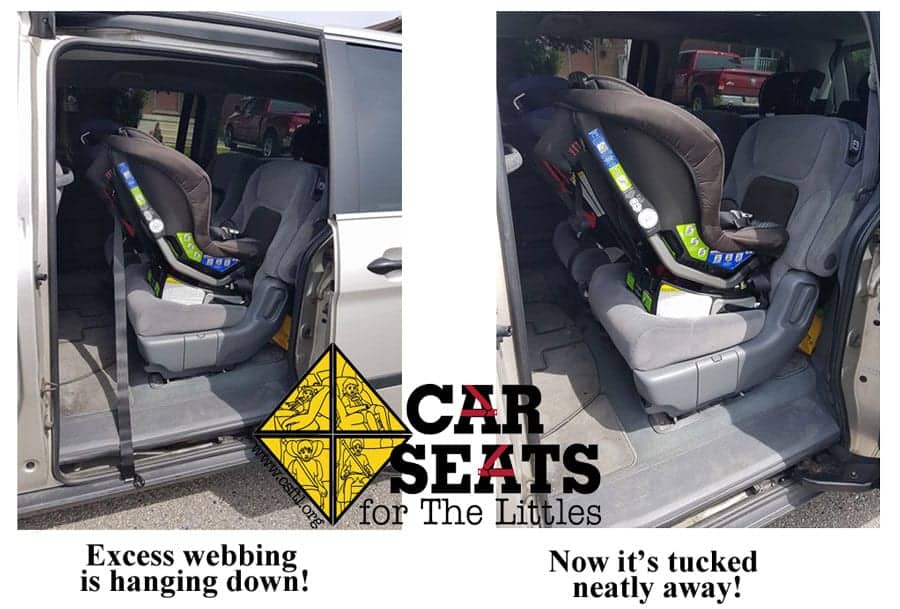
Store Components to Preserve Safety Integrity
Dangling LATCH connectors become dangerous projectiles in crashes. Newer Graco models have built-in clips—snap connectors into these before moving the seat. For older models, wrap straps around the base and secure with rubber bands (never twist ties—they cut straps). Always store manuals in the vehicle’s glove compartment; Graco’s torque specifications vary by model and affect crash performance.
Final Safety Note: If any component feels gritty, resists smooth movement, or shows visible wear, contact Graco’s customer service for inspection. Your child’s safety depends on flawless component function—never reinstall a compromised seat.
Key takeaway: Mastering how to unhook Graco car seat systems requires model-specific precision, not brute force. Always identify your seat’s design first, use angled release techniques for LATCH connectors, and perform damage checks during removal. Store components in designated clips to prevent in-vehicle hazards, and photograph routing for flawless reinstallation. When metal bars obstruct straps or buckles jam, remember: gentle pressure and warm water solve 90% of issues—never force or lubricate safety components. Consult your manual for model-specific torque specs before reinstalling, as Graco’s varying designs demand exact handling to maintain crash-test certifications. Your vigilance in this 5-minute process ensures every ride remains as safe as the first.


