
That mysterious coffee stain from Tuesday’s commute. The mud tracks from last weekend’s hike. The lingering smell after your dog’s muddy adventure. Dirty fabric car seats transform your daily drive into an unpleasant chore. When spills soak into porous upholstery, they don’t just look bad—they create breeding grounds for odors and bacteria. The good news? You can achieve professional-level results without expensive detailing services. This guide reveals the exact techniques auto detailers use, adapted for your garage. You’ll learn to identify your specific fabric type, choose the right cleaning method for stubborn stains, and avoid costly mistakes like water rings or color damage. Most importantly, you’ll gain confidence to tackle any mess while protecting your car’s interior investment.
Identify Your Fabric Type Before Cleaning
Using the wrong cleaner on delicate upholstery can cause permanent damage like fading or shrinkage. Always verify your seat material before applying any liquid. Check your owner’s manual first—it provides the most reliable fabric specifications. If unavailable, locate the sewn-in label on the seat edge or underside, or enter your VIN on the manufacturer’s website. Most vehicles use nylon (durable but highly absorbent) or polyester/microfiber (softer texture that traps particles). Premium models might feature micro-suede requiring gentler handling. Rare silk blends demand pH-neutral cleaners only—never assume. Skipping this step risks ruining your seats with incompatible chemicals.
Critical Fabric Safety Test
- Choose inconspicuous spot (under headrest or seat crease)
- Apply dime-sized cleaner with cotton swab
- Wait 10 minutes checking for color bleeding or texture change
- Proceed only if no damage occurs
Essential Tools for Flawless Cleaning

Gathering everything beforehand prevents moisture from sitting too long on fabric—a leading cause of water rings and mildew. Start with core tools: a wet/dry vacuum with crevice and upholstery attachments, soft-bristle detailing brushes (black for light soil, yellow for heavy grime), and high-quality microfiber towels (minimum 300 gsm). Add an adjustable-nozzle spray bottle and LED flashlight to reveal hidden stains in seams.
Choose Your Cleaning System Wisely
| Method | Best For | Cost |
|---|---|---|
| Dish soap + warm water | Fresh spills, light soil | $3 |
| Baking soda paste | Oil/grease stains | $2 |
| Citrus foam cleaner | Pet accidents, heavy grime | $20 |
| Enzyme cleaner | Organic stains, odors | $15 |
Pro Tip: Always begin with the gentlest method—you can escalate if needed. Never skip the fabric safety test.
Dry Extraction: Eliminate Grit Before Moisture
This 15-minute vacuum step prevents abrasive particles from scratching fabric fibers during cleaning. Start with the crevice tool along seat seams, buckle anchors, and pocket edges where debris hides. Switch to the upholstery brush attachment and vacuum in straight front-to-back passes, then side-to-side to lift the fabric pile. Shine your LED flashlight across the surface to spot missed particles—repeat until no visible grit remains. For pet hair, wear a rubber glove to lift stubborn strands before vacuuming. Skipping dry extraction grinds dirt deeper into fibers when you add moisture.
Pre-Treat Stains with Precision
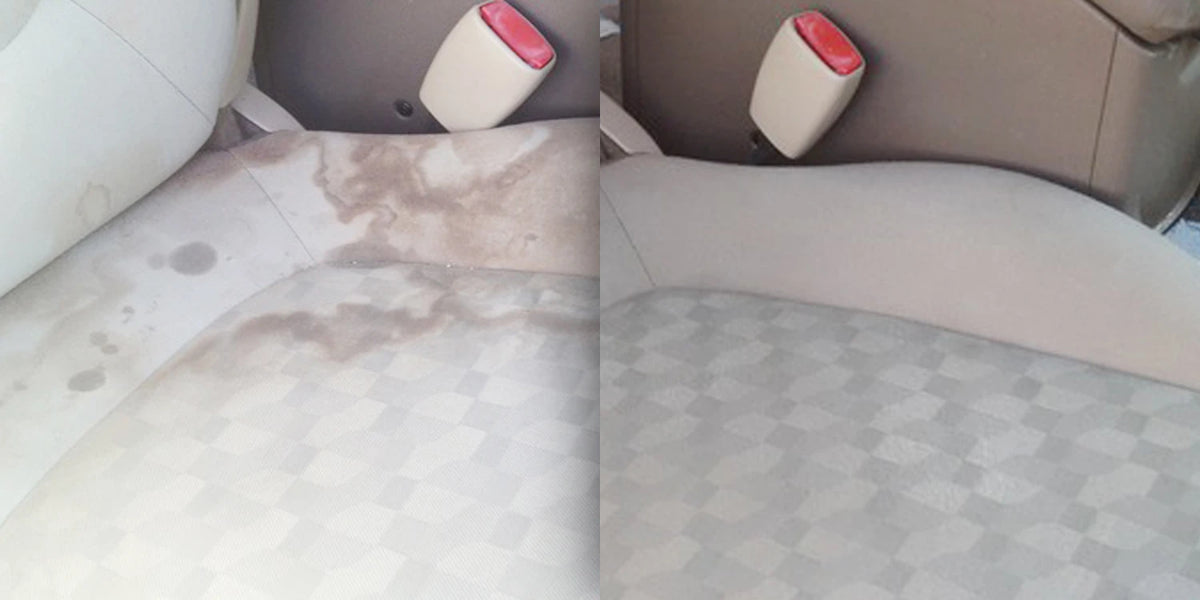
Fresh Spills (Coffee, Juice, Ketchup)
- Blot immediately with dry microfiber—never rub
- Apply enzyme cleaner directly to the spot
- Gently agitate with soft brush for 30 seconds
- Wait 5 minutes max, then blot with clean towel
Set-In or Unknown Stains
- Mix oxygen bleach paste to toothpaste consistency
- Apply thin layer covering stain completely
- Seal with plastic wrap to prevent drying
- Wait 60 minutes, then vacuum residue
Oil and Grease Spills
- Cover stain with dry baking soda
- Let absorb 15 minutes (reapply if saturated)
- Vacuum thoroughly before using citrus cleaner
Deep Cleaning Method Selection
Choose based on your fabric type and soil level.
Manual Hand Scrub (Most Control)
Work in 2×2 foot sections using cross-hatch motions (up-down, then left-right). Apply light pressure with a black detailing brush for delicate fabrics or yellow brush for heavy soil. Add cleaning solution sparingly—build gradually as needed. This method gives maximum control for treating problem areas.
Drill-Powered Cleaning (Fastest Results)
Attach a gray light-duty brush to a cordless drill set to 800 rpm. Keep the brush flat against the seat surface to prevent pilling. Make 2-4 overlapping passes depending on soil level. Ideal for large SUV seats but requires practice to avoid over-wetting.
Moisture Management Secrets

This step makes or breaks your results. After cleaning each section:
1. Blot firmly with dry microfiber, lifting straight up
2. Check towel—it should show soil transfer
3. Open all doors and position fans toward seats
4. Run cabin heat on high for 30 minutes
Never close your car until seats are fully dry—mildew develops within 24 hours in damp environments. For complete drying, leave the garage door cracked overnight with weighted towels placed on seats to draw moisture from foam padding.
Fabric Protection Application
Apply protection only after seats are 100% dry. Choose a silicone-free fabric guard to avoid residue on adjacent surfaces. Hold the spray 8-10 inches from the seat and apply two light, even coats with 30 minutes between applications. Mask leather trim and plastic with painter’s tape first—overspray creates permanent white marks. Reapply every 3-6 months based on usage.
Odor Elimination Protocol
Baking soda remains the most effective odor neutralizer. After seats dry completely:
1. Sprinkle liberally across all seating surfaces
2. Dwell 15 minutes (24 hours for smoke/vomit)
3. Vacuum thoroughly with upholstery attachment
For ongoing protection, place an open box of baking soda under the seat and replace monthly.
Troubleshooting Water Rings and Musty Smells
Water Rings After Drying
Cause: Over-wetting or hard water minerals
Fix: Lightly mist area with distilled water, blot immediately, and extend fan drying time.
Musty Odor Returns
Cause: Moisture trapped in foam padding
Fix: Re-clean with enzyme cleaner, add silica desiccant packs during drying, and double drying time.
Color Fading
Cause: Cleaner too strong or excessive dwell time
Fix: Stop using product immediately—consult an upholstery specialist for color restoration.
Child Seat Cleaning Specifics
For removable covers, follow care label instructions precisely. Machine-wash in cold water and air-dry only—heat compromises fire-retardant properties. Never saturate harness straps; spot-clean with mild soap solution and air-dry away from direct sunlight. Between deep cleans, vacuum covers and sprinkle baking soda to control odors.
Maintenance Schedule by Usage
| Driving Scenario | Vacuum Frequency | Deep Clean | Prevention |
|---|---|---|---|
| Solo commuter | Weekly | Every 6 months | Use spill-proof travel mugs |
| Family with kids | Weekly | Every 1-2 months | Install washable seat covers |
| Pet owner | Weekly | Every 1-2 months | Use hammock barrier, lint-roll first |
| Ride-share driver | Bi-weekly | Monthly | Keep microfiber towels in console |
Quick Reference Checklist
Print this for your glovebox:
□ Identify fabric type (manual/label/VIN)
□ Vacuum entire seat (crevice tool first)
□ Pre-treat stains (test hidden area)
□ Work in 2×2 foot sections
□ Blot dry with microfiber towels
□ Air-dry 3+ hours with ventilation
□ Apply fabric protector (optional)
□ Schedule next clean based on usage
Cost and Time Comparison
DIY cleaning costs $5-$10 for basic supplies (dish soap, baking soda, microfiber towels) versus $150-$300 for professional detailing. The hands-on time is about 2.5 hours for two front seats, with 5-6 hours total including drying. You’ll recoup your supply costs after one use while gaining the satisfaction of restoring your car’s interior yourself. Clean seats aren’t just about appearance—they improve air quality, extend upholstery life, and make every journey more enjoyable. Follow this guide to maintain that new-car feeling for years to come.


