
Ever struggle to find the perfect driving position or wonder why your child’s car seat harness seems so complicated? Understanding how do car seat adjustments work isn’t just about comfort—it’s a critical safety component that most drivers overlook daily. When you reach for that seat lever or tighten your child’s harness, you’re interacting with precision-engineered systems designed to protect you in a collision. This guide reveals exactly how both driver seat adjustments and child car seat harness mechanisms function, so you can optimize safety and comfort on every journey.
Driver Seat Position Adjustment Systems
Fore-Aft Slide Mechanism Explained
When you pull the lever under your seat, you’re releasing a locking mechanism that allows the entire seat assembly to glide along precision-engineered rails mounted directly to your vehicle’s floor. Manual systems use spring-loaded pins that engage with holes in the rail system—pull the lever, pins retract, seat slides freely. Release the lever, and those pins snap into position, locking your seat securely. Power systems replace this mechanical action with electric motors that drive the seat along the same rails, offering millimeter-perfect positioning.
The optimal position isn’t arbitrary—it’s biomechanically engineered for safety. When your knees maintain a slight bend while your foot presses the gas pedal fully, you’ve achieved the proper fore-aft position. That two-finger gap between your seat edge and the back of your knee prevents circulation issues during long drives while ensuring your legs can properly absorb impact forces in a collision. If you find yourself sitting too close to the steering wheel, remember the critical 10-inch rule: your chest should maintain this distance from the wheel to allow proper airbag deployment.
Height Adjustment Engineering
Vertical positioning happens through one of two systems. Manual height adjustment uses either a scissor mechanism (similar to a car jack) or threaded posts that raise and lower your seat through pump handles or levers. Each pump typically raises the seat 1-2 centimeters, giving you precise control over your eye level relative to the dashboard. Power height systems employ electric motors that work on the same mechanical principles but offer infinite adjustment positions and memory settings.
The engineering goal is simple but vital: getting your hips level with your knees. This position promotes proper blood circulation while ensuring you can see over the dashboard without craning your neck. More importantly, it positions your pelvis correctly to ensure the seat belt contacts your pelvic bones rather than your stomach—reducing internal injury risk by 45% in frontal crashes. If you drive a vehicle with adjustable pedals instead of seat height adjustment, you’re experiencing an alternative solution designed primarily for shorter drivers who might otherwise sit too close to the steering wheel.
Backrest Recline Mechanics
The angle between your seat bottom and backrest adjusts through a ratchet mechanism in manual systems or electric motors in power seats. Manual recline uses a side-mounted lever that releases the ratchet, allowing you to lean back against the backrest to achieve your desired angle. The ratchet clicks into position every few degrees, giving you discrete adjustment options. Power recline eliminates these clicks, offering smooth, infinite adjustment through typically 50-70 degrees of range.
The optimal angle—approximately 100 degrees—reduces lower back pressure while maintaining your ability to reach the steering wheel without stretching. This position ensures full back contact with the backrest, which is critical for proper force distribution during a collision. Never recline beyond the point where you can comfortably maintain the “9 and 3” hand position on the steering wheel, as excessive recline significantly increases injury risk in frontal impacts.
Headrest Positioning System
Your headrest adjusts vertically through spring-loaded posts that click into predetermined positions. The mechanism is deceptively simple: press a button on one post, and both posts release simultaneously, allowing smooth vertical movement. Power headrests in premium vehicles add electric motors and memory positioning, letting you program specific heights for different drivers.
The critical positioning rule isn’t about comfort—it’s about preventing whiplash injuries. The center of the headrest should align with the center of your head, with the top edge level with the top of your head. A properly positioned headrest reduces neck injury risk by 28% in rear-end collisions. Many drivers make the mistake of lowering their headrests for better rear visibility, but this compromises safety significantly. Always verify headrest position with seasonal clothing changes, as bulky winter coats can affect proper alignment.
Child Car Seat Harness Engineering
Harness Tension Mechanism
The harness adjustment system operates on a principle similar to a parachute harness but with far more precision. The adjustment strap at the front of the car seat connects to a continuous loop system that runs through the seat shell. When you pull the strap, you’re tightening this loop around your child, distributing force evenly across their shoulders and hips.
The pinch test isn’t just parental paranoia—it’s a biomechanical safety check. Properly tightened harness webbing should prevent you from pinching any slack at your child’s shoulders because loose harnesses increase ejection risk by 400% in crashes. Follow this sequence for proper tension:
1. Push down on the crotch buckle
2. Pull up on torso straps to remove hip slack
3. Slide chest clip down
4. Pull harness adjuster strap to tighten
5. Position chest clip at armpit level
6. Perform pinch test at shoulders
Height Adjustment Systems
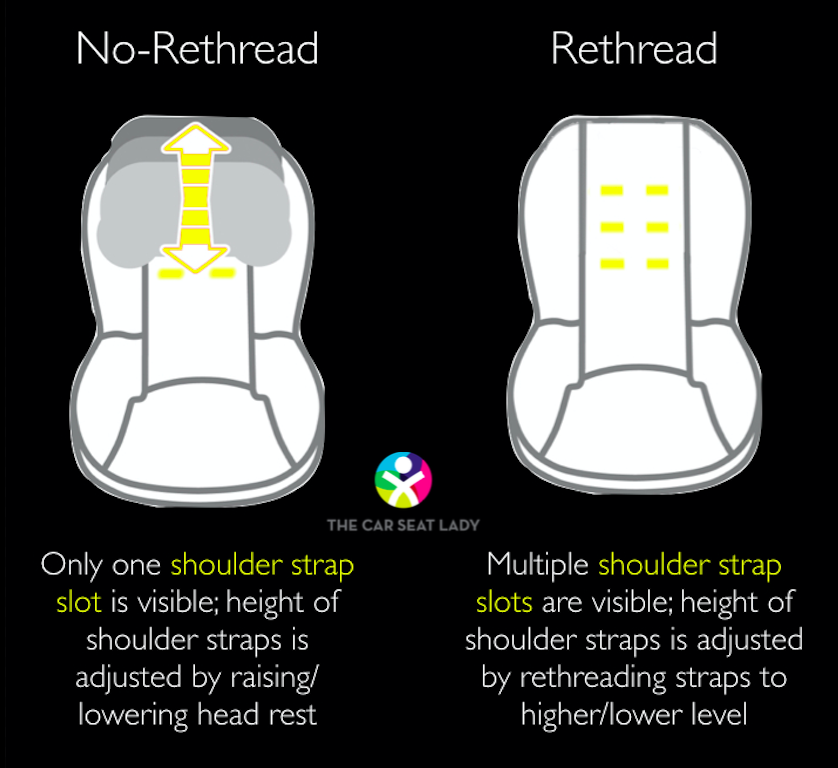
Externally adjustable harnesses use a handle or lever at the top of the seat that moves the entire harness system up or down without requiring seat removal. This system employs a sliding mechanism that repositions the shoulder strap slots while maintaining proper geometry with the crotch buckle. The advantage is obvious: you can adjust as your child grows without reinstalling the entire seat.
Re-thread systems require complete removal because the harness straps physically thread through different slots in the seat shell. This design offers more precise positioning since the straps can be placed exactly at the correct height relative to your child’s shoulders:
– Rear-facing: At or slightly below shoulders
– Forward-facing: At or slightly above shoulders
While more labor-intensive, re-thread systems provide superior positioning accuracy. The trade-off is convenience versus precision, so choose based on your family’s needs and how frequently your child grows.
Chest Clip Engineering Purpose
The chest clip serves a critical but often misunderstood role. It’s not a primary restraint device—rather, it positions the shoulder straps correctly across your child’s chest. The clip’s position at armpit level ensures the straps contact the strong skeletal areas (shoulders and hips) while preventing them from slipping off the shoulders during impact.
Too high, and the clip can cause throat injury. Too low, and it allows dangerous strap slippage that could lead to partial ejection. The engineering solution is a simple plastic clip with just enough grip to maintain position under normal forces but designed to break away under extreme crash loads to prevent abdominal injuries.
Common Adjustment Problems Decoded
When Manual Adjustments Fail
Manual seat mechanisms can fail when debris accumulates in the rails or when the locking pins become worn. The solution often involves cleaning the rails with compressed air and applying lithium grease to restore smooth operation. If the lever feels loose or doesn’t engage properly, the cable connecting the lever to the locking mechanism may need adjustment—similar to tuning a bicycle brake.
For child car seats, twisted straps create a dangerous false sense of tightness because the twist concentrates force on a smaller area. The triangle fold method solves this: fold the strap into a triangle, feed it through the buckle slot, then pull to unfold. This technique works because it reduces the strap’s effective width temporarily, allowing it to pass through restricted spaces.
Power System Malfunctions
Power seat failures typically stem from three sources: electrical, mechanical, or switch-related. Electrical failures often manifest as complete system shutdown, usually caused by a blown fuse or faulty relay. Mechanical failures occur when the motor or gears strip, creating grinding noises or partial movement. Switch failures result in intermittent operation or one-directional movement only.
The diagnostic process mirrors troubleshooting a power window: check the fuse first, then test the switch, and finally inspect the motor. Most vehicles include a manual override for power systems—typically a small access panel on the seat side that allows manual adjustment during emergencies. Always verify your vehicle’s specific override procedure in the owner’s manual.
Maintenance and Safety Standards
Adjustment Frequency Guidelines
Your driver’s seat should be adjusted for every driver change—no exceptions. Child harnesses need checking before every ride and height adjustment every 3-6 months as children grow. These aren’t arbitrary timelines; they’re based on crash test data showing rapid changes in effectiveness as children outgrow proper positioning.
NHTSA studies reveal that 46% of car seats have at least one significant installation error. Regular maintenance prevents most issues—monthly inspection for twists, wear, or damage keeps the system functioning correctly. The webbing itself should lie flat against your child’s body without any kinks or folds that could create pressure points during impact.
Critical Measurement Points
The 10-inch rule for steering wheel distance isn’t about comfort—it’s about airbag safety. When your chest maintains this distance from the wheel, the airbag deploys into the space between you and the wheel rather than into your body. Similarly, seat belt positioning across your pelvic bones (not your stomach) reduces internal injury risk by 45% in frontal crashes.
Understanding how do car seat adjustments work transforms daily actions into safety-conscious decisions. Every lever pull, button press, or harness adjustment isn’t just about comfort—it’s about engineering precision designed to protect you and your passengers. The next time you adjust your seat or your child’s harness, you’re participating in a sophisticated safety system refined through decades of crash testing and biomechanical research. Proper adjustment could mean the difference between minor injuries and life-altering trauma in the event of a collision.


