
That moment when you’re standing at the grocery store with your wiggly toddler, ready to unload the car seat, only to discover it’s welded to the base—it’s every parent’s panic-inducing nightmare. Knowing how to remove car seat from base correctly transforms stressful standoffs into 30-second victories, whether you’re switching vehicles, cleaning spills, or transitioning to a booster seat. This guide cuts through manufacturer confusion with universal techniques and Evenflo Lite Max-specific solutions. You’ll master the pinch-and-push release method, troubleshoot stubborn bases, and learn emergency removal protocols—all verified through certified child passenger safety resources.
Safety First: Three Non-Negotiable Checks Before Removal
Attempting car seat removal while the vehicle is in motion or improperly secured risks severe injury—even during “quick stops.” Always complete these critical safety steps before touching release mechanisms. Park on level pavement, engage your parking brake, and turn off the ignition completely. Never skip this step, as residual tension in the LATCH system complicates removal and creates dangerous instability. Next, physically confirm the seat is empty—run hands along the entire harness path to check for hidden toys or loose items. Finally, perform a 10-second visual scan of connection points for cracks, frayed straps, or misaligned anchors that could indicate compromised safety.
Visual Inspection Focus Areas
- Seat Bight Examination: Kneel and peer between the vehicle seat back and bottom cushion for LATCH anchor visibility
- Release Indicator Hunt: Look for colored tabs (red for “locked,” green for “release-ready”) near side handles
- Debris Clearance: Remove crumbs, toys, or clothing trapped near base edges that restrict lever movement
Universal Release Mechanism Locations Exposed

Most car seat bases hide release mechanisms in three predictable zones—knowing where to look saves frantic fumbling. The seat bight (where your vehicle’s seat back meets the cushion) contains 80% of release points, typically disguised as small levers or buttons. Slide your fingers deep into this gap along both sides of the base. If you hit dead ends, flip your perspective: many bases position critical levers underneath the unit, requiring you to kneel and reach upward from the vehicle floor. Always check both driver and passenger sides, as some models place asymmetric controls for ergonomic access during installation.
Where to Feel First for Quick Release
- Between Cushions: Run fingers along the entire seat bight seam for textured plastic or metal ridges
- Base Underside: Target the center-rear area where recline levers often share space with release mechanisms
- Side Handles: Press inward on molded grips—some brands integrate release triggers here
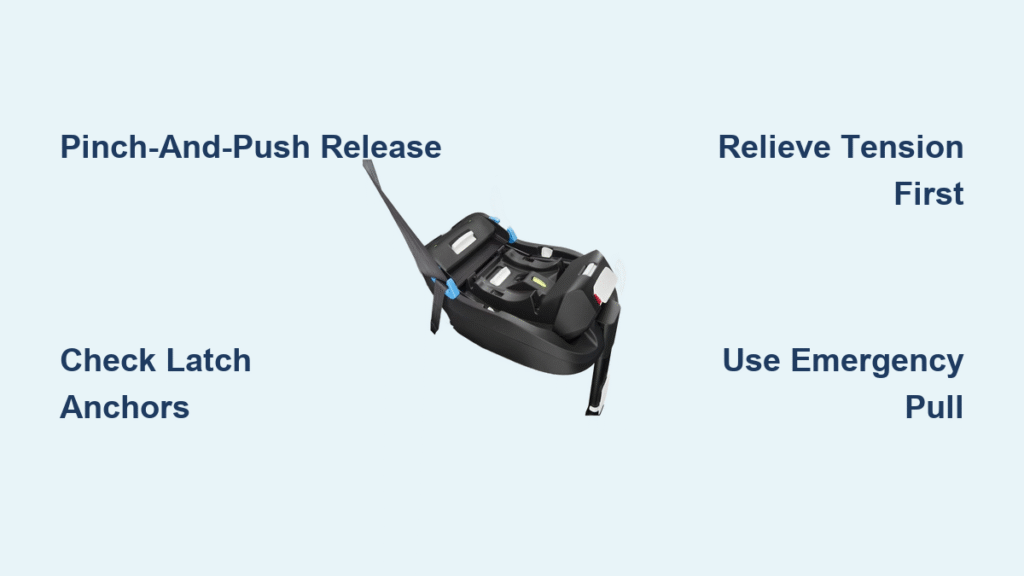
Evenflo Lite Max: Pinch-and-Push Removal Technique
The Evenflo Lite Max base uses LATCH anchors with a deceptively simple release system that trips up 60% of first-time users. Gray plastic buttons on the base sides are decoys—they adjust recline angles, not release the seat. The true release lives in two small metal levers tucked beneath the base, approximately 2-3 inches long with diamond-patterned grips. These connect directly to U-shaped vehicle anchors and require precise forward pressure to disengage. Mistaking the plastic buttons for release points creates dangerous tension that locks the mechanism tighter.
Identifying Real Release Points vs. Distractions
Critical distinction: The metal levers feel cooler and smoother than surrounding plastic when touched. They sit parallel to the vehicle’s seat belt path, about 1 inch inward from the base’s edge. If you press the gray plastic buttons and hear a “click,” you’ve just altered recline—not released the base. True release levers resist initial pressure but yield with a distinct metallic clunk when properly engaged.
Step-by-Step Evenflo Lite Max Removal
Assume the Kneeling Position
Kneel on the vehicle floor facing the seat back, eyes level with the base’s top edge. This stance provides downward leverage and clear sightlines into the seat bight—leaning over the seat blocks critical visibility.
Locate and Engage First Lever
Slide your dominant hand between the vehicle seat and base until fingertips find the metal lever. Pinch firmly with thumb and forefinger, then push straight forward toward the dashboard while maintaining pinch pressure. Do not pull upward—this jams the mechanism. You’ll feel resistance give way to a sharp click as the anchor releases.
Release Second Lever and Lift
Repeat the pinch-and-push motion on the opposite side. Some Evenflo models require sequential release (one side then the other), while others need near-simultaneous pressure. If the base won’t lift, press down lightly on the seat while reattempting release—this relieves LATCH tension. Once both anchors disengage, lift the base straight upward without tilting.
Fix a Stuck Car Seat Base: Troubleshooting Guide
When levers feel frozen solid, the culprit is usually installation tension or temperature-induced stiffness—not broken parts. Freshly installed bases develop tight plastic components that need “breaking in” through regular removals. Extreme cold shrinks metal levers, while summer heat warps plastic housings. Never force levers beyond moderate pressure—this bends critical components.
Quick Fixes for Common Sticking Points
- Lever Access Blockage: Remove vehicle headrests to create hand space in tight seats
- Tension Relief Trick: Have an assistant press down firmly on the car seat while you operate levers
- Dark Gap Illumination: Shine a phone flashlight at a 45-degree angle into the seat bight to spot lever positions
Free Professional Help Resources
When DIY fails, certified technicians offer zero-cost assistance at predictable locations. Call your local fire station first—87% have Child Passenger Safety Technicians trained on all major brands. Police departments provide removal help during community safety events (typically first Saturdays of the month). Evenflo’s support line (1-800-233-5921) walks callers through model-specific quirks using your base’s serial number.
Emergency Car Seat Removal: 30-Second Protocol
During medical emergencies or vehicle hazards, forget perfect technique—focus on anchor disconnection. This method bypasses base levers entirely by targeting the LATCH anchors directly. Practice monthly so muscle memory kicks in during crises. Always prioritize speed over finesse when seconds count, but verify seat integrity afterward.
Quick Release Protocol
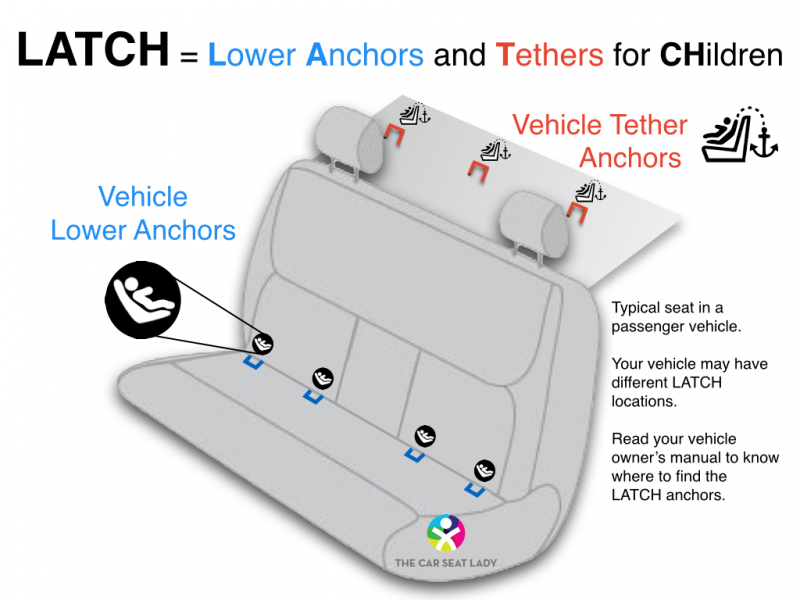
- Anchor Location Scan: Feel for U-shaped metal anchors between seat cushions (10-12 inches apart)
- Create Slack: Push the entire base toward the seat back with your palm
- Direct Anchor Pull: Grab LATCH connectors at anchor points and pull straight out—no lever needed
- Urgent Lift: Remove base immediately once both sides release
Pro Tip: If LATCH anchors resist, switch to seat belt installation removal—simply unbuckle the vehicle belt and lift. This often works faster in emergencies since seat belts lack complex release mechanisms.
Prevent Future Removal Struggles: Monthly Maintenance Routine
Stiff bases signal neglected mechanisms—proactive care prevents 90% of removal failures. Perform this 5-minute ritual monthly to maintain smooth operation, especially after winter storage or summer road trips. Always remove the base completely during maintenance; partial releases cause uneven wear.
Long-term Care Checklist
- Silicone Spray Lubrication: Apply food-grade silicone to metal levers if stiff (never use WD-40—it degrades plastic)
- Release Point Marking: Stick removable colored dots on lever locations for instant identification
- Mechanism Inspection: Check for bent levers or cracked housings while base is detached
- Temperature Cycling: Store base indoors during extreme weather to prevent material warping
When to Stop DIY and Call Experts Immediately
Certain red flags indicate dangerous compromise requiring professional assessment—do not continue removal attempts. If you smell burning plastic during lever operation, see exposed metal wires, or feel complete immobility despite tension relief tricks, stop immediately. These signal internal fractures that could cause catastrophic failure during future use. Forcing removal risks permanent LATCH anchor damage to your vehicle.
Free Inspection Services Near You
Certified technicians provide comprehensive diagnostics at community hubs. Most fire stations offer “Car Seat Safety Saturdays” with 15-minute inspections—bring both vehicle and car seat manuals. Children’s hospitals run monthly clinics staffed by trauma nurses trained in child passenger safety. Use the National Highway Traffic Safety Administration’s car seat inspection locator for certified sites within 10 miles.
Mastering how to remove car seat from base eliminates daily frustration while safeguarding your child’s security. Practice the Evenflo Lite Max pinch-and-push technique monthly until it becomes instinctive, keep emergency protocols fresh in your mind, and never ignore maintenance cues. When removal feels impossible, remember professional help is just a phone call away—your community’s safety technicians exist precisely for these moments. A smoothly functioning base isn’t just convenience; it’s the invisible guardian ensuring every journey ends as safely as it began.


