
You’re standing at the grocery store parking lot with bags in hand, your baby finally asleep in their Graco car seat, and suddenly you realize you need to remove the carrier from its base—but the mechanism feels stuck. This frustrating scenario happens to nearly every parent who owns a Graco infant car seat. Knowing exactly how to remove Graco car seat from base properly can mean the difference between a smooth transfer and a jarring wake-up for your little one. The process should take less than 10 seconds once you’ve mastered the right technique, but many caregivers waste precious moments wrestling with the mechanism while balancing groceries or trying not to wake a sleeping infant.
Most parents don’t realize that improper removal technique not only creates daily frustration but can also compromise safety over time. When you struggle unnecessarily with the release mechanism, you risk developing habits that could lead to incomplete installation during the next car ride—a dangerous situation many don’t consider. This guide delivers the precise, model-specific steps to remove your Graco car seat from base smoothly every time, whether you’re using a SnugRide, Click Connect, or Classic Connect system. By the end, you’ll gain the confidence to handle this essential task in seconds, even with your hands full or your baby asleep.
Perfect Your Parking Position Before Removal
Stop completely and stabilize your vehicle before attempting to remove your Graco car seat. Many parents try to remove the carrier while the car is still rolling to a stop or on a slight incline, creating dangerous instability. Always engage your parking brake firmly and confirm you’re on level ground—this prevents the base from shifting during removal and reduces strain on your back.
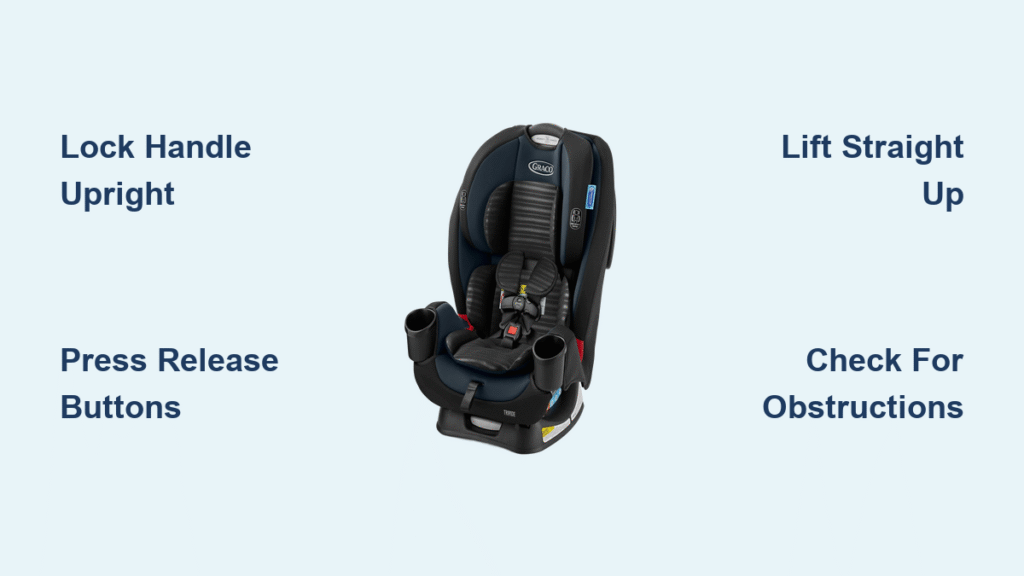
Lock the carrier handle in the upright position before touching the release mechanism. Locate the small buttons on both sides of the handle where it connects to the seat body. Press both simultaneously while pulling the handle upward until you hear a distinct click. This locked position provides critical stability during lifting and prevents the handle from collapsing unexpectedly when you transfer weight.
Why Handle Position Determines Removal Success
The handle must be fully locked before removal—this isn’t just a recommendation but a safety requirement built into Graco’s design. When the handle isn’t properly secured, the carrier becomes unstable during lift-off, forcing you to compensate with awkward hand positions that increase the risk of dropping your baby. Test the handle lock by gently tugging downward after positioning; if it moves, readjust until secure. A properly locked handle supports the full weight of your baby and carrier without wobbling or collapsing.
Locate and Operate the Base Release Correctly
Find the release handle at the rear connection point where the carrier meets the base. This critical component sits near your baby’s foot area—look for a prominent handle or large button designed for one-handed operation. Graco positions this mechanism deliberately within easy reach when you’re standing at the car door, but many parents waste time searching for it during their first few attempts.
Apply deliberate pressure while maintaining stability with your other hand. The release mechanism requires firm, consistent force—not a quick jab—to disengage properly. Use your dominant hand to operate the release while your non-dominant hand grips the carrier handle firmly. This balanced approach prevents awkward twisting motions that could strain your back or disturb your baby.
What to Do When the Release Feels Stuck
If the mechanism resists your pressure, first verify the carrier handle is fully locked in the upright position—this is the most common reason for release difficulties. A partially collapsed handle creates binding pressure that prevents smooth disengagement. Next, check for obstructions like spilled liquids, crumbs, or twisted straps caught in the connection area. Even a single Cheerio can jam the mechanism enough to make removal difficult. Finally, confirm your vehicle is parked on level ground, as even slight inclines change the angle of engagement and increase resistance.
Execute the Lift-Off Motion for Smooth Removal
Lift straight upward in one fluid motion after activating the release. Avoid tilting or twisting during lift-off, as this can cause partial disengagement that makes the carrier feel heavier than it is. The proper motion resembles lifting a suitcase straight off the floor—keep your back straight, bend at the knees, and use your leg muscles rather than your back.
Complete the separation before adjusting your grip. Many parents make the mistake of starting to reposition their hands while the carrier is still partially connected, which increases strain and risks dropping the seat. Wait until the carrier is completely clear of the base before shifting your grip for carrying. You’ll know the disconnection is complete when you feel no resistance and hear a distinct separation sound.
Weight Management Techniques for Safe Handling
With your baby weighing 10-30 pounds plus the 5-10 pound carrier, you’re lifting 15-40 pounds total—more than many expect. To reduce strain, practice removing the carrier when empty to develop muscle memory for the proper lifting technique. Stand directly behind the seat rather than reaching across your body, and keep the carrier close to your center of gravity during the lift. If you have back issues, consider installing the base in the rear passenger seat rather than behind the driver for easier access.
Verify Complete Disconnection After Removal
Check that the base remains securely installed after removing the carrier. The base should stay firmly in place with no wobbling or shifting. If the base moves when you remove the carrier, your initial installation needs adjustment before your next ride—this indicates improper installation that could compromise safety in a collision.
Inspect both connection points visually to ensure nothing remains attached. Look for any fabric, straps, or debris caught between the carrier and base. The metal locking mechanism on both the carrier and base should be fully visible and unobstructed after separation. This quick check prevents future installation issues and ensures your next placement will click securely into place.
Troubleshoot Model-Specific Release Challenges
SnugRide series requires a more vertical lift due to its higher release handle position. These models often need slightly more upward force than other Graco variants. Stand directly behind the seat and lift straight up rather than pulling toward you.
Click Connect systems feature a push-button release that’s smaller but equally effective. These models typically provide a louder “click” during both installation and removal, giving clearer auditory feedback that the mechanism has fully engaged or released.
Classic Connect models need a more horizontal motion as their release lever sits lower on the carrier body. Position yourself slightly to the side of the seat and pull toward you at a 45-degree angle rather than lifting straight up.
Maintain Your Mechanism for Long-Term Reliability

Clean the release area weekly using a dry or slightly damp cloth. Avoid spraying liquids directly onto the mechanism, as moisture can cause internal components to corrode over time. Focus on removing crumbs, sand, or other debris that accumulates around the connection points.
Test the release monthly when the seat is empty to catch developing issues early. A smooth, consistent motion indicates proper function, while grinding sensations or increased resistance signal the need for cleaning or inspection. Never apply lubricants to the mechanism—they attract dirt and compromise safety over time.
Store carrier and base separately when not in use for extended periods. Leaving them connected for weeks or months can cause the locking mechanism to seize from prolonged compression, making future removal unexpectedly difficult.
Quick Reference Removal Checklist
Before each removal, verify these critical points:
– [ ] Vehicle completely stopped on level ground with parking brake engaged
– [ ] Carrier handle fully locked in upright position
– [ ] Clear path for lifting motion with nothing obstructing removal
– [ ] Both hands positioned correctly before activating release
– [ ] No visible debris in connection area
Mastering how to remove Graco car seat from base properly transforms what many consider a daily annoyance into a seamless, safety-enhancing routine. Practice the technique several times without your baby present to build muscle memory, and you’ll handle removal effortlessly even when juggling multiple responsibilities. Remember that smooth, consistent removal indicates proper installation—struggling with the mechanism often signals your base needs repositioning for optimal safety. By following these precise steps, you’ll not only save time and reduce physical strain but also ensure your car seat system functions as designed to protect your most precious passenger.


