
That moment when you’re installing your baby’s car seat base for the first time—tugging straps, second-guessing clicks, wondering if it’s truly secure enough—can feel overwhelming. You’re not alone; 75% of car seats are improperly installed, putting children at risk in crashes. The good news? When you know exactly how to install car seat base correctly and pass the critical inch test, you can achieve rock-solid security that protects your child through every journey. This guide reveals the professional techniques certified technicians use to eliminate dangerous wiggle room, whether you’re using LATCH anchors or your vehicle’s seat belt system.
Before you begin, understand that both installation methods are equally safe when executed properly—the right choice depends entirely on which gives you the tightest, most confident fit in your specific vehicle. Your child’s safety hinges on a single connection point between car seat and vehicle, so take the time to master these steps. Whether you’re a first-time parent or reinstalling after a vehicle change, this guide delivers the precise instructions you need to get it right the first time.
Pick the Right Installation Method for Your Vehicle
Why LATCH Might Fail Your Safety Test
The LATCH system (Lower Anchors and Tethers for Children) uses built-in metal anchors hidden in your vehicle’s seat crack, eliminating the need for seat belts. But don’t assume it’s automatically the best choice—many parents waste time struggling with LATCH when their seat belt system would provide superior stability. Critical limitation: LATCH only supports up to 65 pounds combined (child weight plus car seat weight). Once your baby approaches this threshold, you must switch to seat belt installation to maintain safety compliance.
Seat Belt Installation: When It Outperforms LATCH
Choose seat belt installation when:
– Your vehicle lacks accessible LATCH anchors in your preferred seating position
– Combined child and car seat weight exceeds LATCH limits
– The seat belt system provides significantly less movement during the inch test
– You’re installing in the center seat where LATCH anchors may be absent
Pro tip: Test both methods in your vehicle before final installation. Whichever method gives you less than 1 inch of movement at the belt path during the inch test is the safer choice for your specific configuration.
Position Your Base for Maximum Crash Protection
Why Center Seat Isn’t Always the Safest Option
While safety experts recommend the center rear seat for maximum protection from side impacts, many modern vehicles have pronounced seat humps or contours that prevent proper base installation. If your center seat has:
– A significant raised floor
– Uneven cushioning
– Limited recline angle
– No accessible LATCH anchors
Choose the outboard seat that allows the flattest, most stable base placement. Never force a center seat installation if it compromises security—proper installation in an outboard seat provides better protection than improper installation in the center.
Avoid Costly Positioning Mistakes
Before attaching a single strap, consult your vehicle owner’s manual for seating restrictions. Some vehicles prohibit car seats in certain positions due to airbag systems or structural limitations. This 30-second check prevents wasted effort and potential safety disasters. Many modern SUVs and trucks have specific center seat limitations that aren’t obvious until you attempt installation.
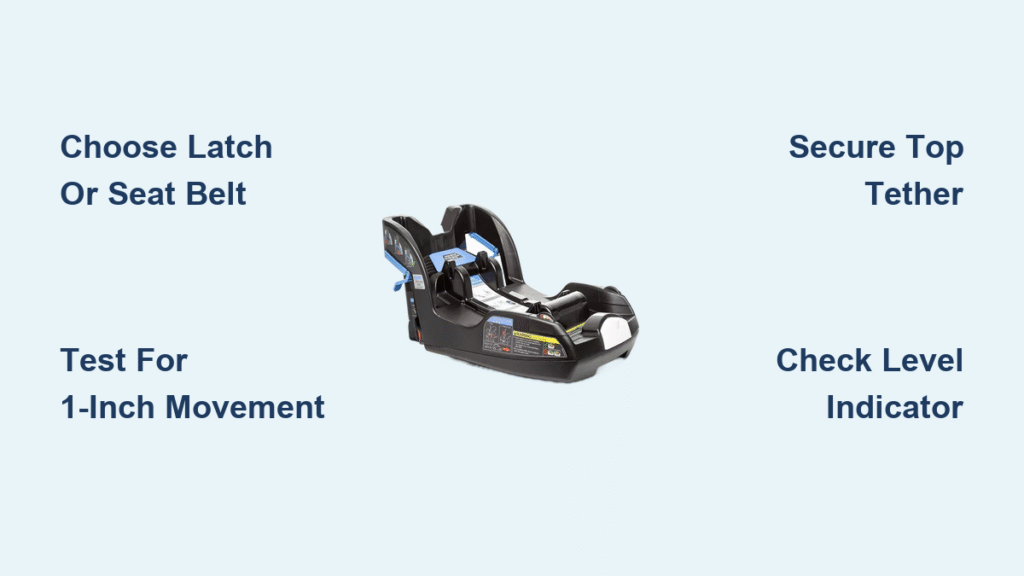
Secure Your Base Using LATCH Anchors Properly

Connect Anchors Like a Certified Technician
- Locate anchor points: Slide your hand deep into the seat crack where backrest meets cushion—anchors often hide under plastic covers or fabric flaps
- Attach connectors: Clip LATCH hooks onto metal anchors until you hear a distinct double-click
- Tighten strategically: Pull adjustment strap while pressing down firmly on the base with your knee
- Verify angle: Check built-in bubble level—many parents miss that the level indicator only works when base is properly seated
Warning: Never use both LATCH and seat belt simultaneously—this creates dangerous tension points that could compromise the entire installation during impact.
Test LATCH Security Like a Safety Inspector
Press your knee into the base while pulling adjustment straps tight. The base should feel like it’s welded to the vehicle seat, with zero give near the anchor points. If you detect any movement during this pre-test tensioning, unhook and restart the process—forcing tightness after initial connection often creates false security.
Achieve Perfect Seat Belt Installation Every Time
Master Your Vehicle’s Specific Locking Mechanism
- Route correctly: Feed seat belt through the clearly marked belt path (usually red or yellow) on base
- Engage lock: Buckle seat belt, then pull shoulder portion all the way out before feeding back in (for auto-locking retractors)
- Remove slack: Pull shoulder belt while pressing base firmly into seat with both hands
- Verify lock: Tug belt—it shouldn’t extend when properly locked
Critical variation: Some vehicles require manual locking clips—check your vehicle manual if the belt won’t stay tight after installation. Luxury vehicles often have complex seat belt systems that behave differently than standard models.
Vehicle-Specific Belt Techniques That Work
Different cars demand different approaches:
– Newer models: May require pulling seat belt all the way out to engage auto-lock
– Older vehicles: Might need a locking clip purchased separately
– SUVs with high seat backs: Often require routing belt differently to achieve tightness
Always consult both your vehicle manual and car seat manual for model-specific instructions—never rely solely on generic online advice.
Pass the Critical Inch Test That Determines Safety

The Only Movement Measurement That Matters
This test separates safe installations from life-threatening ones:
- Position correctly: Kneel at the belt path area where straps connect to vehicle
- Grip properly: Both hands on base exactly where seat belt/LATCH passes through
- Apply real force: Pull forward and side-to-side using push-up level strength
- Measure movement: Focus ONLY on movement at the connection point
Pass: Less than 1 inch of movement at belt path
Fail: More than 1 inch—you must reinstall immediately
Why Most Parents Fail the Inch Test
- Testing at wrong location: Movement at the top of base is normal and safe
- Using insufficient force: Gentle tugs won’t reveal dangerous movement
- Ignoring vehicle-specific requirements: Some bases need different tensioning methods
Pro tip: Have someone watch your hands during testing—the movement must be measured at the exact connection point, not the front edge of the base.
Forward-Facing Base: Don’t Skip This Critical Step
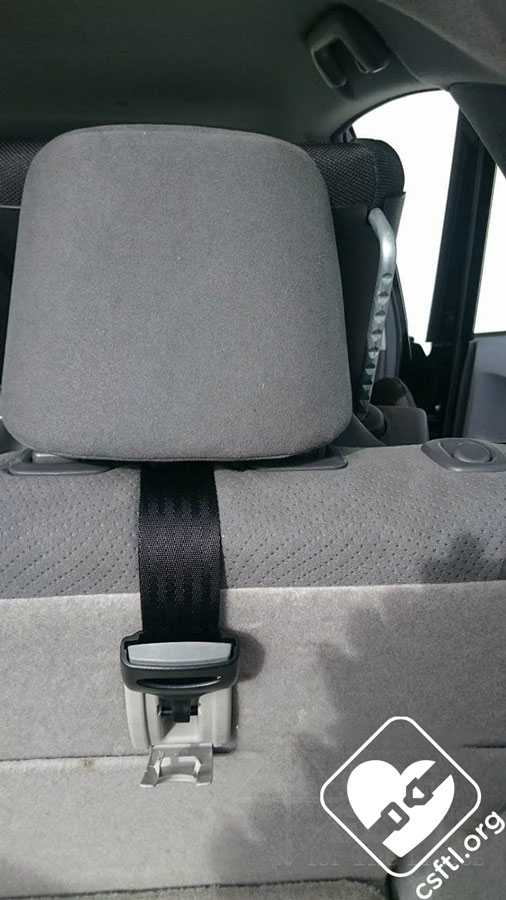
Top Tether Installation That Reduces Head Movement by 6 Inches
Forward-facing bases require this essential safety addition:
1. Find tether anchor: Check rear shelf, floor, or ceiling (consult vehicle manual)
2. Attach securely: Hook tether strap to anchor, then pull until taut
3. Route correctly: Follow car seat manual for proper tether path through vehicle
This single strap dramatically reduces forward head movement during frontal crashes—the most common collision type. Never install a forward-facing seat without connecting the top tether.
Fix Common Installation Problems Immediately
Base Won’t Tighten Enough: Three Proven Solutions
- LATCH method: Press knee into base while pulling adjustment strap—most parents don’t apply enough downward force
- Seat belt method: Try different locking technique or routing path—small changes make big differences
- Both methods: Check for twisted straps or incorrect belt path usage—common mistake with newer parents
Level Indicator Troubleshooting Guide
- Base tilting forward: Place rolled towel under front edge of base
- Base tilting backward: Adjust recline angle using built-in mechanism
- Always recheck: Level indicators can shift after final tightening—verify twice
Vehicle Seat Compatibility Fixes
- Bucket seats: May require angle adjusters for proper installation
- Leather seats: Place thin towel under base to prevent sliding
- Split seats: Ensure base doesn’t bridge the seat gap—this creates dangerous instability
Verify Your Installation Before Every Single Ride
Five-Point Safety Checklist That Could Save a Life
Before driving with your child:
– [ ] Base moves less than 1 inch at belt path during inch test
– [ ] Level indicator shows correct angle for your child’s age/weight
– [ ] No twisted straps or loose connections visible
– [ ] Car seat clicks securely into base with audible confirmation
– [ ] Top tether attached and tight (forward-facing only)
Critical reminder: Never skip the inch test before each trip—temperature changes and vehicle movement can loosen installations over time.
Professional Inspection: Why Even Experts Get Checked
Even perfect DIY installations benefit from expert verification. Certified Child Passenger Safety Technicians catch subtle issues like:
– Incorrect anchor usage (using upper tether anchors for LATCH)
– Hidden seat belt problems specific to your vehicle model
– Vehicle-specific quirks not mentioned in manuals
– Wear patterns developing in straps you might miss
Free resource: Find certified inspection stations at hospitals, fire departments, and police stations through SafeKids.org—many offer same-day appointments.
Maintain Long-Term Safety With Simple Habits
Monthly Security Maintenance Routine
- Recheck inch test movement monthly as vehicle seats compress
- Inspect for visible wear, cracks, or loose connections
- Clean anchor points with damp cloth (never harsh chemicals)
- Verify level indicator still shows correct angle
Critical Reinstallation Triggers
Always reinstall your base when:
– Switching vehicles (even temporary use of another car)
– Baby reaches weight milestones triggering LATCH limit changes
– After any vehicle collision (even minor bumps)
– When base shows wear or damage during monthly checks
Your baby’s safety depends entirely on this single connection point between car seat and vehicle. Most parents need 2-3 attempts to achieve proper tightness—don’t get discouraged. When in doubt, consult both manuals and consider professional inspection. The extra 15 minutes you spend perfecting your how to install car seat base technique today could save your child’s life tomorrow. Remember: a properly installed car seat is 71% more effective at preventing fatal injuries than an improperly installed one—make every installation count.


