
Struggling to get your baby’s car seat at the perfect angle? You’re not alone. Most parents find themselves wrestling with confusing recline indicators, unsure if their precious cargo is positioned safely. The difference between a proper 45-degree recline for newborns and a more upright 30-degree angle for older babies isn’t just about comfort—it’s life-saving positioning that prevents airway obstruction. Incorrect recline angles account for 30% of improper car seat installations, putting babies at risk during every ride.
This guide transforms those cryptic bubble levels and mysterious lines into clear, actionable steps for how to recline car seat properly. Whether you’re installing a Graco SnugRide with its dual-bubble system or deciphering the single line on an Evenflo SureRide, you’ll master the recline adjustment process quickly and confidently. Your baby’s safety depends on getting this right, and we’ll show you exactly how to do it.
Identify Your Car Seat’s Recline Indicator Type
Bubble Indicators (Graco Models)
Look for a liquid-filled chamber with floating bubbles on your Graco SnugRide or 4Ever seat. These display two age ranges: 0-3+ months and 3+ months. The bubble must rest between the marked lines for your child’s age group. When installing how to recline car seat with this system, tilt the base slightly forward and back until the bubble centers in the correct range. If you can’t see the bubble clearly, try adjusting in natural daylight—many parents miss this critical detail when working in dimly lit garages.
Pro tip: Before finalizing installation, gently shake the car seat base to ensure the bubble moves freely within the chamber. A stuck bubble gives false readings that compromise safety.
Wheel Indicators (Click Connect Bases)
Circular indicators on Graco Click Connect bases show two positions. These wheels can be stubborn—if yours won’t budge to the upright position, don’t force it. The more reclined angle remains perfectly safe for all rear-facing use. When learning how to recline car seat with wheel indicators, apply steady pressure while supporting the base with your other hand. Many parents accidentally shift the entire base while trying to adjust the wheel, throwing off their alignment.
Ball Indicators (Extend2Fit Series)
Graco Extend2Fit uses a small ball bearing instead of bubbles. The ball rolls to indicate proper angle—0+ months requires the most reclined position, while 3+ months allows a more upright installation. Unlike bubble indicators, ball systems work without liquid that can freeze in cold weather. When adjusting how to recline car seat with this system, watch for the ball to settle completely before reading the angle—rushing this step causes frequent misalignment.
Line Indicators (Evenflo & Safety 1st)
Single or dual lines embossed on the seat shell indicate proper angles. The Evenflo SureRide’s line matches the seat color, making it nearly invisible. Critical mistake: Many parents rely on visual estimation alone, which is dangerously inaccurate. Trace the line with metallic marker for instant visibility—this simple trick revolutionizes how to recline car seat properly. For dual-line systems like the Safety 1st Guide 65, always use the more reclined line for newborns regardless of their actual weight.
Check Ground Level Before Adjusting Recline Angle
Find a Truly Level Surface
Your driveway lies. Most residential surfaces slope for drainage, skewing recline readings by 5-15 degrees—enough to put your baby at risk. Gas station pump areas provide consistently level surfaces, making them ideal locations for verifying proper installation. Indoor parking garages and the center of your garage (away from the door) also offer reliable flat surfaces. Never attempt how to recline car seat on an uneven driveway—this common mistake invalidates all your careful adjustments.
Test Your Location’s Accuracy
Place a smartphone level app on your car seat base before installing. If it shows more than 2 degrees off horizontal, move to a flatter location. Many parents skip this verification step, assuming their garage is level when it’s actually sloped 3-5 degrees. This small error compounds when combined with car seat angles, creating dangerously steep reclines that restrict baby’s breathing.
Adjust Recline for Newborns (0-3 Months)
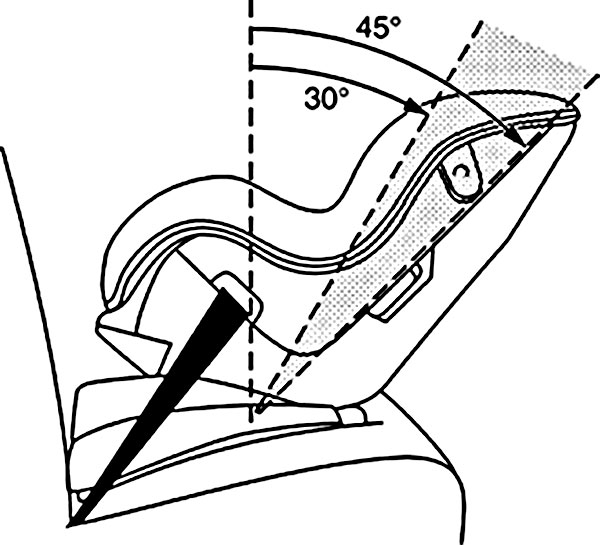
Position to 45 Degrees for Airway Safety
Newborns need maximum recline to prevent head drop. For bubble indicators, align the bubble at the most reclined position within the 0-3+ month range. The 45-degree angle keeps baby’s head tilted back slightly, maintaining an open airway. Warning signs of incorrect angle: Chin touching chest, head falling forward when baby relaxes, or baby appears scrunched in seat. If you notice these, immediately readjust how to recline car seat—you’re compromising your baby’s breathing.
Baby Trend Secure Snap Newborn Positioning
This model labels weight ranges clearly, but many parents miss that age matters more than weight for recline positioning. Set the base to the newborn position (typically the most reclined setting) regardless of your baby’s actual weight if they’re under 3 months. The “Secure Snap Gear 32” model specifically requires this approach—using the upright position too early is a common installation error that puts newborns at risk.
Modify for Older Babies (3+ Months)
Transition to 30 Degrees for Comfort and Space
Once your baby demonstrates consistent head and neck control, adjust to the more upright position. This creates more leg room and reduces the seat’s front-to-back footprint, solving common space issues in compact vehicles. Development markers to watch: Head stays steady when upright, pushes up during tummy time, and shows no head lag when pulled to sitting position. Never rush this transition—wait for clear developmental signs before adjusting how to recline car seat to the upright position.
Troubleshooting Difficult Adjustments
Some wheel indicators refuse to move to the upright position despite proper technique. Don’t force it—the reclined position remains safe throughout rear-facing use. Many parents damage their car seats trying to force adjustments that aren’t necessary. If your Graco Click Connect base won’t shift to the upright setting, leave it reclined; your child is still safe, and you’ve avoided potential equipment damage.
Handle Special Cases for Tricky Vehicles

Diono Radian Space-Saving Solution
These seats create massive front-to-back space at their fixed angle. Purchase the Angle Adjuster foam block ($20-30) to reduce recline by 5-10 degrees and gain crucial inches. Installation tip: Place the Angle Adjuster under the seat’s front edge, not the base—this subtle difference maximizes space savings without compromising safety. Many parents install it backward, accidentally increasing rather than decreasing the recline angle.
Nuna RAVA Flexibility Advantage
This premium seat has no specific recline requirements, offering unique flexibility. Install at whatever angle fits your vehicle properly while maintaining rear-facing orientation. When figuring how to recline car seat with this model, focus on tight installation rather than specific angles—this eliminates one common stress point for parents. The Nuna RAVA’s design accommodates various vehicle seat geometries that would challenge other models.
Quick Visual Inspection Steps
Step 1: Verify Indicator Reading
Check your specific indicator shows proper range for child’s age and development. Many parents assume “close enough” is acceptable, but even 5 degrees off can affect breathing. Recheck after every long trip—car seats settle into vehicle seats over time.
Step 2: Conduct the Eye-Level Test
Kneel beside the seat. The baby’s head should not fall forward past their chest when they’re relaxed. If it does, increase the recline angle immediately. This simple visual check supplements your indicator readings for how to recline car seat properly.
Step 3: Recheck Harness Tightness
Recline changes often loosen straps slightly. Ensure the harness remains snug at the new angle—two fingers should not fit at the shoulder. Many parents miss this critical step when adjusting recline position.
Common Mistakes to Avoid
Never use rolled towels or pool noodles without consulting your manual first—these unauthorized modifications void safety certifications. Avoid adjusting recline while baby is in the seat—this creates dangerous instability during adjustment. Skip visual estimation alone—always use the indicator system designed for your specific model. These common errors undermine how to recline car seat safely and effectively.
Maintenance and Prevention Tips
Monthly Rechecks Are Essential
Recline angles shift as vehicles flex and seats settle. Check your indicator monthly, especially after long trips or temperature extremes that cause materials to expand or contract. Many parents install correctly initially but neglect ongoing verification as conditions change.
Seasonal Adjustments Matter
Winter coats and bulky clothing affect recline readings. Remove thick layers before checking angle accuracy—many parents mistakenly adjust recline to accommodate winter clothing, creating dangerous angles once lighter clothing returns in spring.
When to Seek Professional Help
If your indicator won’t read correctly despite level ground, contact a certified Child Passenger Safety Technician. Many fire stations and hospitals offer free safety checks. Never struggle alone with how to recline car seat properly—professionals can spot issues you might miss.
Mastering car seat recline angles transforms from frustrating guesswork into confident safety assurance. Remember: when in doubt, the more reclined position errs on the side of safety for younger babies. Your child’s developmental stage—not just age—determines the safest angle. Check indicators monthly, trust the guides over visual estimation, and never hesitate to seek professional help for complex installations. Proper recline positioning takes just minutes but protects your most precious passenger on every journey.


