
Juice explosions, crushed crackers, and mysterious sticky spots—your Chicco car seat battles daily hazards while keeping your child safe. But improper cleaning risks damaging critical safety components or voiding your warranty. This guide cuts through the confusion with manufacturer-approved methods for every Chicco model, from KeyFit infant carriers to KidFit boosters. You’ll discover exactly which parts can go in the washer (and which will melt if you try), how to avoid buckle-jamming mistakes 90% of parents make, and why “air-dry” isn’t optional. Let’s restore your seat’s safety and freshness in under 24 hours.
Most parents don’t realize that using bleach or fabric softener degrades flame-retardant properties in Chicco’s GREENGUARD Gold-certified fabrics. Worse, rushing the drying process traps moisture in harness slots where mold hides. By following these model-specific steps, you’ll extend your seat’s lifespan through multiple children while maintaining crash-test safety.
Critical Safety Steps Before Cleaning Your Chicco Car Seat
Skipping these steps risks permanent damage to safety mechanisms. First, download your exact manual from chiccousa.com—never guess based on similar models. The KeyFit 30 Zip requires different disassembly than the classic KeyFit, and using the wrong method can snap internal plastic guides. Second, block out 18-24 hours of downtime. Rushing reassembly with damp straps causes mold growth in hidden crevices, creating respiratory hazards. Always have a backup seat available.
Chicco explicitly bans bleach, solvents, and fabric softeners because they compromise the ClearTex® fabric’s flame resistance and gum up buckle springs. Stick to fragrance-free detergents like Seventh Generation Free & Clear—these won’t interfere with the seat’s safety certifications. If you’ve used harsh chemicals before, inspect straps for stiffness; brittle webbing must be replaced immediately.
Exact Supplies Needed to Clean a Chicco Car Seat
Gather these before starting to avoid mid-process substitutions that damage components:
– Two microfiber cloths (paper towels leave lint in harness slots)
– Mild infant detergent (1–2 drops max per cleaning session)
– Soft-bristle toothbrush (for buckle crevices)
– Hand vacuum with crevice tool
– Drying rack (never use radiators or dryers)
– Large towel (for blotting—not rubbing—stains)
Skip the “laundry bag trick” for shoulder pads unless your manual specifies machine-washable models like the KeyFit Zip. Most classic Chicco lines require hand-washing straps to prevent unraveling.
6-Step Deep Cleaning Process for Any Chicco Model

This workflow applies to KeyFit, NextFit, KidFit, and GoFit seats. Model differences only appear in disassembly steps (covered next).
Remove Seat & Document Every Connection Point
Take the entire unit out of your vehicle. Lay it on a table with good lighting. Take photos at every disassembly stage—especially harness routing—since forgetting one elastic loop delays reinstallation by 30+ minutes. Unhook chest clips, buckle tongues, and y-splitters before sliding fabric covers off. For infant seats, note the exact harness slot height; reinstalling at the wrong level reduces crash protection.
Vacuum Hidden Debris First
Skip this, and you’ll create mud when cleaning. Use the crevice tool to extract:
– Sand in recline mechanisms (common in beach trips)
– Cereal crumbs behind LATCH connectors
– Cracker dust from cup holder grooves
– Pet hair woven into fabric backing
Focus on harness slots—they trap the most grime. If crumbs won’t budge, gently brush with a dry toothbrush.
Wash Plastics & Frame Without Damage
Mix one drop of detergent in warm water. Sponge-clean:
– Shell and base surfaces
– Harness adjuster buckles
– LATCH hardware channels
Rinse immediately with a clean damp cloth. Towel-dry thoroughly, then air-dry away from sunlight—UV rays weaken plastic over time. Never submerge the entire shell; water can seep into foam padding.
Spot-Clean Straps & Buckles Correctly
Harness straps: Sponge with water/detergent mix only. Never machine-wash—they fray easily.
LATCH straps: Same method; damage here often means replacing the whole seat.
Buckles: Rinse under warm running water without soap. Lubricants cause internal springs to stick, failing safety tests. If sticky, dunk in warm water for 60 seconds, then air-dry upright for 2 hours.
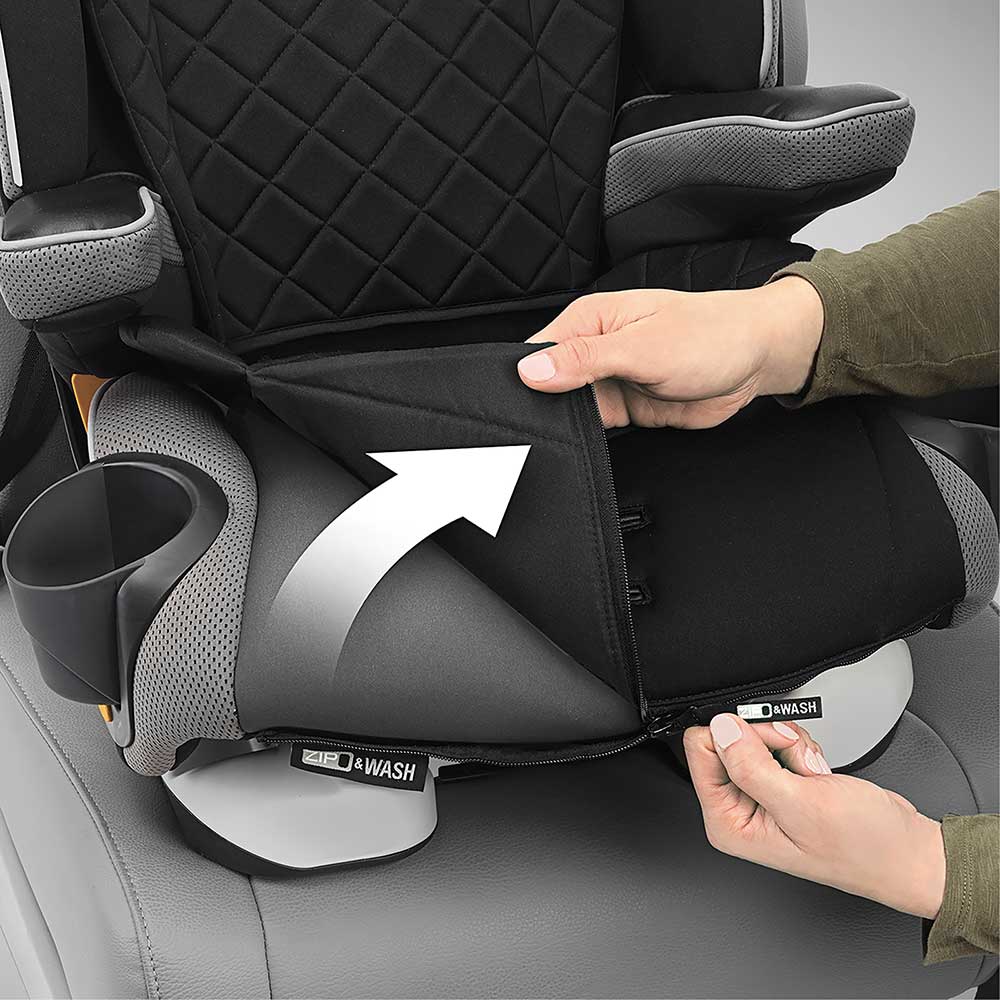
Wash Fabric Components by Model
Check this critical chart before washing:
| Component | Machine-Wash Safe? | Cycle & Temp | Drying Method | Model Exceptions |
|---|---|---|---|---|
| Seat cover | Yes (Zip models) | Cold, delicate | Hang air-dry | KeyFit Classic: Spot-clean only |
| Shoulder pads | Yes (Zip lines) | Cold, gentle + bag | Air-dry flat | Never machine classic models |
| Infant inserts | Yes | Cold, gentle | Air-dry flat | Remove metal snaps first |
| Elastic loops | No | Spot-clean only | Air-dry | Heat destroys elasticity |
For “spot-clean only” models like KeyFit Classic, use a damp microfiber cloth with mild soap. Blot stains—don’t scrub—to avoid fraying.
Reassemble Using Photo Evidence
Reverse your disassembly photos. Critical checks:
– Harness straps run perfectly straight (twists reduce strength by 50%)
– Buckle tongue clicks audibly when inserted
– Red release button snaps back in <1 second
– All elastic loops sit flush under fabric
Reinstall using both your vehicle and seat manuals—LATCH weight limits change yearly.
KeyFit vs. NextFit Fabric Removal Secrets
KeyFit Series (30/Classic/Zip)
- Unfasten harness from splitter plate under seat base
- Slide straps out of slots while noting height markers
- Unhook elastic bands around handle pivots
- Disconnect chest clip and buckle tongues
- Keep adjuster cover secured while sliding pad out
Never remove harness webbing from shell—if stained, order replacement parts. Classic models require rethreading straps through 12+ guides; Zip versions unzip in 30 seconds.
NextFit & KidFit Models
- NextFit: Unzip seat cover per Page 96 of manual. Buckles detach via Page 98 instructions.
- KidFit: Release cover via Page 70 zipper path. Hand-rinse foam inserts—never machine-wash.
- LATCH straps are permanently riveted on both lines—sponge-clean only.
5-Minute Spot Cleaning for Fresh Spills
For yogurt or juice accidents:
1. Scrape solids with spoon edge (never knife—it cuts straps)
2. Blot liquids immediately—rubbing pushes stains deeper
3. Dampen cloth with water/detergent mix, dab stain
4. Rinse cloth, dab to remove soap residue
5. Air-dry 2+ hours before reuse (damp buckles fail safety tests)
When to Toss Your Chicco Seat vs. Clean It

Discard immediately if:
– Visible mold appears (black spots that don’t fade after washing)
– Mildew smell persists after vinegar washes
– Harness straps feel stiff or brittle
Safe to clean if:
– Mildew smell with no visible mold: Wash cover with 1 cup white vinegar, sun-dry
– Stains remain after 2 washes: Cosmetic only—safety unaffected
Drying Timeline Verification Chart
| Part | Minimum Dry Time | Safety Check |
|---|---|---|
| Seat cover | 8 hours | Fabric cool/dry to touch |
| Harness straps | 4 hours | Flexible with no dampness |
| Buckle assembly | 1 hour | Smooth click, instant red button |
| Plastic shell | 2 hours | Zero water in crevices |
Never skip the buckle test: Press the release button firmly—it must pop back within a second. Delayed returns indicate trapped moisture.
Chicco Car Seat Cleaning Schedule
- Daily: Wipe spills immediately with damp cloth
- Weekly: Vacuum crumbs from cup holders and harness slots
- Deep clean: After road trips, stomach viruses, or before storing between kids
- Boosters: Every 6 months (food accidents degrade fabric faster)
Ordering Replacement Parts Safely
For damaged harnesses or buckles:
1. Visit chiccousa.com > Support > Replacement Parts
2. Call 1-877-424-4226 with your model name and manufacture date (white sticker on shell)
3. Provide color code (e.g., “Navy” or “Coral”)
Never buy third-party straps—they lack Chicco’s safety testing.
Proper cleaning keeps your Chicco seat protecting your child through multiple kids. By following these exact steps, you’ll avoid the #1 mistake parents make: rushing reassembly with damp parts. That extra hour of drying time prevents mold growth that could trigger asthma attacks. Ready for your next road trip? Your spotless, safety-certified seat awaits.


