
Installing a Cosco infant car seat base might seem daunting, especially if you’re a new parent juggling the excitement of bringing your baby home with the stress of ensuring everything is secure. If you’ve ever fumbled with straps or worried about whether your installation is tight enough to protect your little one in a crash, you’re not alone—many parents face this frustration. The good news? With the right steps, you can install your Cosco infant car seat base properly using either the LATCH system or your vehicle’s seat belt, providing a stable foundation that meets federal safety standards for rear-facing infants.
In this comprehensive guide, we’ll go beyond the basics to cover everything from gathering the right tools to troubleshooting common issues, ensuring your installation is rock-solid. You’ll learn preparation tips, a detailed step-by-step process, and post-installation checks to verify safety. By the end, you’ll feel confident that your Cosco base is installed correctly, giving you peace of mind on every drive. Let’s get started and make car seat safety straightforward.
What You’ll Need for Cosco Infant Car Seat Base Installation
Before diving into the installation, gather your materials to avoid mid-process interruptions. Most Cosco infant car seats, like the popular Cosco Scenera NEXT or Comfi2, come with the base included, but double-check your model’s manual for specifics. No heavy tools are typically required, as the process relies on your vehicle’s built-in anchors and belts.
Here’s a handy table of essentials:
| Item | Quantity | Specifications |
|---|---|---|
| Cosco Infant Car Seat Base | 1 | Model-specific (e.g., for rear-facing use; ensure compatibility with your car seat) |
| Vehicle Owner’s Manual | 1 | To confirm LATCH-equipped seats and weight limits |
| Cosco Car Seat Manual | 1 | Detailed instructions for your exact model |
| LATCH Connectors (if using) | 2 | Built into the base; rated for children up to 35-65 lbs depending on model |
| Seat Belt (if using) | 1 | Lap/shoulder belt from your vehicle; avoid locking retractors if possible |
| Level Tool or Built-in Level Indicator | 1 | Many Cosco bases have a built-in bubble level; otherwise, use a smartphone app or separate tool |
| Towel or Blanket | 1 | For leveling uneven vehicle seats (optional) |
| Tensioning Tools (optional) | 1 set | Like a seat belt clamp if your vehicle requires it for extra tightness |
These items ensure a smooth setup. If your vehicle doesn’t have LATCH (Lower Anchors and Tethers for Children), you’ll default to the seat belt method—both are safe when done right.
Preparing Your Vehicle and Safety Considerations
Proper preparation is key to a secure Cosco infant car seat base installation and can prevent common errors that lead to loose fits. Start by choosing the right spot: the rear-facing position in the back seat is safest for infants, ideally behind the passenger seat for easy access. Federal guidelines from the National Highway Traffic Safety Administration (NHTSA) recommend the center position if LATCH anchors are available there, but side positions work too if they’re within your vehicle’s specs.
Safety first: Always park on a flat surface with the engine off and the parking brake engaged. Remove any clutter from the seat, like coats or bags, as they can interfere with leveling. If your vehicle seat is sloped, fold a towel under the base’s front edge to achieve a level installation—your Cosco base’s built-in level indicator should show green when it’s plumb.
Check your vehicle’s manual for LATCH compatibility; most cars made after 2002 have it in at least two rear positions. For infants under 1 year and 20 lbs, rear-facing is mandatory. Warning: Never install forward-facing without the base, and always register your car seat with Cosco for recall alerts. If you’re unsure about your setup, consult a certified Child Passenger Safety Technician (CPST) via safekids.org.
Allow 30-45 minutes for the full process, including reading manuals. This prep step minimizes frustration and ensures compliance with safety regs.
Step-by-Step Cosco Infant Car Seat Base Installation Process
Now for the core of the guide: a clear, phased approach to installing your Cosco infant car seat base. We’ll cover both LATCH and seat belt methods, as your vehicle might require one over the other. Follow these sequentially, and refer to your model’s manual for any variations (e.g., the Cosco Comfi2 base has color-coded straps for ease).
Phase 1: Positioning and Initial Setup
- Select and clear the seat position: Slide the front seats forward if needed to access the rear. Buckle any existing seat belts out of the way.
- Place the base: Set the Cosco base flat on the vehicle seat, rear-facing toward the back of the car. Align it so the LATCH anchors or seat belt path are accessible.
- Check for level: Use the base’s built-in level indicator. Adjust with a rolled towel under the front if it’s not level side-to-side or front-to-back. A slight recline (as per manual, usually 30-45 degrees) is normal for rear-facing.
This phase takes about 5-10 minutes and sets the foundation. Important: If the base rocks more than an inch side-to-side or front-to-back, reposition immediately—it’s not secure yet.
Phase 2: Securing with LATCH System
If your vehicle has LATCH, this is often the easiest method for a tight fit without tools.
- Locate the anchors: Find the lower anchors in your vehicle’s seat crease (metal bars covered by fabric flaps). Expose them carefully.
- Attach connectors: The Cosco base has rigid or flexible LATCH straps with hooks. Clip them onto the anchors—push firmly until you hear a click. Tug to confirm they’re locked.
- Tighten the straps: Pull the free end of each LATCH strap to remove slack. The base should be flush against the vehicle seat with less than 1 inch of movement at the belt path.
- Route the top tether (if applicable): For added stability, attach the tether hook to the vehicle’s top anchor (usually in the trunk or seatback). Tighten until snug.
Test by grabbing the base and shaking it—no more than 1 inch of wiggle. This LATCH phase should take 10-15 minutes. Pro Tip: If straps are hard to access, use a flashlight for better visibility.
Troubleshooting LATCH Issues
- Straps too short? Some vehicles have deep seats; extend with official Cosco adapters if needed, but check compatibility.
- No click sound? Re-seat the connectors and try again—loose attachments are a top installation error per NHTSA.
Phase 3: Securing with Seat Belt Method
Use this if LATCH isn’t available or for the center position without anchors. It’s equally safe and often simpler.
- Thread the belt: Buckle the lap/shoulder belt through the base’s belt slots (follow the blue guides on the Cosco base). Ensure it’s in “locking” mode—pull the belt all the way out to activate the lock.
- Position and buckle: Place the base in position and buckle the belt. For vehicles without automatic locking retractors, thread a locking clip (included with some Cosco models) onto the belt just above the buckle.
- Tighten firmly: Push down on the base with your body weight (kneel on it if needed) while pulling the shoulder belt to remove all slack. The base should not move more than 1 inch.
- Lock it in: If your vehicle has a seat belt lock-off, engage it per the manual.
This method takes 10-15 minutes. Warning: Avoid using the shoulder belt only—always include the lap portion for stability.
Variations for Different Cosco Models
- For the Cosco Scenera base, the slots are wider for easier threading.
- If installing without the base (travel mode), use the seat belt directly through the shell, but bases provide better reusability.
Phase 4: Attaching the Infant Carrier
Once the base is secure:
- Align and latch: Lift the handle on your Cosco infant carrier and align the tabs with the base’s slots. Push down firmly until it clicks—both sides should lock.
- Tug test: Pull up on the carrier to ensure it’s secure; it shouldn’t lift more than a quarter-inch.
- Adjust recline: Use the base’s recline foot if available to fine-tune the angle for your baby’s size.
Snap-in takes just 2-3 minutes, but always verify the connection before driving.
Post-Installation Testing and Troubleshooting
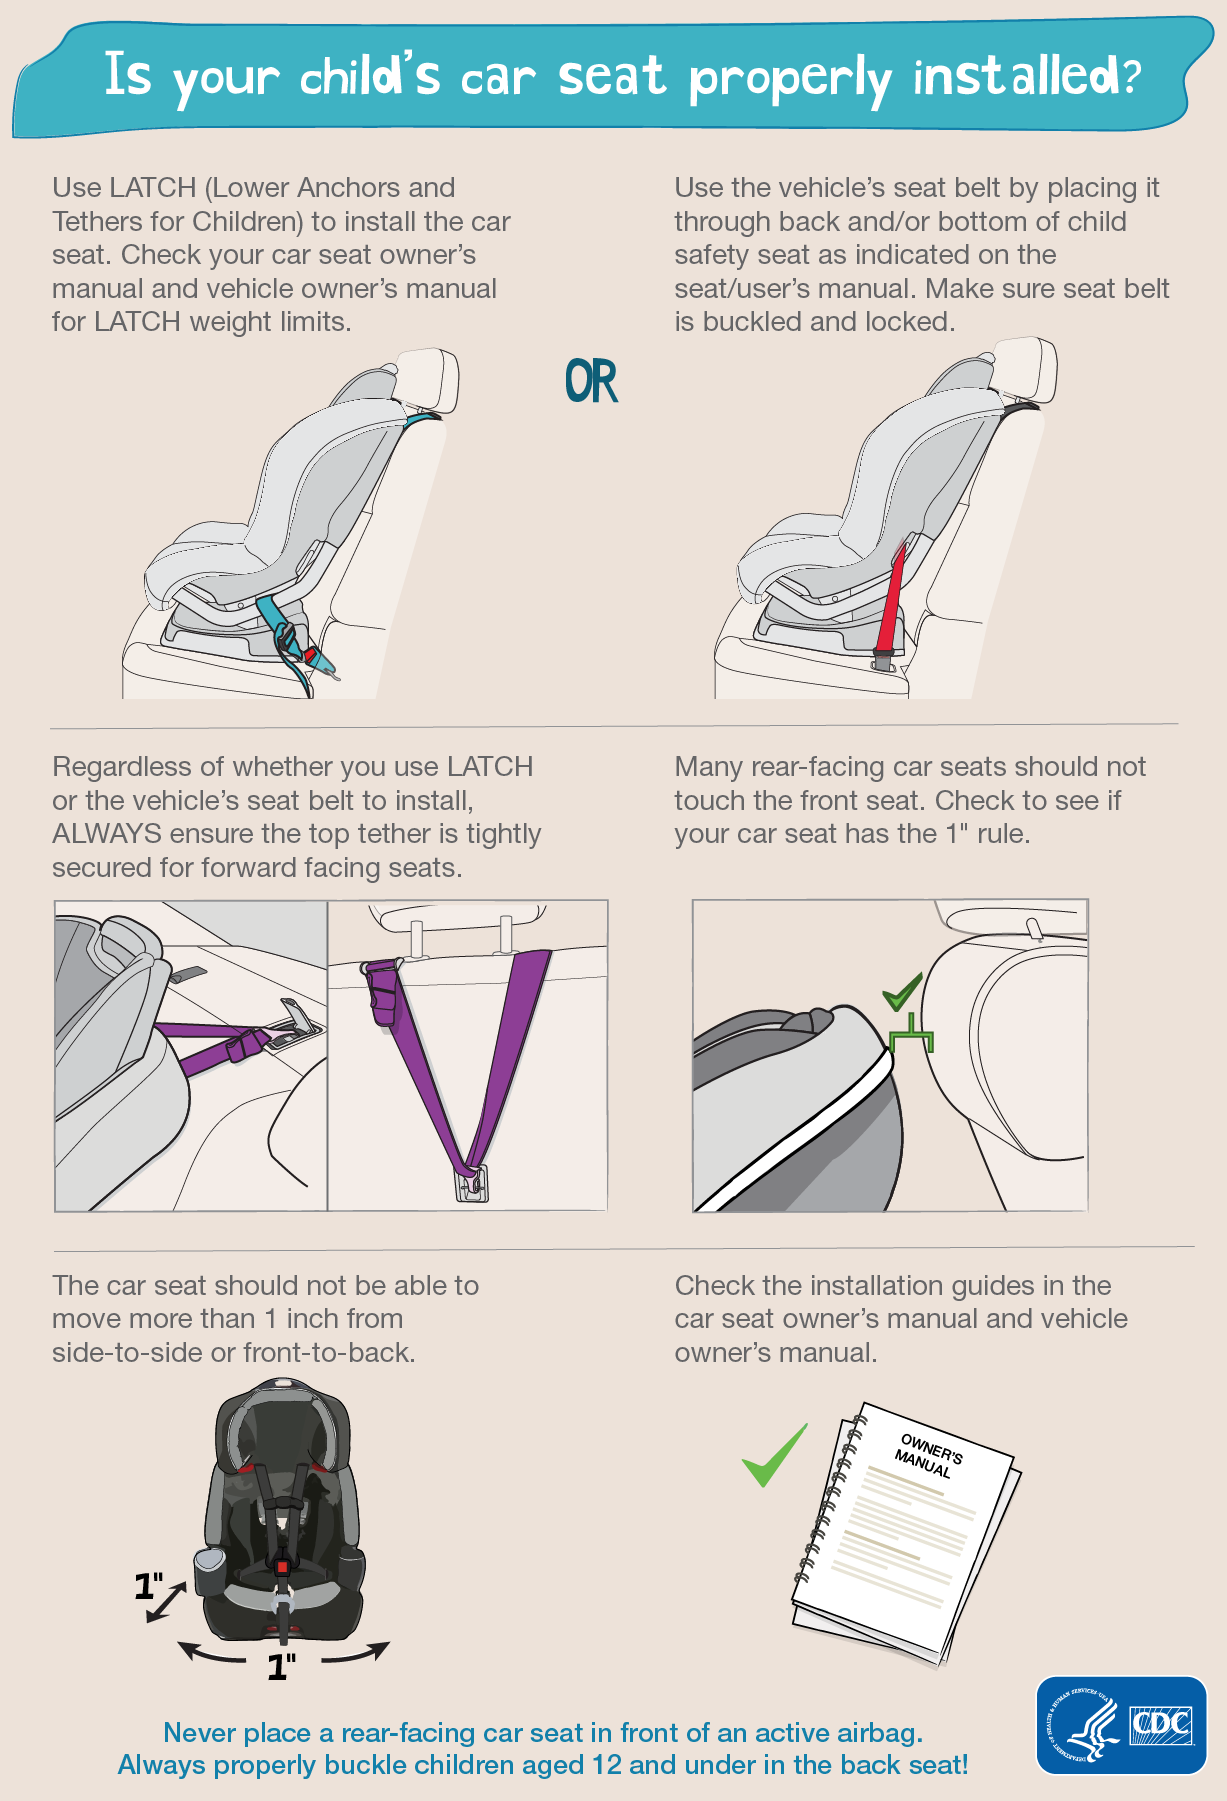
Your work isn’t done until you’ve verified the setup. The NHTSA recommends the “1-inch rule”: Grasp the base at the belt path and push/pull—it should move no more than 1 inch in any direction.
Full testing steps:
1. Install the carrier with a stuffed animal or weighted doll (5-10 lbs) to simulate your baby.
2. Shake vigorously: Check for wobbles at the top, sides, and front.
3. Drive test: Take a short, low-speed drive and listen for rattles. Readjust if needed.
4. Re-check after stops: Bases can loosen over bumps; inspect weekly.
If it fails the test, loosen everything and restart from Phase 1. Common issues include improper belt routing (double-check slots) or uneven leveling—fix by repositioning the towel. For persistent problems, like incompatible vehicle seats, consult your manuals or a CPST. This testing ensures your Cosco installation passes safety inspections.
Pro Tips for Optimal Cosco Infant Car Seat Base Installation
To elevate your setup from good to great, here are expert insights from child safety pros:
- Choose the right position wisely: Center rear seat is ideal for side-impact protection, but only if LATCH fits without extension straps (which can reduce security).
- Avoid common mistakes: Don’t skip the level check—unlevel bases increase injury risk in crashes by up to 70%, per IIHS studies. Also, never add aftermarket padding; it voids warranties.
- Optimize for comfort: Once installed, ensure the harness adjusts easily for growing babies. Cosco models like the Comfi2 have 5-point harnesses that thread simply.
- Maintenance hacks: Clean the base monthly with mild soap to prevent strap slippage. Store LATCH connectors clipped when not in use to avoid loss.
- Tech aids: Use apps like “Car Seat Check” for vehicle compatibility scans, or YouTube’s NHTSA videos for visual demos.
- Winter prep: In cold weather, warm the base interior before snapping in the carrier to avoid condensation on straps.
- Long-term savings: Proper installation extends the base’s life up to 10 years; register it online at coscobaby.com for free replacements in recalls.
These tips can save time and enhance safety, making every trip worry-free.
When to Seek Professional Help
While DIY installation is straightforward for most, some situations call for a pro. Signs include: your vehicle lacks clear LATCH points, the base won’t tighten despite multiple tries, or you’re adapting for a larger SUV/minivan. Persistent 1-inch+ movement after testing also warrants help.
Look for a certified CPST through safekids.org—they offer free or low-cost checks at fire stations or hospitals. Expect $50-100 for home visits. For Cosco-specific issues, contact their support at 1-800-544-1108; they cover warranty repairs (typically 1-2 years) for defects. Always mention your model for tailored advice—pros can spot hidden incompatibilities.
FAQ
Q: Can I install the Cosco infant car seat base without LATCH?
A: Yes, the seat belt method is fully approved and often just as secure. Thread the lap/shoulder belt through the designated paths, lock it, and tighten until snug. It’s ideal for older vehicles or center positions without anchors—just ensure your car’s belt system locks properly.
Q: How do I know if my installation is level?
A: Use the built-in bubble level on the side of the Cosco base; it should align within the green zone when viewed from the side. If your vehicle seat slopes, add a thin towel roll under the front edge, but keep it under 1/4 inch thick to avoid instability.
Q: What’s the weight limit for the Cosco base?
A: Most models, like the Scenera NEXT base, support rear-facing up to 35 lbs and 32 inches. Always check your specific manual, as limits vary—exceeding them risks safety and voids the warranty.
Q: Can I move the base between cars easily?
A: Absolutely, that’s the base’s main benefit. Unclip LATCH or unbuckle the belt, remove it, and reinstall in the new vehicle following the same steps. It takes 10-15 minutes per car; label straps if switching often.
Q: What if the base clicks but still moves?
A: This indicates slack—loosen and retighten while pushing down hard. If it persists, inspect for twists in straps or use a locking clip. Retest with the 1-inch rule; if needed, get a CPST inspection.
Q: Is it safe to install in the front seat?
A: No, never for rear-facing infants due to airbag risks. The back seat is mandatory per NHTSA guidelines until your child outgrows rear-facing.
Q: How often should I recheck the installation?
A: Weekly, or after any moderate bump or long trip. Straps can loosen over time, so a quick tug test keeps it secure.
Alternative Solutions for Car Seat Bases
If the standard Cosco base doesn’t fit your needs (e.g., for multiple vehicles or travel), consider these options. They’re compatible with many infant carriers but always verify.
| Solution | Pros | Cons | Best For |
|---|---|---|---|
| Universal LATCH Base (e.g., Chicco or Graco) | Works with non-Cosco carriers; easy swap | May require adapters; slightly bulkier | Frequent car-sharing parents |
| Belt-Only Portable Base (e.g., Clek Fllo) | No LATCH needed; lightweight at 5 lbs | Less stable in some vehicles; higher cost ($150+) | City drivers without LATCH-equipped cars |
| Baseless Travel System (e.g., Uppababy Mesa without base) | Ultra-portable; direct seat belt install | More effort to reinstall; not reusable | Air travel or rentals |
| Cosco Final Fit Convertible (no base) | All-in-one from infant to booster; budget-friendly ($60) | Forward-facing earlier; bulkier long-term | Budget-conscious families avoiding bases |
The Cosco base remains a top pick for its affordability ($50-80) and simplicity, but alternatives shine for specific lifestyles.
You’re All Set with Your Cosco Infant Car Seat Base!
Congratulations—you’ve now mastered installing your Cosco infant car seat base safely and effectively. Here’s a quick recap of the key takeaways:
– Gather essentials and prepare your vehicle for a level, clutter-free setup.
– Follow the phased process: position, secure with LATCH or belt, attach the carrier, and test rigorously.
– Use pro tips and FAQs to troubleshoot, and know when to call in experts.
By following this guide, you’ve ensured top-tier safety that complies with NHTSA standards, protecting your baby on every journey. Take that first test drive with confidence—your little one is secure.
Have you installed your Cosco base successfully? Share your tips or any hiccups in the comments below to help other parents! If issues persist, describe your vehicle model for more tailored advice. Safe travels!


