
Sewing your own infant car seat cover can transform a basic safety essential into a personalized, cozy shield for your little one against sun, wind, and spills. If you’re a new parent frustrated with store-bought options that are either too pricey or not quite the right fit, you’re not alone—many feel the same way. The good news? With some fabric, a sewing machine, and this straightforward guide, you can sew an infant car seat cover in just a few hours that fits perfectly and matches your style.
In this comprehensive DIY tutorial, we’ll go beyond the basics to cover everything from selecting materials to troubleshooting common snags. You’ll get detailed step-by-step instructions, safety tips to ensure your creation is road-ready, and pro advice for customization. By the end, you’ll have the confidence to craft a durable, machine-washable cover that keeps your baby safe and comfortable on every drive—no advanced sewing skills required.
What You’ll Need to Sew an Infant Car Seat Cover
Before diving in, gather your supplies. This project is beginner-friendly but requires precise measurements for a snug fit. Aim for breathable, durable fabrics to prioritize your baby’s comfort and safety. The total cost can range from $20–$50, depending on your choices.
Here’s a breakdown of essential materials and tools:
| Item | Quantity | Specifications |
|---|---|---|
| Main fabric (e.g., cotton canvas or waterproof polyester) | 1–1.5 yards | Medium-weight, 45–60 inches wide; choose fade-resistant colors for UV protection |
| Lining fabric (e.g., soft fleece or cotton) | 1 yard | Lightweight, hypoallergenic; optional for added coziness but recommended for infants |
| Elastic or drawstring | 2–3 yards | 1/4–1/2 inch wide; for securing the cover around the car seat edges |
| Hook-and-loop (Velcro) strips or snaps | 2–4 sets | 1-inch wide, sew-on type; for easy attachment to harness straps |
| Thread | 1 spool | Matching color, heavy-duty polyester for durability |
| Sewing machine or needle/thread (for hand-sewing alternative) | 1 | Basic model with zigzag stitch capability; skip if hand-sewing |
| Fabric scissors or rotary cutter | 1 | Sharp, for clean cuts |
| Measuring tape and pins | 1 each | Fabric-marking pins to hold pieces in place |
| Iron and ironing board | 1 set | For pressing seams crisp |
| Pattern paper or newspaper | Several sheets | For creating a custom template based on your car seat model |
Pro Tip: Check your car seat manual for size guidelines—most infant models like Graco SnugRide or Chicco KeyFit measure about 28×18 inches at the base. Wash all fabrics before cutting to prevent shrinkage.
Preparing to Sew Your Infant Car Seat Cover

Preparation is key to a frustration-free sewing session and ensures your cover meets safety standards. Start by measuring your specific infant car seat model, as sizes vary (e.g., a Peg Perego Primo Viaggio might need adjustments for its angled design). Drape a sheet over the seat to trace the shape, adding 2–3 inches of overhang for elastic gathering.
Safety first: This DIY cover is meant to provide weather protection, not replace the car seat’s built-in canopy. Warning: Never block the baby’s airways or obstruct harness access—test fit without the infant present. Use flame-retardant fabrics if possible, and avoid small parts that could become choking hazards. Work in a well-lit, flat space, and if you’re new to sewing, practice on scrap fabric.
Unpack your car seat and remove any attachments. Iron your fabrics to remove wrinkles, then create a paper pattern: Outline the seat’s back, seat bottom, and sides on large paper, cutting out the shape with seam allowances (1/2 inch all around). Label pieces (e.g., “back panel”) to avoid mix-ups. This prep should take 30–45 minutes.
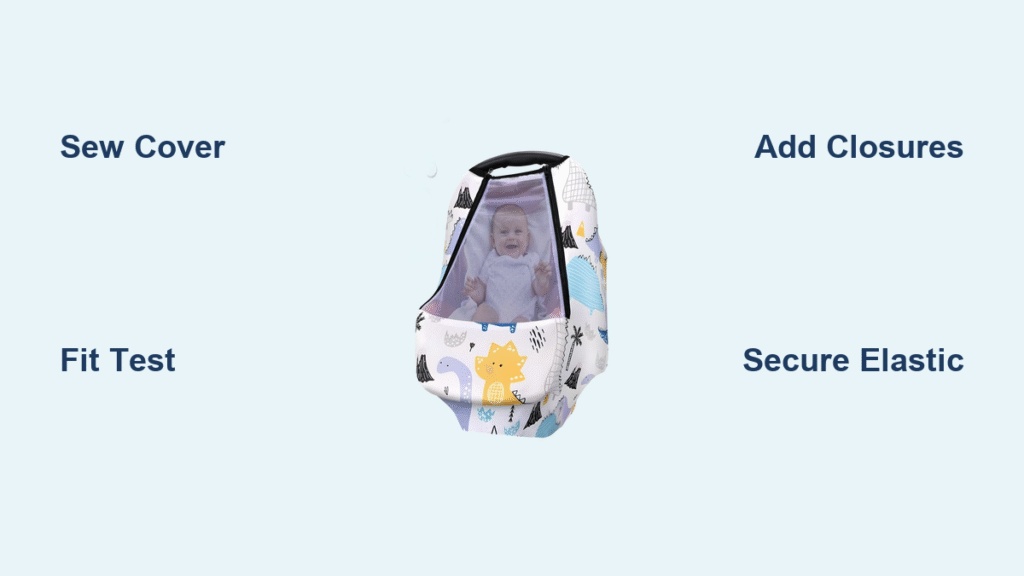
Step-by-Step Guide to Sewing an Infant Car Seat Cover
We’ll break this into four phases for manageability. The entire process takes 2–4 hours, depending on your experience. Use a 1/2-inch seam allowance throughout unless noted, and backstitch at starts/ends for strength. If hand-sewing, double your thread and use a backstitch for durability.
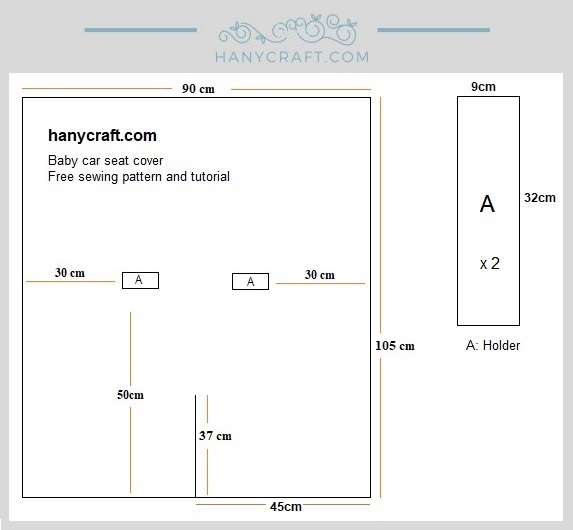
Phase 1: Cutting the Fabric
- Lay out your main fabric on a clean, flat surface. Pin your paper pattern to it, ensuring the fabric’s stretch (if any) runs horizontally for better drape.
- Cut the main pieces: One back panel (about 30×20 inches), two side panels (10×20 inches each), and one bottom panel (28×18 inches). Repeat for the lining fabric.
- For the hood or flap (optional for extra coverage), cut a semi-circle or rectangle (12×18 inches) from the main fabric.
- Cut elastic channels: Two strips of fabric (2×30 inches) for the edges where the cover will gather.
- Double-check cuts against your pattern—trim any excess to avoid bulky seams. This phase takes about 20 minutes.
Troubleshooting Tip: If your fabric frays easily, apply fray-check liquid to edges before sewing.
Phase 2: Assembling the Main Body
- With right sides together (the printed or “pretty” sides facing in), pin the side panels to the back panel along the vertical edges. Sew straight stitches down each side.
- Attach the bottom panel: Pin and sew it to the bottom edges of the back and sides, forming a U-shape. Press seams open with your iron for a flat finish.
- If adding a hood, pin the semi-circle to the top of the back panel (right sides together) and sew around the curve. Clip small notches into the seam allowance to help it lay flat, then turn right-side out and topstitch 1/4 inch from the edge.
- Repeat steps 1–3 with the lining fabric, but leave a 6-inch opening in the bottom seam for turning later.
- This assembly should take 45–60 minutes. Test-drape the unfinished shell over the car seat to ensure fit—adjust if the sides gap.
Important: Reinforce stress points (like corners) with zigzag stitching to handle daily use.
Phase 3: Adding the Lining and Closures
- Slide the lining inside the main shell (right sides facing each other). Align all raw edges and pin around the top and sides.
- Sew around the entire top perimeter, leaving the bottom open for now. Reach through the lining’s opening to pull the whole thing right-side out—smooth it with your iron.
- Close the lining gap: Fold in the raw edges and hand-stitch or machine-sew it shut.
- Create elastic casings: Fold under 1/4 inch on the long edges of your casing strips, then fold the strip in half lengthwise (wrong sides together) and sew along the fold to form tubes. Attach these to the cover’s bottom and side edges by sewing them on, leaving ends open.
- Thread elastic through the casings using a safety pin—stretch slightly and overlap ends by 1 inch, then sew securely. For drawstring options, use cord instead and add toggles.
- This phase takes 30–45 minutes and adds the functional elements.
Phase 4: Finishing Touches and Attachments
- Sew on Velcro or snaps: Position strips along the inner edges where the cover meets the harness straps (typically 4–6 inches from the sides). Stitch securely, testing placement by laying the cover over the empty car seat.
- Add any custom details: Embroider a name, attach appliques, or sew in pockets for toys (cut 6×8-inch rectangles and attach to sides before lining).
- Hem any loose edges: Fold under 1/4 inch and topstitch for a professional look.
- Give it a final press and shake out. Total finishing time: 20–30 minutes.
Your cover is now ready! It should slip over the car seat like a fitted sheet, secured by elastic and closures.
Testing and Troubleshooting Your Sewn Car Seat Cover

Once sewn, test thoroughly for safety and fit. Place it on the car seat without the infant: Ensure it doesn’t interfere with the harness buckling or airbag sensors (consult your car seat manual). Tug on elastic to confirm it stays put during simulated bumps—drive around the block empty if possible.
Common issues and fixes:
– Too loose? Shorten the elastic by 2–4 inches and re-sew.
– Seams splitting? Reinforce with double stitching; if persistent, use heavier fabric next time.
– Not breathable enough? Add mesh vents by cutting small rectangles and binding edges.
– Fits poorly on curves? Re-measure and add darts (triangular tucks) in Phase 2 for better contouring.
If it passes tests, machine-wash on gentle cycle (air-dry to preserve shape). Re-test after washing.
Pro Tips for Sewing the Perfect Infant Car Seat Cover
- Customize for seasons: Use quilted fabric for winter warmth or UV-blocking mesh for summer sun protection—always prioritize breathability to prevent overheating.
- Measure twice, cut once: Variations in car seat brands (e.g., Britax vs. Evenflo) mean custom patterns are essential; trace directly on the seat for accuracy.
- Avoid common mistakes: Don’t skip pre-washing fabrics, as shrinkage can ruin fit. Also, test Velcro adhesion on scrap first to ensure it doesn’t pull off easily.
- Boost durability: Interface seams with fusible webbing for extra strength, especially on high-wear areas like the bottom.
- Eco-friendly twist: Opt for organic cotton or recycled polyester to make your cover sustainable.
- Speed it up: If you’re short on time, pre-cut patterns from online templates (search for your model) and use a walking-foot presser for thick layers.
- Storage savvy: Fold with elastic intact for compact storage; refresh with fabric spray between washes.
These tweaks can elevate your project from basic to boutique-quality.
When to Seek Professional Help
While this DIY is accessible, consider a pro if you’re uncomfortable with curves or heavy fabrics—seamstresses at local shops can assemble for $50–$100. Signs you need help: Persistent machine jams, inability to match seams, or if safety concerns arise (e.g., cover obstructing views). Look for providers experienced in baby gear via Yelp or sewing guilds. Check warranties: Altering a car seat voids some, but a cover doesn’t—still, confirm with the manufacturer.
FAQ
Q: Do I need a sewing machine to make an infant car seat cover?
A: No, but it speeds things up significantly. Hand-sewing works for simpler designs, though it may take 6–8 hours. Use a sturdy needle and waxed thread for longevity; focus on reinforced stitches at edges.
Q: What fabrics are safest for an infant car seat cover?
A: Breathable, non-toxic options like 100% cotton or Oeko-Tex certified synthetics. Avoid anything slippery or treated with harsh chemicals—test for skin irritation if your baby has sensitivities.
Q: How do I make the cover removable for cleaning?
A: Incorporate zippers or more Velcro along one side for easy on/off. Always design it to slip over without tools, ensuring quick removal in emergencies.
Q: Can I sew this for convertible car seats too?
A: Yes, but scale up measurements (e.g., 35×22 inches base). Add adjustable straps for growing babies; test in multiple recline positions.
Q: What if my cover doesn’t fit after sewing?
A: Undo the elastic casing and adjust length, or add gussets (fabric inserts) for more room. If it’s way off, repurpose the fabric into a stroller blanket.
Q: Is this cover crash-tested?
A: No DIY cover is officially crash-tested—it’s for protection from elements only. Ensure it doesn’t add weight or alter the seat’s structure, per NHTSA guidelines.
Q: How long will my sewn cover last?
A: With quality fabrics and care, 2–3 years or until the baby outgrows the seat. Spot-clean spills immediately to extend life.
Alternative Solutions to Sewing an Infant Car Seat Cover
If sewing isn’t feasible, consider no-sew or ready-made options. No-sew methods use fabric glue and iron-on hem tape for assembly in under an hour, ideal for beginners.
| Solution | Pros | Cons | Best For |
|---|---|---|---|
| No-Sew Fabric Glue Method | Quick (1 hour), no machine needed; customizable fabrics | Less durable seams; glue can fail in wash | Absolute beginners or time-crunched parents |
| Store-Bought Universal Covers (e.g., Skip Hop or JJ Cole) | Instant fit, often UV50+ rated; machine-washable | Generic sizing may gap; $20–$40 cost | Those avoiding DIY altogether |
| Knit or Crochet Version | Soft, stretchy for snug fit; therapeutic to make | Time-intensive (10+ hours); yarn can pill | Crafters preferring non-sewing textiles |
| Re-Purposed Blanket Hack | Free/cheap using old receiving blankets; easy ties | Not tailored; may bunch up | Budget-conscious or eco-focused users |
Weigh these based on your skill level—sewing offers the best personalization, but alternatives provide fast relief.
Protect Your Baby in Style with Your DIY Cover
Congratulations—you’ve just created a custom infant car seat cover that’s safe, stylish, and tailored to your needs! This guide walked you through:
– Essential materials and prep for a secure start
– Detailed phases from cutting to finishing for foolproof results
– Testing tips and pro hacks to ensure longevity
Following these steps not only saves money but gives you peace of mind knowing every stitch prioritizes your baby’s comfort. Slip it on your next outing and admire your handiwork—your little one will thank you with sweet smiles.
Ready to sew? Share your progress or questions in the comments below—we’d love to see your creations and offer tweaks! If this helped, pin it for later or tag a friend tackling baby projects.


