
As a new parent, the thought of bringing your precious baby home from the hospital can be both exciting and nerve-wracking—especially when it comes to figuring out how to use an infant car seat correctly. You might feel overwhelmed by all the straps, buckles, and warnings, or frustrated if your first attempt at installation leaves you second-guessing everything. The good news? A simple, quick fix starts with checking your vehicle’s LATCH system (Lower Anchors and Tethers for Children) and ensuring the seat is rear-facing and at the right angle—often just a 10-15 minute adjustment that can prevent common errors and keep your little one secure from the get-go.
In this comprehensive guide, we’ll go far beyond that initial setup to cover everything you need to know about infant car seat use, from selecting the perfect model to daily handling tips and long-term safety. You’ll get step-by-step instructions, troubleshooting for tricky scenarios, and expert advice to build your confidence. By the end, you’ll be equipped to install, use, and maintain your infant car seat like a pro, ensuring every ride is safe and stress-free for you and your baby.
What You’ll Need for Infant Car Seat Installation
Before diving into the installation, gather the right tools and materials. This ensures a smooth process and minimizes frustration. Infant car seats are designed for newborns up to about 30-35 pounds (check your model’s limits), and they must always be used rear-facing. Focus on compatibility with your vehicle—most modern cars have LATCH anchors, but seat belts work too.
Here’s a handy table of essentials:
| Item | Quantity | Specifications |
|---|---|---|
| Infant Car Seat | 1 | Rear-facing only, NHTSA-approved (look for the federal certification label); examples: Graco SnugRide, Chicco KeyFit 30 (fits infants 4-35 lbs, up to 32″ tall) |
| Vehicle Owner’s Manual | 1 | Specific to your car model for LATCH locations and seat belt instructions |
| Car Seat Manual | 1 | Included with your seat; read it cover-to-cover before starting |
| LATCH Connectors or Seat Belt | As needed | Built into the car seat; use LATCH for vehicles 2002+ (up to 65 lbs child + seat weight) |
| Leveling Tool | 1 | Built-in on most seats (bubble indicator) or a separate smartphone app like Car Seat Check |
| Pool Noodle or Towel | 1-2 | Foam (4-5 inches thick) for leveling if the seat tilts; avoid for seats with built-in recline |
| Locking Clip (if using seat belt) | 1 | Often included with car seat; tightens the belt to prevent movement |
| Harness Straps Adjuster | Built-in | For tightening chest and crotch straps; no extra tool needed |
These items should take about 5-10 minutes to assemble. Pro tip: Shop at a baby store for hands-on demos, and always verify your purchase meets current safety standards from the National Highway Traffic Safety Administration (NHTSA).
Preparation Steps and Safety Considerations
Proper preparation is key to safe infant car seat use—rushing this can lead to improper installation, which the NHTSA reports affects up to 46% of seats in real-world checks. Start by parking your vehicle on a flat surface in a well-lit area, like your garage, to avoid distractions.
Safety First: Never install or adjust the seat while driving or with the baby inside. Keep pets and siblings away to prevent interference. If your vehicle has side airbags, ensure the seat is in the back (rear-facing seats shouldn’t face front airbags). For preemies or tiny babies, consult your pediatrician about positioning to avoid airway compression—some seats have infant inserts for this.
Step-by-Step Preparation:
1. Read both manuals thoroughly (15-20 minutes). Note your vehicle’s LATCH weight limit and any warnings, like avoiding captain’s chairs without tethers.
2. Inspect the car seat for damage: Check for cracks, frayed straps, or expiration dates (seats last 6-10 years from manufacture).
3. Clean the vehicle seat area: Remove trash or debris that could interfere with anchors.
4. Test-fit without securing: Place the empty seat in position to gauge space—aim for the middle rear seat if possible for optimal crash protection.
Warning: Alcohol wipes or harsh chemicals can damage straps—use only mild soap if cleaning is needed. If you’re unsure about your vehicle’s compatibility, use the NHTSA’s online vehicle-seat matcher tool.
These steps typically take 20-30 minutes and set you up for success, reducing installation errors by up to 70% according to safety experts.
Step-by-Step Installation Process
Installing an infant car seat correctly is straightforward once broken down into phases. The goal is a secure, level seat with less than 1 inch of movement at the belt path. Expect 30-45 minutes for your first time; practice makes it faster. Always install in the back seat, rear-facing.
Phase 1: Choosing and Positioning the Seat
Select a spot that’s easy to access but protected in a crash—middle rear is ideal, but side positions work if LATCH is available.
- Buckle up any unused seat belts to avoid tangles.
- If using LATCH, locate the anchors (metal bars under the seat crease—consult manual for exact spots).
- Place the car seat rear-facing, ensuring the handle is in the carry position (upright, unless specified otherwise).
H4: Safety Setup
Important: For newborns, the seat should recline at a 30-45 degree angle—use the built-in level indicator. If it’s too upright, add a rolled towel under the front base (not behind the baby).
Phase 2: Securing with LATCH or Seat Belt
Most installations use either LATCH (preferred for stability) or the vehicle seat belt. Don’t mix methods.
Using LATCH Anchors
- Attach the LATCH connectors (rigid or flexible straps on the seat base) to your vehicle’s lower anchors. Push firmly until you hear a click—tug hard to confirm.
- Tighten the straps using the adjustment mechanism (usually a dial or pull strap) until the seat doesn’t move side-to-side more than 1 inch.
- If your seat has a top tether, connect it to the vehicle’s tether anchor (behind the seat) and tighten.
This method takes about 10 minutes and is ideal for lighter setups.
Using the Seat Belt (No LATCH or Over Weight Limit)
- Thread the lap portion of the seat belt through the car’s belt path on the seat base (blue guides often mark it).
- Buckle the belt, then feed the shoulder portion back through if required.
- Use the locking clip (place it at the belt path, 1 inch from the buckle) to prevent loosening—pull the belt tight.
- Push down firmly on the seat while tightening to remove slack.
Warning: In some vehicles (like certain SUVs), the belt may need the shoulder lock-off feature engaged. Time: 15 minutes.
Phase 3: Checking Recline and Stability
- Use the level indicator on the seat side—adjust with a pool noodle under the front if needed (remove after leveling).
- Grab the seat at the belt path and shake: It should wiggle less than 1 inch forward/back and side-to-side.
- Recline test: Place a weight (like a book) where baby’s bottom goes—if it slides, add anti-slip material under the base.
If it’s unstable, loosen and retry—common in sloped seats.
Phase 4: Securing Your Baby
Once installed, focus on harnessing your infant properly. This is crucial for how to use an infant car seat daily.
- Dress baby in light layers—no bulky coats, as they compress the harness.
- Place baby in the seat, feet toward the front (rear-facing position).
- Thread the crotch strap between legs, then pull chest straps over shoulders—ensure straps are at or below shoulders for rear-facing.
- Buckle the chest clip at armpit level, then the lap buckle.
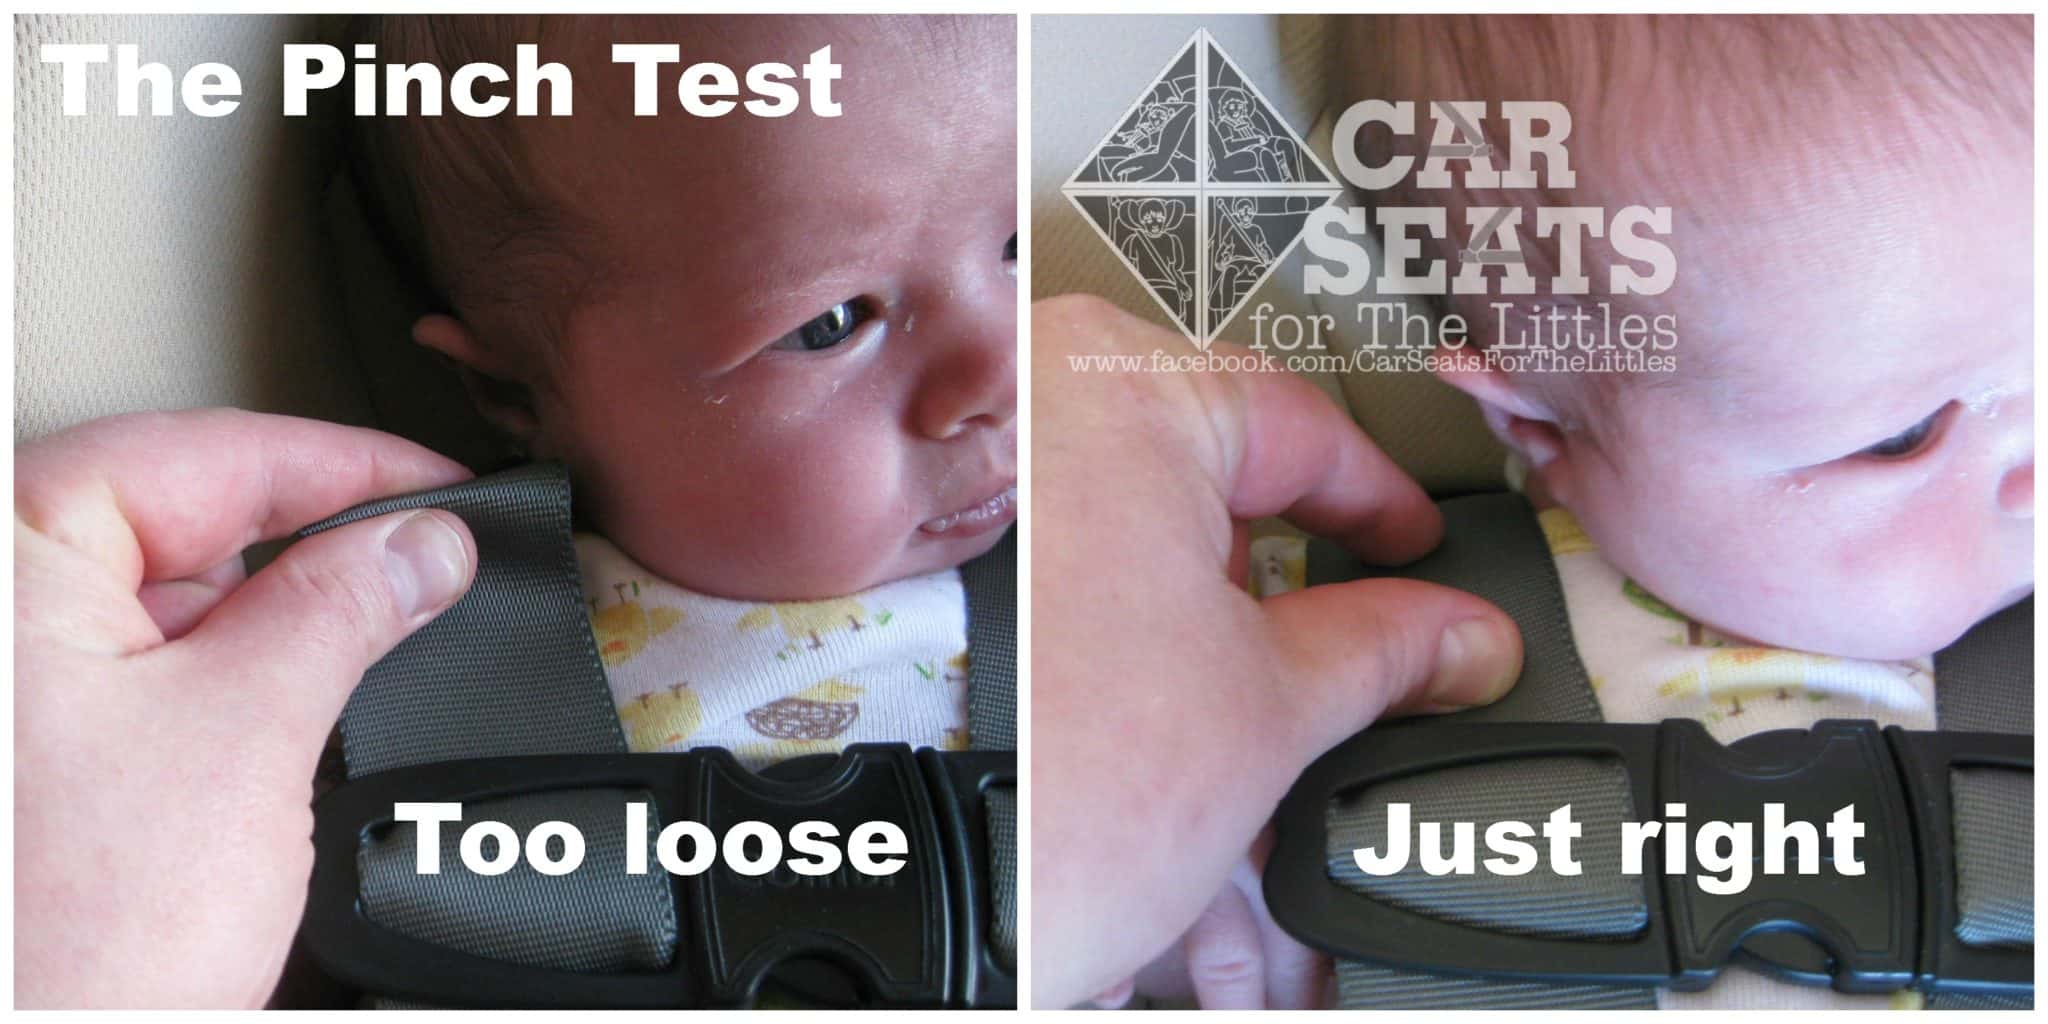
- Tighten the harness: Pull the front adjuster until you can’t pinch fabric at the shoulders (snug but not digging in).
- Position the chest clip level with armpits.
H4: Tool Preparation for Daily Use
Keep a small mirror for rear-facing visibility and a harness cover for comfort. For outings, collapse the canopy and secure the handle down.
Post-Installation Testing and Troubleshooting
After setup, test everything before the first ride. Buckle a stuffed toy (same weight as baby) and drive around the block slowly—listen for rattles or shifts.
Common Issues and Fixes:
– Seat Too Loose: Re-tighten LATCH/belt; add the locking clip if forgotten. If persistent, try the other installation method.
– Not Level: Check for uneven vehicle floors—use shims only if manual-approved. In minivans, avoid the very back row if sloped.
– Harness Too Loose/Tight: Adjust in small increments; for tiny babies, remove inserts after 3 months or per manual.
– Airbag Warnings: If lights flash, consult a certified technician—never ignore.
If tests fail, uninstall and restart. The NHTSA recommends a free inspection at a local fire station or hospital. For ongoing use, check straps before every trip (5 minutes) and after any accident.
Pro Tips for Using Your Infant Car Seat
To maximize safety and ease with your infant car seat, go beyond the basics with these expert insights:
– Rotate the Handle for Comfort: During drives, lower the handle to cradle position—it reduces head flop in bumpy rides without affecting safety.
– Avoid Aftermarket Accessories: Skip unapproved add-ons like extra padding; they can interfere with crash performance. Stick to manufacturer extras.
– Temperature Control: In hot weather, cover the seat with a breathable blanket when not in use—seats can reach 140°F inside a car, risking burns.
– Travel System Integration: If pairing with a stroller, practice snapping the seat on/off (clicks securely) to save time on walks.
– Expiration Awareness: Mark your calendar for the seat’s end date—plastic degrades over time, even unused.
– Winter Coat Hack: Layer a blanket over the harness post-buckling instead of under; test fit with a jacket at home.
– Multi-Vehicle Use: Label straps for each car if switching—prevents mix-ups.
Common mistakes to avoid: Installing forward-facing too soon (wait until at least 2 years and 40 lbs) or leaving baby unattended in the seat (risk of suffocation if tipped).
When to Seek Professional Help

While DIY installation is empowering, some situations call for experts. Signs include: persistent wobble after multiple tries, vehicle-specific quirks (e.g., European models without LATCH), or if you’re adapting for special needs like a preemie.
Look for certified child passenger safety technicians (CPSTs) via Safe Kids Worldwide or NHTSA locator—sessions cost $20-50 and include a vehicle-specific check. What to expect: A 30-minute hands-on review. Costs for full service: $50-100. If under warranty (most seats have 1-2 years), contact the manufacturer first—they may cover defects.
FAQ
Q: How long can I use an infant car seat?
A: Typically until your baby reaches the height/weight limit (around 30-35 lbs or 32 inches), often 9-15 months. Transition to a convertible seat rear-facing afterward for continued protection—rear-facing reduces injury risk by 5x per NHTSA data.
Q: Can I install an infant car seat in the front seat?
A: No, never—front airbags can deploy with lethal force against a rear-facing seat. Always use the back seat; if your car lacks one (e.g., pickup), disable the passenger airbag and consult a technician.
Q: What’s the difference between LATCH and seat belt installation?
A: LATCH uses built-in anchors for quicker, more rigid securing (best for under 40 lbs total weight). Seat belts are universal but may require the locking clip for tightness. Both are safe if done right—try both to see what fits your vehicle best.
Q: How do I know if the harness is tight enough?
A: The pinch test: If you can pinch more than an inch of strap at the shoulder, tighten more. It should hug the body snugly without gaps, allowing two fingers under the straps over the chest.
Q: Is it safe to use a second-hand infant car seat?
A: Only if it’s under 6 years old, never in a crash, and includes all parts/manuals. Inspect for recalls via NHTSA’s site—avoid if unknown history, as hidden damage can fail in accidents.
Q: How often should I check the installation?
A: Before every use, and fully recheck after 6 months or any vehicle maintenance. Straps can loosen from temperature changes or vibrations.
Q: What if my baby hates the car seat?
A: Start with short trips, use soothing toys or white noise. Ensure proper fit—arching back often means straps are too loose or the recline is off. If ongoing, a pediatrician can rule out reflux.
Safely Transport Your Baby Every Time
You’ve now mastered how to use an infant car seat with detailed steps for installation, daily securing, and maintenance:
– Essential tools and prep for a hassle-free start
– Phased process from LATCH/seat belt methods to baby harnessing
– Testing tips and pro advice to avoid pitfalls
Following this guide ensures your baby’s safety on every journey, giving you peace of mind amid the chaos of parenthood. Take action today: Install or double-check your seat, then enjoy that first drive home worry-free.
Have you installed your infant car seat successfully? Share your tips or questions in the comments to support other parents!


