
Your car battery dies in a deserted parking lot as rain begins to fall. Instead of waiting indefinitely for roadside assistance, you reach for your Black and Decker jump starter—a compact powerhouse that can revive your dead battery in minutes without another vehicle. These essential emergency tools have transformed roadside breakdowns from stressful ordeals into quick fixes, but only when used correctly. Many drivers own these devices yet hesitate to use them due to safety concerns or uncertainty about proper procedures.
Mastering your Black and Decker jump starter operation is critical for reliable emergency response. This guide delivers precise, step-by-step instructions verified against manufacturer specifications, covering everything from initial safety checks to advanced troubleshooting. You’ll learn the exact connection sequence that prevents dangerous sparks, recognize critical warning indicators, and maintain peak performance for when you need it most—whether dealing with forgotten headlights or frigid morning starts.
Essential Safety Checks Before Jumping
Inspect Unit and Battery Condition
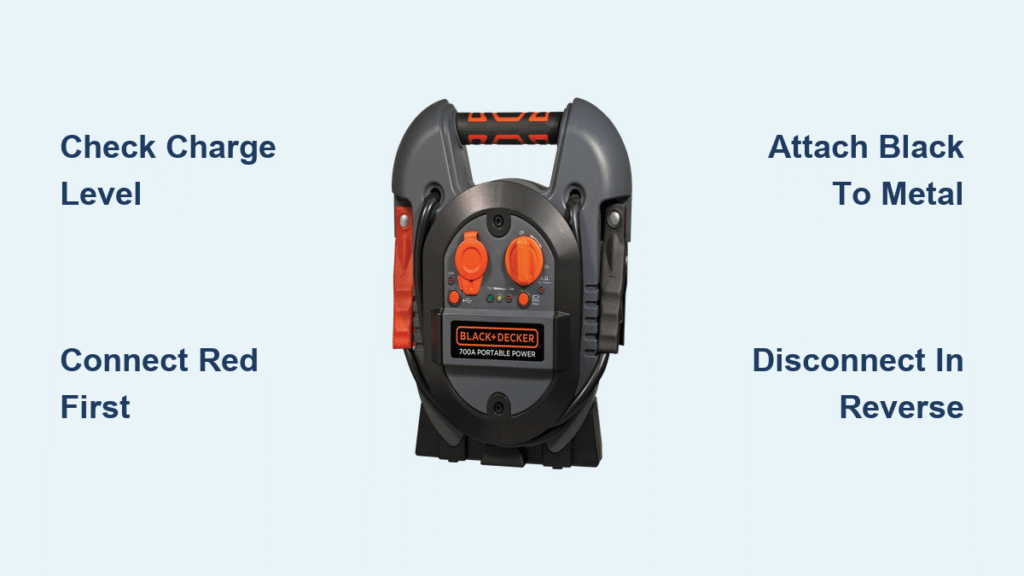
Never skip this critical step—damaged equipment or batteries can cause explosions. Thoroughly examine your Black and Decker jump starter for cracks, exposed wiring, or bulging cases before each use. Confirm the unit shows at least 50% charge via its LED indicator; attempting a jump with low power risks failure and component damage. Simultaneously inspect your vehicle battery: corrosion appears as white/green crust, leaks manifest as wet residue, and swelling indicates internal failure—all requiring professional service instead of jump-starting.
Required Safety Equipment
Always wear safety glasses and insulated gloves to protect against acid splashes and electrical hazards. Remove rings, watches, and bracelets that could accidentally contact terminals and cause severe burns. Work in a well-ventilated area since batteries emit hydrogen gas during operation—a single spark can trigger an explosion. Keep bystanders at least 10 feet away, and never lean over the battery while connecting clamps.
Position and Prepare Your Vehicle
Phase 1: Pre-Jump Setup
Park on level ground with your engine OFF and parking brake engaged. Disable all electrical drains: headlights, radio, climate control, and phone chargers. For key-ignition vehicles, remove keys; for push-button starts, ensure the vehicle displays “OFF” or “ACCESSORY.” Open the hood and secure it with the prop rod. If your battery is hidden in the trunk or under seats (common in European models), consult your vehicle manual before proceeding.
Locate Battery Terminals
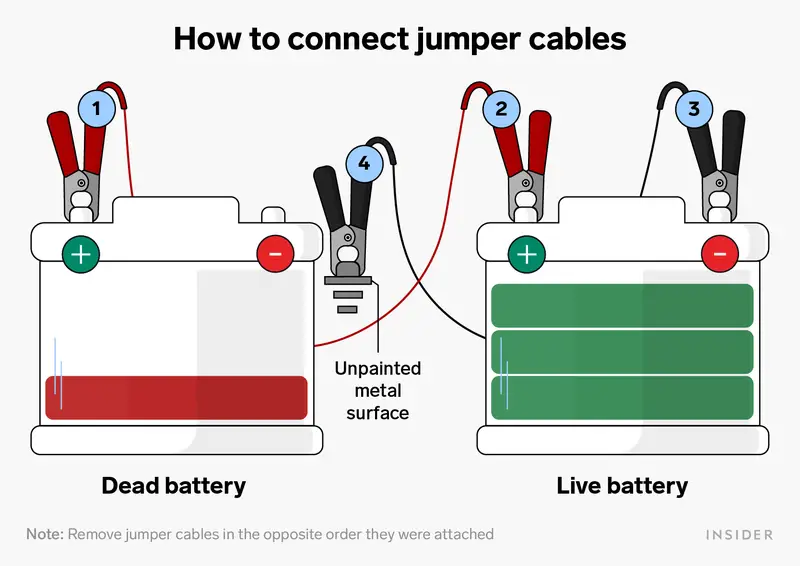
Identify the positive terminal (marked “+” and usually red) and negative terminal (marked “-” and typically black). Clean corrosion with a wire brush—never use metal tools that could short-circuit terminals. If terminals are obscured, locate an unpainted metal engine component like a bolt head or bracket 12-18 inches from the battery for the negative clamp connection. Avoid painted surfaces as they prevent proper grounding.
Connect Jumper Cables Safely
Proper Clamp Sequence
Follow this order precisely to prevent dangerous sparks:
1. Attach red clamp firmly to the positive battery terminal until you hear a solid click
2. Secure black clamp to an unpainted metal surface on the engine block or chassis—never the negative battery terminal
3. Verify clamp stability by gently tugging each connection
Connecting the negative clamp directly to the battery risks igniting hydrogen gas. The engine block location safely dissipates electrical current away from the battery.
Verify Connection Status
Check your Black and Decker unit’s LED indicators:
– Solid green: Correct polarity and strong connection
– Flashing red: Reverse polarity—disconnect immediately and swap clamps
– Flashing yellow: Weak connection or insufficient unit charge
If lights indicate errors, reposition clamps on clean metal surfaces before retrying. Never force connections—corroded terminals require thorough cleaning first.
Start Your Engine Successfully
Power Transfer Process
Activate your Black and Decker jump starter using the power button. Wait exactly 2-3 minutes for the unit to transfer initial charge to your vehicle battery—this critical step prevents voltage spikes. During this time, ensure cables are clear of fan blades, belts, and moving parts. For diesel engines or vehicles in extreme cold, extend this wait time to 5 minutes.
Starting Sequence
Enter your vehicle and turn the ignition to “START” (or press the start button) for no longer than 5 seconds. Exceeding this duration overheats the jump starter’s internal components. If the engine doesn’t catch:
– Wait 2-3 minutes before retrying
– Limit attempts to 3-4 tries total
– If cranking is sluggish, wait an extra 5 minutes for additional charge
Pro tip: Disable all non-essential electronics during restart attempts—every amp diverted to the radio reduces cranking power.
Post-Start Safety Protocol
Disconnect in Reverse Order
Once your engine runs smoothly, let it idle for 2-3 minutes to stabilize voltage. Turn OFF the jump starter before removing clamps. Remove the black clamp first from its grounding point, then detach the red clamp from the positive terminal. This reverse-sequence disconnect prevents sparks near the battery. Never remove clamps while the engine is running.
Immediate Recharging Required
Recharge your Black and Decker jump starter within 24 hours after any use. Jump-starting drains over 80% of the unit’s capacity, and partial discharges degrade lithium-ion batteries faster. Use only the manufacturer-provided charger—third-party adapters risk overcharging and fire hazards.
Troubleshoot Common Failure Points

When Engine Won’t Start
If your vehicle remains unresponsive:
– Recheck clamp connections for corrosion or loose fits
– Verify peak amp rating—500-amp models struggle with V8 engines
– Test battery voltage—below 9.6V indicates possible internal damage
– Disconnect aftermarket devices like dash cams that drain power
For slow cranking, allow 5-10 minutes of additional charging time before your final attempt—the dead battery needs sustained low-current input.
Reverse Polarity Warning
Flashing red lights mean immediate disconnection is required. Double-check terminal markings: positive terminals are larger diameter and stamped with “+”. Clean corroded terminals with a wire brush before reconnecting. If reverse polarity occurs repeatedly, your vehicle’s battery may be installed backward—a serious safety issue requiring mechanic inspection.
Maintain Peak Performance
Monthly Maintenance Routine
Preserve reliability with this schedule:
– Check charge level monthly—recharge if below 75%
– Perform full charge cycles quarterly by completely discharging then fully recharging
– Clean clamps semi-annually with a wire brush and apply dielectric grease
Units stored at partial charge lose capacity permanently within months. Lithium models particularly suffer from deep discharges.
Optimal Storage Conditions
Store your Black and Decker jump starter in cool, dry locations between 32°F-80°F. Never leave it in vehicles during summer (temperatures exceed 140°F) or winter (below -4°F). Maintain 50-75% charge during storage—use the unit’s self-test button monthly to verify readiness. Extreme temperatures permanently reduce battery capacity within weeks.
Use Advanced Features
USB Emergency Charging
Most Black and Decker models provide 3-6 smartphone charges via USB ports. Press the power button once to activate charging—ports automatically shut off after 30-60 minutes to preserve jump-start capability. For critical situations, prioritize phone charging before attempting vehicle restarts.
LED Light Functions
Master these emergency modes:
– Single press: Standard flashlight (20-40 hour runtime)
– Double press: SOS distress signal (international standard)
– Triple press: Strobe mode for high-visibility emergencies
The LED light operates independently of jump-start functions, making it invaluable during nighttime breakdowns.
Air Compressor Operation (Select Models)
Models like PPRH5B feature 120 PSI compressors with auto-shutoff. Attach the needle valve for sports balls or tapered nozzle for inflatables. Never exceed 10 minutes of continuous use—allow equal cool-down time between sessions to prevent motor burnout. Set pressure 5 PSI below your tire’s maximum rating for safety.
Decode Warning Lights and Sounds
LED Status Guide
Understand these critical indicators:
– Solid green: Ready for immediate use
– Flashing red: Reverse polarity (disconnect immediately)
– Solid yellow: Low battery—recharge now
– Flashing yellow: Overheating—allow 30 minutes cooldown
Persistent solid red lights indicate internal faults requiring professional service.
Audible Alert Meanings
Listen for these signals:
– Triple beep: Connection error
– Continuous beeping: Dangerous short circuit
– Single beep: Normal power cycle
Silence during operation is equally important—if expected beeps don’t occur, check connections immediately.
Replace or Upgrade Your Unit
When to Replace
Replace lithium units after 2-3 years and lead-acid models after 3-5 years regardless of apparent condition. Performance degrades gradually: a 3-year-old unit may deliver only 60% of its original peak amps. Test aging units quarterly—if cranking time exceeds 3 seconds consistently, replace immediately.
Model Selection Guide

Choose peak amps based on engine size:
– 500 peak amps: 4-cylinder cars under 2.0L
– 700 peak amps: 6-cylinder engines up to 4.0L
– 1000+ peak amps: Diesel trucks and large SUVs
Always select a model rated 20% higher than your vehicle’s minimum requirement for cold-weather reliability.
Key Takeaway: Your Black and Decker jump starter becomes a lifeline only when maintained properly and operated with strict adherence to safety protocols. Keep it charged to 75% minimum, store it in climate-controlled environments, and practice the connection sequence quarterly. This preparation ensures you’ll revive a dead battery confidently in under 10 minutes—no waiting for help.
Next Steps: Test your unit today by checking its charge level and practicing clamp connections on your cold engine. For vehicles over 5 years old or in extreme climates, keep a backup jump starter in your emergency kit. Register your device online to activate the full 2-year warranty and receive critical safety updates directly from Black and Decker.


