

You’re stranded with a dead battery on a freezing morning, late for an important meeting. The panic sets in as you realize you’re completely alone—no helpful passerby with jumper cables in sight. This is exactly why your Halfords jump starter belongs in every vehicle’s emergency kit. Unlike traditional jump leads requiring another car, these compact powerhouses deliver instant starts without assistance. Whether you drive a compact city car or a heavy-duty SUV, mastering your Halfords jump starter means transforming roadside disasters into 5-minute victories. In this guide, you’ll discover precise connection sequences for every model, critical safety steps most drivers skip, and pro techniques to maximize your device’s lifespan.
Don’t waste precious minutes fumbling with clamps while your engine ticks toward total discharge. We’ve distilled Halfords’ technical manuals into actionable steps you can execute in gloves with numb fingers. You’ll learn why connecting the black clamp to your engine block—not the battery terminal—prevents explosive sparks, how to diagnose why your jump starter isn’t working when you need it most, and the exact charging routine that keeps your unit ready for three years of emergencies. Most importantly, you’ll gain the confidence to handle dead batteries anywhere, anytime—no roadside assistance required.
Identify Your Halfords Model Before Connecting

Using the wrong jump starter for your engine size causes dangerous failures. Check your unit’s label immediately—never guess based on size alone. The Halfords 6-in-1 (400A) handles petrol engines up to 2.0L and diesels up to 1.6L, while the Advanced Lithium (600A) tackles petrol up to 3.0L and diesels up to 2.5L. SUVs and vans require the Professional 4-in-1 (900A), and motorcycles need the Micro (300A) model.
Why Model Matching Matters
An undersized unit won’t crank large engines and risks permanent damage to both your jump starter and vehicle electronics. If you hear rapid clicking instead of engine turnover, you’ve exceeded your model’s capacity—stop immediately. Pro tip: Tape your vehicle’s engine size inside the jump starter case for instant reference during emergencies.
Execute Critical Safety Checks in 30 Seconds
Skipping these steps risks battery explosion. First, inspect your car battery for cracks, leaks, or white corrosion—never jump a damaged unit. Confirm it’s not frozen (below -10°C); wait for thawing if needed. Next, ensure all vehicle accessories (headlights, radio) are OFF to prevent electrical surges. Finally, put on safety glasses and acid-resistant gloves—battery acid causes permanent eye damage.
Grounding Point Verification
Locate a clean, unpainted metal bolt on your engine block at least 12 inches from the battery. This is where the black clamp connects—never to the negative terminal. Test with your fingernail; if paint scrapes off easily, it won’t conduct properly. Look for factory-installed grounding points near the alternator or cylinder head.
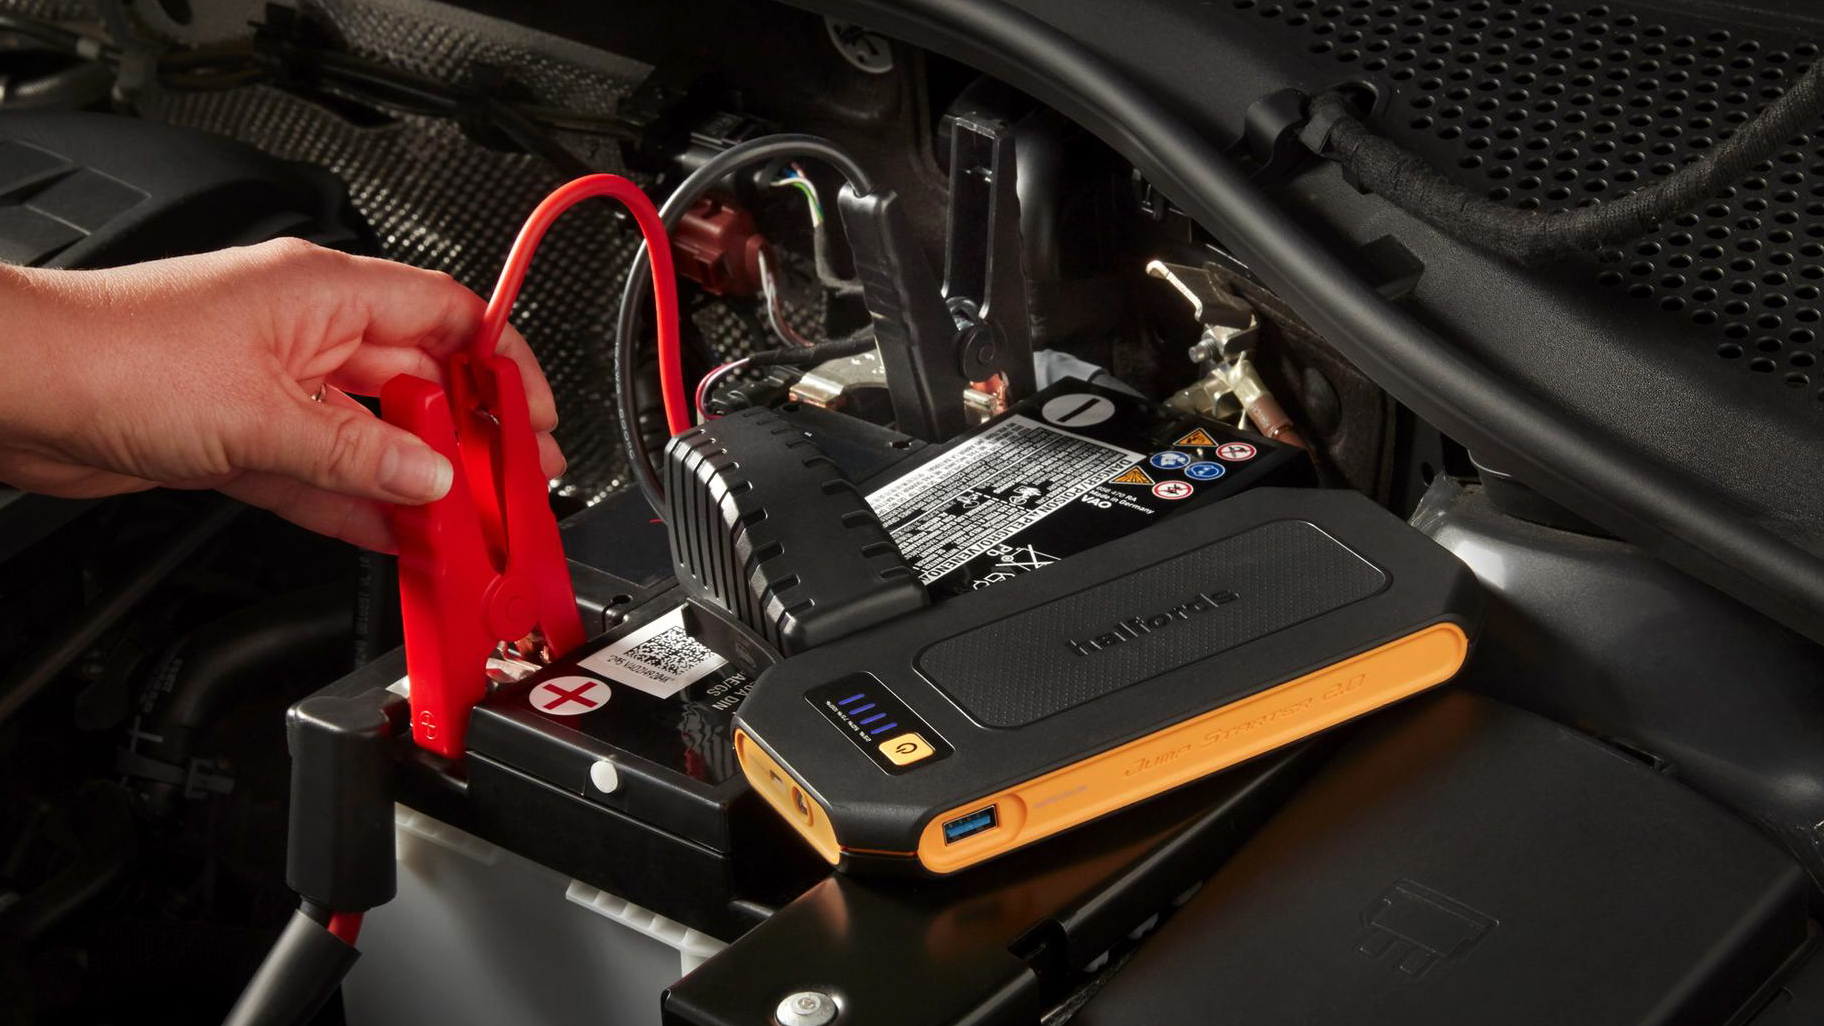
Connect 6-in-1 and 4-in-1 Models Correctly
This sequence prevents catastrophic sparks. Press and hold the power button for 3 seconds until LEDs glow. Attach the red clamp firmly to the positive (+) battery terminal—wiggle it to pierce corrosion. Then connect the black clamp to your verified grounding point. A solid green LED confirms correct polarity; flashing red means reverse connection—disconnect immediately.
Avoid the #1 User Error
Most failures happen because drivers connect black to the negative battery terminal. This creates sparks near hydrogen gas emitted by batteries, risking explosion. Always use engine block grounding—it’s the single most critical safety step in how to use Halfords jump starter properly.
Activate Advanced Lithium Smart Features
These models simplify connections but require precise handling. Insert the smart cable until it clicks—no power button needed. A blue LED flashes during automatic polarity check, turning solid green when ready. Connect clamps in the same sequence: red to battery positive, black to chassis.
Troubleshoot Connection Failures
If the unit beeps twice without lighting up, the smart cable isn’t fully seated. Remove and reinsert firmly. Never force the connector—damaged ports void your warranty. For stubborn connections, warm the cable in your pocket for 2 minutes; cold temperatures stiffen the plastic.
Start Your Vehicle Without Damaging Electronics
This step differs significantly by model. For 6-in-1/4-in-1 units: Press the yellow BOOST button for 3 seconds if your battery reads below 10V, then crank for max 5 seconds. Wait 30 seconds between attempts—never exceed four tries. Advanced Lithium models auto-engage boost below 10V and cut power after 3 seconds to prevent overheating.
Cold-Weather Cranking Secrets
Below -5°C, performance drops 40%. Warm your jump starter inside your coat for 10 minutes before use. Critical: If the engine cranks slowly but won’t fire, your battery is likely beyond recovery—stop attempting jumps to avoid draining your jump starter completely.
Disconnect Clamps to Prevent Voltage Spikes
Immediately after starting, switch on your headlights or rear defroster. This creates an electrical load that prevents damaging voltage spikes when disconnecting. Remove the black clamp first from the chassis, then the red clamp from the battery. For 6-in-1/4-in-1 models, hold the power button for 3 seconds to shut down.
Why This Sequence is Non-Negotiable
Removing red first creates a live circuit through your wrench when loosening the clamp—sparking near the battery could ignite hydrogen gas. Always follow black-first removal to break the circuit safely away from explosive gases.
Recharge Your Jump Starter Immediately
Every Halfords unit degrades if left discharged. After use, plug in via the supplied method: 6-in-1/4-in-1 models use the mains adapter (red LED = charging, green = full), while Advanced Lithium takes USB-C (0-80% in 45 minutes). Never skip this—partial discharges cause lithium battery “memory effect” that permanently reduces capacity.
Establish a Charging Routine
Check charge monthly by pressing the power button: three solid green LEDs = full. Recharge when only one LED glows. For long-term storage, maintain 70-80% charge and store between 15°C-25°C—never in your car boot where summer temperatures exceed 60°C and destroy batteries.
Master Built-in Emergency Tools
Your jump starter is a multi-tool in disguise. The 6-in-1 model’s LED work light has three modes: high beam (50-hour runtime), SOS, and emergency strobe (100 hours). Its air compressor inflates tyres to 250 PSI with digital accuracy. Advanced Lithium models charge phones via Quick Charge 3.0 and laptops through USB-C PD up to 60W.
Pro Field Hacks
Use the built-in voltmeter on Advanced Lithium units to diagnose weak batteries before they fail—press the mode button when connected. The 6-in-1’s compressor doubles as a leaf blower for clearing debris from air filters. Never use the air compressor beyond 15-minute intervals to prevent motor burnout.
Diagnose Common Jump Failures in 60 Seconds

No power? Check these in order:
1. Press power button—no LEDs mean dead jump starter (recharge immediately)
2. Clean battery terminals with a wire brush—corrosion blocks conductivity
3. Verify smart cable click (Advanced Lithium models)
Engine won’t crank?
– Battery below 8V requires replacement, not jumping
– Try a different grounding point on the chassis
– Warm the jump starter body in your hands for 5 minutes
Overheating? Allow 3 minutes cooling—repeated attempts without rest trigger thermal shutdown.
Maintain Peak Reliability for 3+ Years
This monthly ritual prevents 90% of failures: Press the power button to check charge level. Recharge if below three LEDs. Clean clamp contacts with a wire brush to remove oxidation. Inspect cables for fraying—never use damaged cables. Store at 70-80% charge in a temperature-controlled space (not your garage).
Seasonal Adjustments
Before winter, perform a full discharge/recharge cycle to recalibrate the battery. Below -10°C, keep your jump starter in the cabin—extreme cold reduces lithium battery output by 50%. After summer, check for heat-swollen cables indicating internal damage.
Your Halfords jump starter transforms roadside emergencies into quick victories when used correctly. By following these model-specific procedures—especially the critical black-clamp-to-chassis connection and immediate post-use recharging—you’ll avoid dangerous mistakes while extending your unit’s lifespan. Remember: a jump starter only works when charged. Test yours monthly, store it properly, and you’ll never face another dead-battery crisis alone. Keep this guide in your glovebox, and you’ll master how to use Halfords jump starter confidently through every season.


