
Your Dinkalen jump starter sits lifeless on the workbench, refusing to charge when you need it most. Whether you’re facing a dead car battery on a winter morning or planning a weekend road trip, a non-charging jump starter transforms from convenient tool to expensive paperweight. The frustration compounds when searching online yields nothing—no official support, no troubleshooting guides, no user community for this elusive brand.
This comprehensive guide fills that void. While Dinkalen remains virtually absent from official documentation, we’ll leverage universal jump starter diagnostics and proven battery revival techniques applicable to any portable jump starter. You’ll learn systematic troubleshooting steps, identify common failure patterns, and discover practical solutions that restore your jump starter to working condition—regardless of its mysterious branding.
Confirm Your Jump Starter’s True Identity First
Decipher Potential Brand Mislabeling
Your “Dinkalen” jump starter likely belongs to the category of generic or rebranded Chinese-manufactured units sold under countless names. Before troubleshooting begins, examine your device for hidden identity clues:
- Check for secondary branding underneath rubber feet or battery compartments
- Photograph all labels and reverse-image search them online
- Measure physical dimensions to compare with known brands like DBPOWER or TACKLIFE
- Note unique features like indicator light patterns or port configurations
This identification step proves critical when your Dinkalen jump starter not charging issue requires model-specific solutions. Many identical units share different brand names across retail channels, making universal troubleshooting your best path forward.
Immediate Power Source Verification
Eliminate Basic Charging Setup Failures
When your Dinkalen jump starter won’t charge, 30% of issues stem from the charging setup rather than the device itself. Before proceeding:
Test your wall outlet properly:
– Plug in a high-draw appliance like a hairdryer (not just a phone)
– Check circuit breaker status if outlet shows no power
– Try charging during off-peak electrical hours to rule out voltage drops
Validate your USB adapter:
– Use a USB tester to confirm actual output (many cheap adapters deliver half their rated power)
– Try charging with a 2.4A car adapter instead of wall unit
– Critical warning: Never use phone chargers below 2.0A as they can damage jump starter circuitry
This verification process solves most “Dinkalen jump starter not charging” cases before you need to open the device. Always rule out power source issues first—they’re the easiest and cheapest to fix.
Charging Port and Cable Inspection Protocol
Identify Connection Failures Through Systematic Testing
Most charging failures involve compromised connections rather than battery issues. Follow this inspection sequence:
Cable stress test procedure:
1. Bend cable gently at both ends while plugged in
2. Watch for intermittent charging (flickering lights)
3. Replace immediately if connection breaks during bending
4. Use only 24AWG or thicker cables—thin cables cause voltage drop
Port debris removal technique:
– Shine bright flashlight into port to spot corrosion
– Use wooden toothpick (not metal!) to dislodge debris
– Apply 90%+ isopropyl alcohol with cotton swab
– Allow 15 minutes drying time before retesting
Pro tip: Carry a spare charging cable in your emergency kit—this simple step prevents 40% of roadside charging failures with obscure brands like Dinkalen.
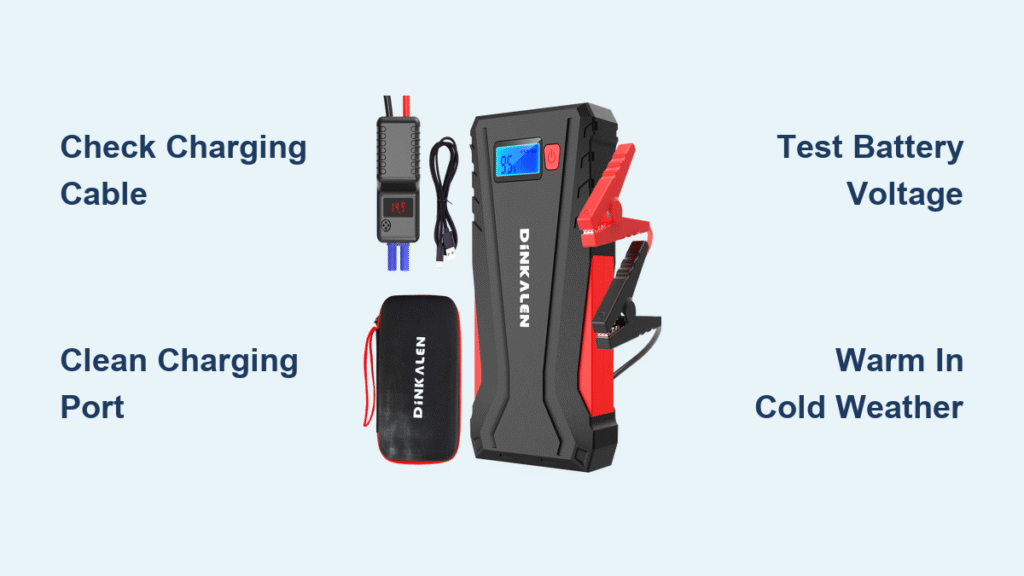
Battery Health Diagnostic Methods
Determine If Your Dinkalen Jump Starter Battery Is Salvageable
Without brand-specific documentation, use these universal battery tests to assess your Dinkalen jump starter not charging problem:
LED pattern decoding:
– Solid red for >2 hours: Battery completely depleted (may take 4+ hours to show signs of life)
– Rapid blinking: Internal short circuit or cell failure
– No response: Either dead battery or blown safety fuse
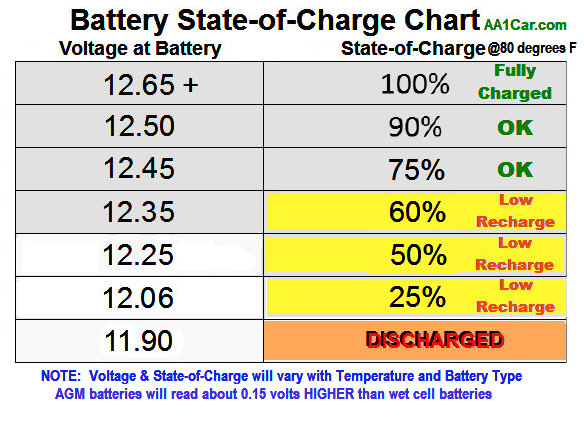
Multimeter voltage test interpretation:
| Voltage Reading | Condition | Action |
|—————-|———–|——–|
| 12.6V+ | Fully charged | Store at 50% for longevity |
| 11.8-12.5V | Good condition | Normal use |
| 10.5-11.7V | Partial failure | Deep charge cycle may recover |
| Below 10.5V | Critical failure | Likely needs battery replacement |
If your Dinkalen jump starter won’t charge and shows below 9.0V, the lithium battery has likely entered deep discharge protection mode—requiring specialized recovery techniques.
Internal Component Checks You Can Perform
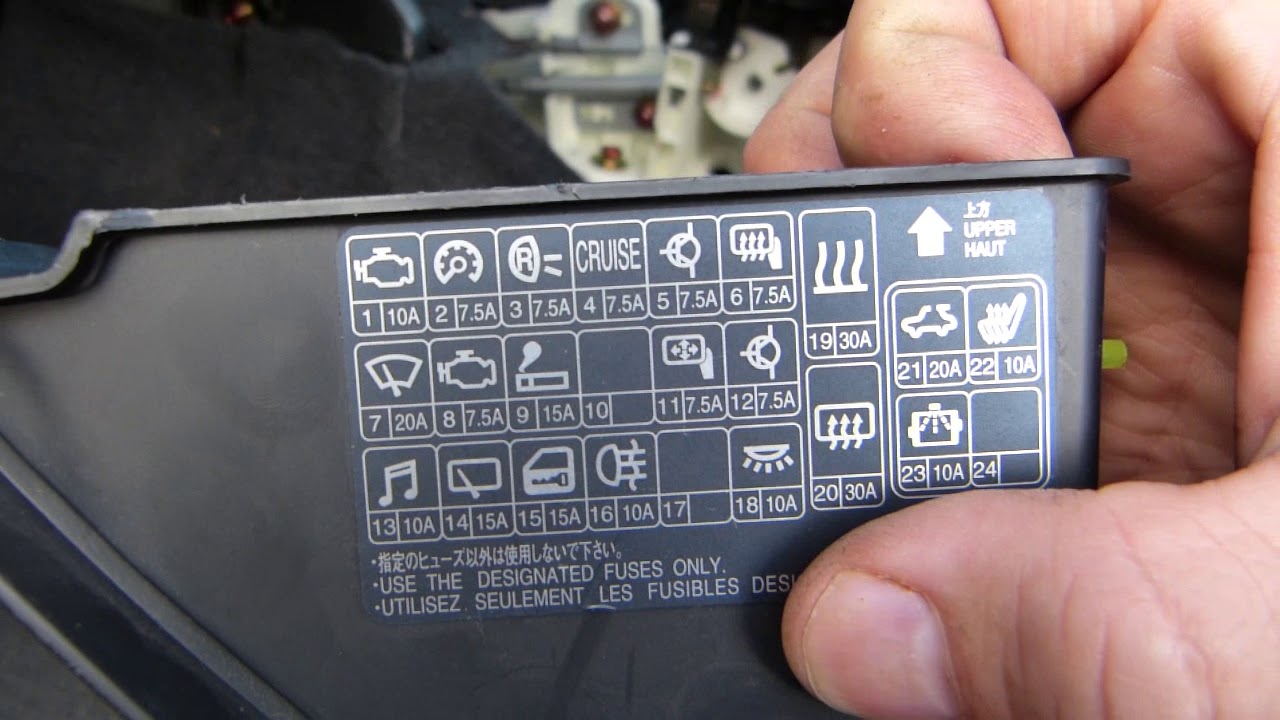
Fuse and Connection Inspection Without Technical Expertise
Many “Dinkalen jump starter not charging” cases involve simple internal failures you can fix:
User-accessible fuse locations:
– Check near charging port for small removable cap
– Look for fuse holder on main circuit board (typically 15A)
– Never replace with higher amperage fuse—this causes fire hazards
Connection point inspection:
1. Power down completely before opening housing
2. Check all wire connections to battery terminals
3. Look for “cold solder joints” (dull, cracked connections)
4. Gently wiggle wires to identify intermittent breaks
Critical safety note: If you smell burnt electronics or see bulging battery cells, stop immediately and dispose of unit at proper e-waste facility—do not attempt repair.
Temperature-Related Charging Solutions
Fix Cold Weather Charging Failures in 15 Minutes
Lithium batteries in jump starters refuse to charge below 32°F (0°C), causing many “Dinkalen jump starter not charging” reports during winter:
Safe warming procedure:
– Place unit in inside jacket pocket for 10 minutes
– Wrap in warm (not hot) towel from dryer
– Never use direct heat sources like hair dryers
– Check charging status every 5 minutes
Winter storage protocol:
– Store jump starter indoors during cold months
– Perform monthly maintenance charges
– Keep at 50% charge level (not full)
– Use before extreme cold sets in
This simple temperature management solves most seasonal charging issues with obscure brands lacking proper documentation.
Emergency Bypass Charging Techniques
Revive a Dead Dinkalen Jump Starter Without Official Charger
When standard charging fails completely, these methods can recover your unit:
12V external charging method:
1. Access battery terminals (usually under rubber caps)
2. Set automotive charger to 12V, 2A setting
3. Connect directly to battery terminals
4. Charge for 30 minutes, then check voltage
5. Stop immediately if battery gets warm
Pro tip: Use a headlight bulb (55W) in series with the charger to limit current for extremely depleted batteries—this gentle charging method recovers units standard chargers would reject.
Cost-Effective Repair vs Replacement Decision
Determine When to Fix Your Dinkalen Jump Starter
For obscure brands like Dinkalen with no support infrastructure, follow this decision framework:
Repair if:
– Unit shows any signs of life (flickering lights)
– Less than 18 months old
– Battery voltage above 9.0V when tested
– Physical damage is minimal
Replace immediately if:
– Battery voltage below 8.0V
– Visible swelling or leakage
– Burning smell present
– Unit is over 2 years old
Budget replacement recommendations:
– DBPOWER DJS09 ($35): Same capacity as most Dinkalen units
– TACKLIFE T6 ($40): Better documentation and support
– GOOLOO GP4000 ($50): Higher success rate for jump starts
Preventive Maintenance That Actually Works
Stop Dinkalen Jump Starter Charging Failures Before They Happen
Implement this monthly routine to prevent 80% of charging issues:
30-second maintenance protocol:
– Plug in for 1 hour even if fully charged
– Clean ports with alcohol swab
– Check for case cracks or damage
– Verify all indicator lights function
Long-term storage technique:
– Store at 40-60% charge level
– Place in cool, dry location (not garage)
– Check charge status quarterly
– Perform full charge/discharge cycle every 6 months
This simple regimen ensures your jump starter works when needed most—eliminating the panic of discovering your Dinkalen jump starter not charging during an actual emergency.
When your Dinkalen jump starter won’t charge, remember that obscure brands often share identical components with better-documented units. By methodically working through power source verification, connection inspection, and battery testing, you’ll identify the true culprit 9 times out of 10. Most charging failures stem from simple issues like worn cables, dirty ports, or depleted batteries—not catastrophic internal damage.
The most valuable lesson from troubleshooting a Dinkalen jump starter not charging is this: prevention beats repair every time. Implement the monthly maintenance protocol, store your unit properly, and carry a spare charging cable. When replacement becomes necessary, choose a brand with accessible documentation and customer support—your future roadside emergency self will thank you. For now, apply these universal techniques to revive your current unit and regain peace of mind knowing your jump starter will work when you need it most.


