
Installing a Graco infant car seat might feel overwhelming at first, especially with the safety of your little one on the line. As a new parent, you’ve probably stared at the instructions manual, wondering if you’re doing it right to keep your baby secure during every drive. The good news? With the right steps, you can install your Graco infant car seat properly and confidently, ensuring rear-facing protection that meets federal safety standards. A quick tip for immediate setup: Always use the LATCH system if your vehicle supports it—it’s often the simplest way to achieve a rock-solid fit without belts twisting.
In this comprehensive guide, we’ll go beyond the basics to cover everything from gathering tools to troubleshooting common issues, so you can handle variations in your vehicle or seat model like the popular Graco SnugRide series. Whether you’re using LATCH anchors or the seat belt method, we’ll walk you through multiple installation approaches, safety checks, and pro tips to prevent future hassles. By the end, you’ll have your Graco infant car seat installed securely, giving you peace of mind on every trip.
What You’ll Need for Graco Infant Car Seat Installation
Before diving in, gather the right tools and materials to make the process smooth and efficient. Graco infant car seats, such as the SnugRide SnugFit 35 or Click Connect models, are designed for easy installation, but having everything ready prevents frustration. Expect the whole setup to take 15-30 minutes, depending on your vehicle.
Here’s a breakdown of essentials:
| Item | Quantity | Specifications |
|---|---|---|
| Graco Infant Car Seat | 1 | Model-specific (e.g., SnugRide with base; ensure it’s NHTSA-certified) |
| LATCH Connectors (if using LATCH) | 1 set | Included with seat; rigid or flexible straps for vehicles with lower anchors |
| Vehicle Seat Belt (if not using LATCH) | N/A | Lap-shoulder belt; avoid using just the shoulder belt |
| Level Indicator Tool | 1 | Built into most Graco bases; or use a separate bubble level app on your phone |
| Screwdriver or Wrench | 1 | Flathead or adjustable; for tightening base adjustments if needed |
| Towel or Foam Wedge | 1 | For leveling on sloped seats (soft, non-slip material only) |
| Owner’s Manuals | 2 | Vehicle manual and Graco seat manual—read both fully |
| Safety Vest or Blanket | Optional | To cover baby during test fits; avoid loose items in the vehicle |
Important: Double-check your vehicle’s compatibility in the owner’s manual. Graco seats are compatible with most cars made after 2002, but confirm LATCH weight limits (typically up to 35-40 lbs for infant seats).
Preparing Your Vehicle and Safety Considerations

Proper preparation is key to a secure Graco infant car seat installation. Start by choosing the right spot: The rear-facing seat must go in the back seat, ideally behind the passenger to avoid airbag risks. Never install in the front seat.
Safety First: Essential Precautions
- Park on a flat surface: Ensure your vehicle is on level ground to accurately check the seat’s angle (30-45 degrees rear-facing).
- Remove hazards: Clear the area of debris, groceries, or sharp objects. Disconnect any child locks if needed.
- Weather check: Install indoors or in a garage if possible—extreme heat or cold can affect strap tension.
- Legal and health notes: Follow NHTSA guidelines: Infants under 1 year or 20 lbs must ride rear-facing. If you’re unsure about your vehicle’s anchors, consult a certified technician (more on that later).
- Warning: Never use aftermarket products like seat extenders unless specified by Graco, as they can void warranties and compromise safety.
Pre-Installation Vehicle Checks
- Inspect LATCH anchors: Located between the lower cushions of the back seat—lower anchors should be easy to access without flipping seats.
- Test seat belt retractors: Pull the belt fully out; it should lock in place when tugged sharply (this activates the pretensioner for secure installation).
- Measure recline angle: Use your phone’s level app to note your vehicle’s seat slope—Graco bases have adjustable recline feet for compensation.
These steps ensure you’re set up for success and minimize errors that could lead to improper fit.
Step-by-Step Graco Infant Car Seat Installation Process
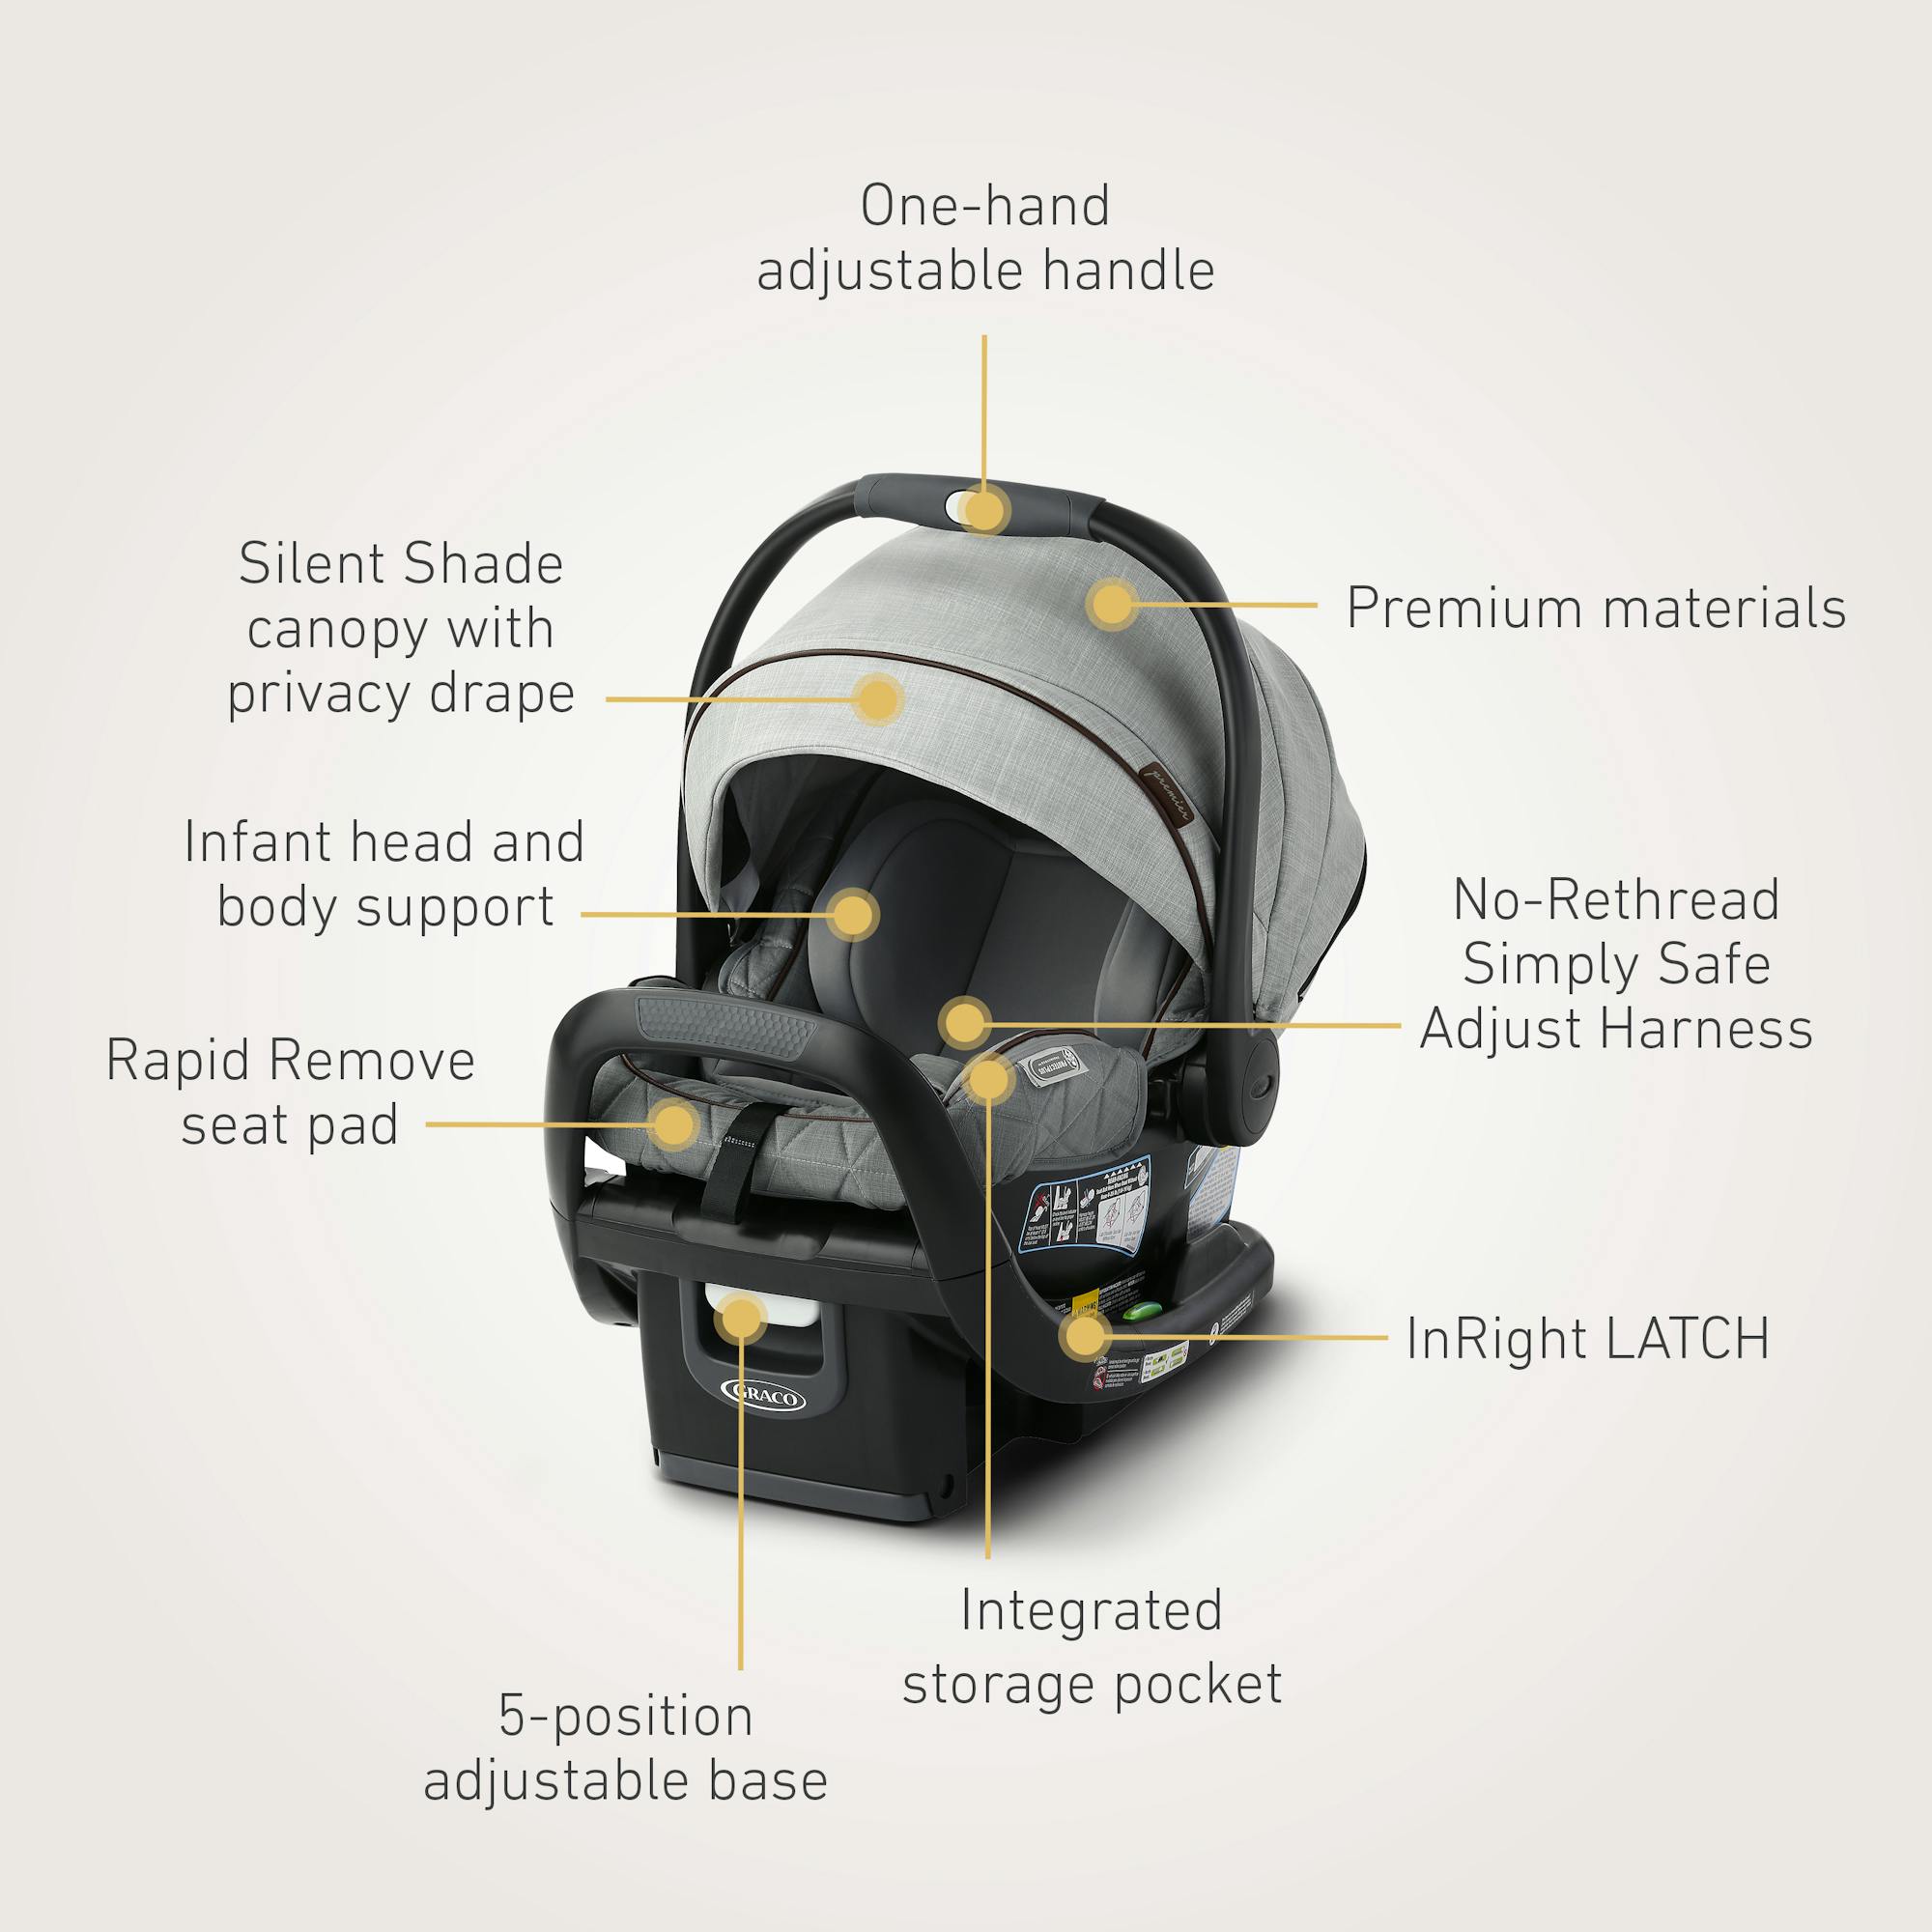
We’ll break this into phases for clarity, covering the two primary methods: LATCH (preferred for most vehicles) and seat belt. Always refer to your specific Graco model’s manual, as slight variations exist (e.g., the SnugRide 35 DLX has an anti-rebound bar). The goal is a tight fit—no more than 1 inch of movement at the belt path.
Phase 1: Installing the Base (Foundation for Stability)
The detachable base is what makes Graco seats versatile—install it first for repeated use.
- Position the base: Place it rear-facing on the chosen back seat. Align the level indicator bubble between the marked lines (aim for 30-45 degrees; use a towel under the front if the seat slopes too much).
- For LATCH installation:
– Attach the lower anchors: Hook the LATCH connectors to your vehicle’s lower anchors. Push firmly until you hear a click—tug hard to confirm they’re locked.
– Tighten the straps: Use the adjustment wheel or lever on the base to pull straps taut. The base should not move side-to-side more than 1 inch. - For seat belt installation (if LATCH isn’t available or exceeds weight limits):
– Route the belt: Thread the lap-shoulder belt through the base’s belt paths (red guides on Graco bases).
– Buckle and lock: Fasten the belt, then pull the shoulder portion sharply to engage the lock mode. Tug the lap belt tight. - Secure the base: Push down firmly on the base while tightening—rock it to test; it should wiggle less than 1 inch at the belt path.
- Lock the base: Engage any push-button locks or levers on the base to prevent sliding.
Time estimate: 5-10 minutes. Pro tip: If using LATCH, route upper tether straps to the vehicle’s top tether anchor behind the seat for extra stability (mandatory for forward-facing later, but recommended here).
Phase 2: Attaching the Carrier and Securing Your Baby
Once the base is rock-solid, snap in the carrier and prepare for your infant.
- Click the carrier into the base: Align the tabs and press down until it audibly clicks—lift slightly to ensure it’s locked (Graco’s Click Connect system makes this foolproof).
- Adjust harness straps: Set to rear-facing mode. Straps should be at or below baby’s shoulders; loosen fully, then thread baby through without twisting.
- Position your baby: Place them in the seat with their back against the shell. Ensure clothing is thin—no bulky coats, as they reduce harness effectiveness.
- Buckle and tighten: Fasten the chest clip at armpit level, then pull the harness adjuster (usually at the front) until you can’t pinch the strap fabric (snug but not uncomfortable).
- Set recline and level: Re-verify the bubble level on the base or carrier side. Adjust recline foot if needed (Graco bases have 4-5 positions).
Warning: The harness must be tight enough that you can’t pinch any webbing when pulling. A loose fit can cause injury in a crash.
Time estimate: 5-10 minutes.
Phase 3: Final Adjustments for Your Specific Vehicle
Vehicles vary, so tweak as needed.
- For SUVs or trucks: If the seat tilts forward, add the foam wedge under the base’s front edge.
- For sedans with low anchors: Extend LATCH straps fully before connecting.
- Upper tether (if applicable): After base installation, attach the tether to the anchor point and tighten to reduce rotation in a collision.
Post-Installation Testing and Troubleshooting
Don’t skip this—testing confirms your Graco infant car seat installation is crash-ready.
Basic Testing Steps
- Movement check: Grab the carrier at the belt path and push/pull. No more than 1 inch of side-to-side or front-to-back movement.
- Harness test: Buckle a stuffed animal or weighted bag (simulating baby weight) and tug straps—ensure no slack.
- Road test: Drive slowly around the block. Listen for rattles; recheck tightness after the first drive, as vibrations can loosen things.
- Visual inspection: Ensure no twists in belts/straps, and the chest clip is level.
Common Troubleshooting Issues
- Base won’t level: Your vehicle seat may be sloped—use the recline foot or a rolled towel. If persistent, try a different seating position.
- LATCH won’t click: Clean anchors of debris; ensure connectors are the right type (some Graco models need adapters for older vehicles).
- Straps too loose: Double-check lock-off mode on the belt. For LATCH, ratchet the tightener fully.
- Carrier doesn’t snap in: Verify the base is unlocked (red indicators show green when ready). Clean tabs if dirty.
- Error persists: If tests fail after two tries, consult the manual or a professional—better safe than sorry.
If issues arise, note your vehicle make/model and Graco seat specifics for targeted help.
Pro Tips for Optimal Graco Infant Car Seat Use
Go beyond the basics with these expert insights to enhance safety and ease:
- Rotate installations: Practice removing and reinstalling the carrier monthly to stay familiar—Graco’s one-hand release is a game-changer for quick swaps.
- Avoid common mistakes: Don’t forget the upper tether, even for rear-facing (it cuts head excursion by 50% per NHTSA studies). Never add padding under baby; it alters crash dynamics.
- Optimize for growth: Mark harness heights on the seat shell to track as baby grows—Graco seats fit from 4-35 lbs typically.
- Seasonal tweaks: In winter, use merino wool layers instead of coats; in summer, choose breathable fabrics to prevent overheating.
- Tech integration: Download the Graco app (if available for your model) for reminders on inspections. Pair with a dash cam for peace of mind.
- Long-term maintenance: Inspect for wear monthly—replace if straps fray or after any accident (Graco offers crash replacement programs).
- Family coordination: Teach all caregivers the installation steps; use a laminated checklist in the glovebox.
These tips can extend your seat’s usability and keep drives stress-free.
When to Seek Professional Help
While DIY Graco infant car seat installation is straightforward, some situations call for experts. Certified Child Passenger Safety Technicians (CPSTs) can verify your setup for free at many fire stations or hospitals.
- Signs you need help: Persistent 1+ inch movement, incompatible vehicle features (e.g., no LATCH in center seat), or if you’re installing multiple seats. Also, if you’ve been in a minor fender-bender—reinstall after professional inspection.
- Choosing a provider: Look for NHTSA-certified techs via safekids.org or Graco’s website locator. Avoid generic mechanics; seek those with car seat specialization.
- Costs: Most inspections are free, but paid consultations run $50-100. Graco warranties cover defects but not improper installation.
- Warranty note: DIY errors won’t void coverage, but pros ensure compliance for claims.
Don’t hesitate— a 30-minute check can save lives.
FAQ
Q: Can I install a Graco infant car seat without the base?
A: Yes, for quick trips using the vehicle seat belt—route it through the carrier’s belt guides and lock the retractor. However, the base provides better stability and reusability; always prioritize a tight fit with no more than 1 inch movement. This method works for models like the SnugRide but isn’t ideal for daily use.
Q: What’s the difference between LATCH and seat belt installation for Graco seats?
A: LATCH uses built-in anchors for a quicker, more secure fit in compatible vehicles (post-2002 models), reducing user error. Seat belt is a reliable alternative for heavier loads or non-LATCH spots—both achieve the same safety if installed correctly. Graco recommends LATCH first; check your manual for weight limits (e.g., 35 lbs max for LATCH).
Q: How do I know if my installation angle is correct?
A: Use the built-in level indicator on the base or carrier—it should show the bubble between the lines for 30-45 degrees. If unavailable, a smartphone level app works. Incorrect angles increase injury risk in crashes, so adjust with recline feet or a wedge.
Q: Is it safe to use a Graco infant car seat in a rideshare or taxi?
A: Not recommended without the base, as taxis often lack LATCH. Hold your baby on your lap only as a last resort (never in front), but for safety, bring the full setup and request a compatible vehicle via apps like Uber Car Seat.
Q: How often should I recheck the installation?
A: After every use initially, then weekly or after any vehicle maintenance. Graco advises full inspections every 6 months or post-accident. Straps can loosen over time from temperature changes or bumps.
Q: What if my vehicle has European belt systems—can I still install Graco?
A: Yes, but use the seat belt method with the ELR (Emergency Locking Retractor) mode. Graco seats are universal, but consult a local tech for adapters if needed. Avoid ALK systems without locking mechanisms.
Q: Can I wash the Graco infant car seat covers?
A: Spot clean with mild soap; machine-washable covers (check model) should air-dry fully. Remove the infant insert first. Never submerge the base or harness—moisture weakens straps.
Alternative Installation Solutions

If standard methods don’t fit your setup, consider these options. For instance, if LATCH is unavailable, seat belt is the go-to, but for unique vehicles like vans, boosters or adapters might help.
| Solution | Pros | Cons | Best For |
|---|---|---|---|
| LATCH System | Quick setup, rigid stability, less belt twisting | Limited to vehicles with anchors; weight cap (35 lbs) | Most modern sedans/SUVs with babies under 1 year |
| Seat Belt Method | Universal compatibility, no anchors needed | Slightly more effort to tighten; potential for twists | Older vehicles or center seats without LATCH |
| Base-Free Carrier Install | Portable for short trips, no heavy base | Less stable long-term; harder to level | Airplanes or taxis (FAA-approved Graco models only) |
| Professional In-Vehicle Kit (e.g., Graco adapters) | Custom fit for non-standard cars | Added cost ($20-50); requires purchase | Imported or modified vehicles |
Weigh these based on your needs—LATCH remains the safest primary choice per IIHS recommendations.
Safely Transport Your Baby with Your Graco Seat
You’ve now mastered the ins and outs of installing a Graco infant car seat, from tools and prep to testing and tweaks:
- Essential materials and safety checks for a strong start
- Detailed LATCH and seat belt methods with phased steps
- Troubleshooting and pro tips for long-term reliability
- Resources for pros and alternatives when needed
Following this guide ensures your setup meets or exceeds safety standards, protecting your precious cargo on every journey. Take action today: Gather your tools, install in a quiet spot, and test drive confidently. You’re equipped to handle it!
Have you installed your Graco infant car seat successfully? Share your tips or challenges in the comments below—we’d love to hear and help others! If issues linger, describe your vehicle for tailored advice. Drive safe.


