
Installing an infant car seat base might seem daunting, especially if you’re a new parent juggling exhaustion and excitement. You want to ensure your little one’s safety on every ride, but confusing instructions or a wobbly base can leave you frustrated and second-guessing. The good news? With the right steps, you can install the base of your infant car seat securely in under 30 minutes, using either the LATCH system or your vehicle’s seat belt for rock-solid stability.
In this comprehensive guide, we’ll go beyond the basics to cover everything from gathering tools to troubleshooting common issues. You’ll learn preparation tips, detailed step-by-step instructions for both installation methods, and post-install testing to confirm everything’s secure. By the end, you’ll feel confident that your infant car seat base is installed correctly, giving you peace of mind for safe travels. Plus, we’ll include pro tips, FAQs, and when to seek professional help to make this a foolproof process.
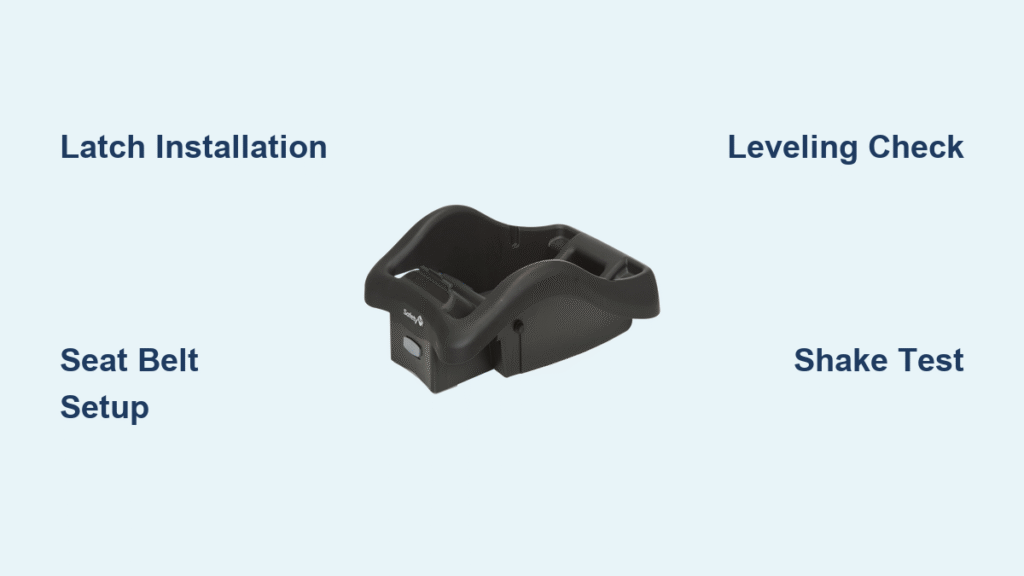
What You’ll Need for Infant Car Seat Base Installation
Before diving in, gather the right materials and tools to make the installation smooth and efficient. Every infant car seat base comes with its own hardware, but you’ll also need a few universal items. Always refer to your car seat manufacturer’s manual (like Graco, Chicco, or Evenflo) and your vehicle’s owner manual for model-specific details—these are non-negotiable for safety.
Here’s a quick checklist in table form:
| Item | Quantity | Specifications |
|---|---|---|
| Infant car seat base | 1 | Compatible with your car seat model; includes LATCH connectors and seat belt guides |
| Vehicle seat belt (if not using LATCH) | N/A | Lap belt only; ensure it’s not extended or locked |
| LATCH anchors (if applicable) | 2 | Built into most vehicles post-2002; lower anchors in seat crease |
| Tether anchor (rear-facing) | 1 | Top tether for added stability; vehicle-specific location |
| Wrench or screwdriver | 1 | For tightening LATCH straps if needed; ratcheting type for torque |
| Seat belt extender (optional) | 1 | If your belt is too short; only use if recommended by manufacturer |
| Leveling tool or app | 1 | Smartphone app like Car Seat Check or built-in bubble level on base |
| Towel or blanket | 1 | For leveling uneven vehicle seats |
Important: Check for recalls on your car seat base via the NHTSA website (nhtsa.gov) before starting. A faulty base could compromise safety, so don’t skip this.
Preparing Your Vehicle and Safety Considerations
Proper preparation is key to a secure infant car seat base installation—rushing this step can lead to errors that affect crash protection. Start by choosing the right spot: the rear-facing position in the back seat, preferably behind the passenger seat for easy access. Avoid front seats with airbags, as they pose a deployment risk to infants.
Safety First: Key Considerations
- Read Manuals Thoroughly: Your car seat base manual outlines weight limits (typically up to 35-50 lbs for the child) and vehicle compatibility. Cross-reference with your car’s manual to confirm LATCH usage—some vehicles limit it to 65 lbs combined child/base weight.
- Vehicle Conditions: Park on a flat surface with the engine off and parking brake engaged. Remove any clutter from the seat area to avoid interference.
- Personal Prep: Wash your hands to keep the base clean. If you’re installing in extreme weather, wait until conditions are moderate—cold can make straps stiff, heat can warp plastic.
- Warning: Never install a base without the car seat attached first for testing. Rear-facing seats must recline at a 30-45 degree angle to prevent head flop in a crash.
Preparation Steps
- Inspect your vehicle seats for damage or wear—faded belts or broken anchors mean a mechanic visit first.
- Adjust the front seats forward to create space and improve the rear seat angle.
- Clean the seat area with a mild soap solution to remove debris that could cause slippage.
- If your vehicle has side curtain airbags, ensure the base won’t interfere—consult your manual.
These steps take about 10 minutes and set you up for success. Remember, a properly prepared installation can reduce injury risk by up to 70%, per NHTSA studies.
Step-by-Step Infant Car Seat Base Installation Process
Now for the core: installing the base. We’ll break this into phases for clarity, covering the two primary methods—LATCH (preferred for vehicles with anchors) and seat belt. LATCH is faster and more secure for most modern cars, but seat belt works well if LATCH isn’t available or exceeds weight limits. Time estimate: 15-20 minutes per method.
Phase 1: Positioning the Base
Positioning ensures the base sits flat and level, which is crucial for the car seat’s recline.
- Place the base on the vehicle seat, centered in the chosen position. The base’s LATCH bars or belt path should align with the seat crease.
- Push down firmly on the base to seat it against the vehicle cushion. Use your body weight if needed—don’t just use your hands.
- Check the level indicator on the base (a bubble or line). Adjust by placing a rolled towel under the front or back edge until it’s between 30-45 degrees. For rear-facing, the angle prevents the child’s head from falling forward.
- Troubleshooting Tip: If the seat is too sloped, try a different vehicle position or add padding only where the manual allows—excess can void warranties.
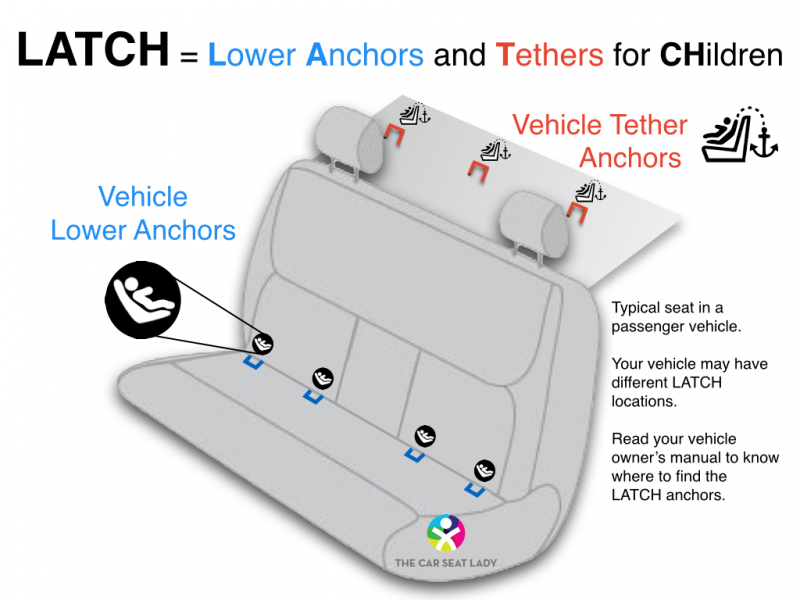
Phase 2: LATCH Installation Method
LATCH uses built-in lower anchors and a top tether for maximum stability. This method is ideal for infants under 1 year.
- Locate the LATCH anchors in your vehicle: They’re metal bars in the seat bight (crease). Flip up any covers.
- Attach the base’s LATCH connectors (rigid or flexible straps) to the anchors. Push until you hear a click—give a tug to confirm.
- Tighten the LATCH straps: Pull the free end firmly while pressing down on the base with your knee. Aim for no more than 1 inch of movement at the belt path.
- Install the top tether: Find the tether anchor point (often in the trunk or seatback). Route the tether through the base’s path, hook it, and tighten until snug. No slack allowed.
- Safety Check: Shake the base side-to-side and front-to-back. It shouldn’t move more than 1 inch. If it does, loosen and retry.
Warning: LATCH isn’t for every seat—switch to seat belt if your child + seat exceeds 65 lbs total.
Phase 3: Seat Belt Installation Method
Use this if LATCH isn’t compatible or for center seats without anchors. It’s reliable but requires more tension.
- Thread the lap belt through the base’s belt guides (usually blue slots). Skip the shoulder belt—lap only for rear-facing.
- Buckle the belt. If your vehicle has automatic locking retractors (ALR), pull the belt all the way out to activate the lock mode.
- Tighten: Press down on the base with your full body weight while pulling the belt tight. Lock the retractor by letting it retract slowly.
- For vehicles without ALR, use the lock-off clip on the base (if provided) to secure the belt.
- Safety Check: Perform the same shake test as LATCH. The base should feel immovable. If loose, unbuckle and repeat tightening.
Phase 4: Attaching and Securing the Infant Car Seat
Once the base is installed:
- Align the car seat’s tabs with the base’s slots and snap it in—listen for the click.
- Tug upward and forward to ensure it’s locked. Adjust the recline if needed using the base’s leveler.
- Route the top tether from the seat (if not already) and tighten.
This phase adds 5 minutes but confirms the full system’s integrity.
Post-Installation Testing and Troubleshooting

After installation, testing is essential to verify safety—don’t skip it, as even small errors can be critical.
Basic Testing
- Shake the entire setup vigorously. Less than 1 inch of movement means success.
- Use a level tool to double-check the angle. Apps like “Bubble Level” on your phone work great.
- Simulate a drive: Buckle up, drive slowly around the block, and listen for rattles.
Common Troubleshooting
- Base is Loose: Retighten straps or try the other method. Check for vehicle seat wear.
- Won’t Click into Place: Ensure connectors are fully inserted; clean any debris.
- Angle Off: Reposition the towel or switch seats—some vehicles have uneven cushions.
- Belt Won’t Lock: Consult your vehicle manual for ALR activation; use an extender if too short.
- If issues persist, remove and reinstall from Phase 1.
Pro Tip: Re-test after every ride or if you move the base. NHTSA recommends annual checks or after accidents.
Pro Tips for Secure Infant Car Seat Base Installation
To elevate your installation from good to expert-level, consider these 5-7 insights:
- Choose the Right Position: Install behind the passenger for quick access, but center rear is safest if LATCH-equipped—reduces side-impact risk by 25%.
- Avoid Common Mistakes: Don’t twist straps or use aftermarket add-ons without approval; they can interfere with crash forces. Also, never place on a seat with a deactivated airbag unless specified.
- Optimize for Your Vehicle: SUVs may need extra leveling due to higher seats. Test fit in all cars you’ll use.
- Maintenance Routine: Inspect straps monthly for frays and clean with mild soap—avoid bleach.
- Tech Helpers: Use the “Car Seat Lady” website for vehicle-specific advice or apps like UP & Away for angle checks.
- Winter Prep: In cold weather, warm straps in your hands before tightening to prevent snapping.
- Upgrade Smartly: If switching bases, opt for anti-rebound models for extra stability.
These tips can save time and boost confidence—many parents overlook them but swear by the difference.
When to Seek Professional Help
While DIY installation is straightforward, some situations call for experts. Certified Child Passenger Safety Technicians (CPSTs) can inspect for free or low cost at fire stations or hospitals.
Signs You Need Help
- Persistent wobble after multiple tries.
- Vehicle modifications (e.g., aftermarket seats) that alter anchor points.
- Uncertainty with older vehicles lacking clear LATCH labels.
- Post-accident reinstallation—always get it checked.
Finding a Provider
Look for CPSTs via safekids.org or NHTSA’s locator. Verify certifications and read reviews. Expect 30-60 minutes for a session.
Costs and Warranty Notes
Inspections are often free, but paid services run $20-50. Keep your receipt—improper install could void the car seat’s 1-2 year warranty. If under warranty, contact the manufacturer first.
FAQ
Q: How long does it take to install an infant car seat base?
A: Most installations take 15-30 minutes once prepared. First-timers might need 45 minutes, but practice speeds it up. Always prioritize accuracy over speed for safety.
Q: Can I install the base without LATCH?
A: Yes, using the seat belt method is fully safe and approved by NHTSA if done correctly. It’s often required for heavier kids or center positions without anchors.
Q: What’s the difference between LATCH and seat belt installation?
A: LATCH uses vehicle anchors for quicker, more consistent tension, ideal for lighter setups. Seat belts rely on your vehicle’s system, which may need more muscle but works in all cars. Both are equally effective when tight.
Q: Do I need to remove the base when not using the car seat?
A: No, leave it installed for convenience—just ensure it’s secure. If switching vehicles, reinstall fresh each time.
Q: How do I know if my installation is correct?
A: Pass the 1-inch shake test, level check, and manual’s visual indicators. For extra assurance, get a free CPST inspection.
Q: Can I install the base in the front seat?
A: Never for rear-facing infant seats due to airbag risks. Always use the back seat.
Q: What if my car seat base is damaged?
A: Replace it immediately—cracks or worn straps reduce protection. Check for recalls and buy from reputable sources.
Q: Is there a weight limit for the base itself?
A: Bases support the car seat’s limits (e.g., 4-35 lbs child), but LATCH caps at 65 lbs total. Always verify per manual.
Alternative Installation Solutions
If the standard base install doesn’t fit your needs (e.g., no LATCH or unique vehicle), consider these options. Always prioritize manufacturer-approved methods.
| Solution | Pros | Cons | Best For |
|---|---|---|---|
| Integrated Vehicle Seats | Built-in anchors; no separate base needed | Limited to specific car models; less portable | Long-term family vehicles like minivans |
| Lock-Off Clips or Tighteners | Easier belt tensioning; reduces effort | Adds cost ($10-20); not universal | Vehicles without ALR; budget setups |
| Professional On-the-Go Services | Expert verification; mobile techs | Fees ($50+); scheduling required | Busy parents or frequent travelers |
| Universal Base Adapters | Fits multiple seats; versatile | May void warranties; compatibility checks needed | Multi-car households |
Compare based on your setup—LATCH remains the gold standard for most.
Safely Transport Your Baby with Confidence
You’ve now mastered how to install the base of your infant car seat, from tools and prep to testing and alternatives:
– Essential materials for a hassle-free start
– Step-by-step LATCH and seat belt methods
– Pro tips and troubleshooting for perfection
– When and how to get professional backup
Following this guide ensures your installation meets safety standards, potentially saving lives in an accident. Take action today: Gather your manual, install in a safe spot, and test thoroughly. Your baby deserves the best protection— you’ve got this.
Have you installed your infant car seat base successfully? Share your tips or challenges in the comments to help other parents! If issues linger, describe them below for community advice.


