Your car battery dies on a freezing morning, the engine only clicks, and you’re stranded in a remote parking lot. Instead of waiting hours for roadside assistance, your Craftsman jump starter can deliver life-saving power in minutes. These compact devices pack enough cranking amps to revive dead batteries without another vehicle – but only if you use them correctly. One wrong connection could damage your vehicle’s electronics or create dangerous sparks. This guide cuts through confusion with exact steps for every Craftsman model, verified safety protocols, and troubleshooting fixes that actually work. You’ll learn how to jump-start confidently whether you own the powerful CMXCESM259 or portable V20 series.
Identify Your Craftsman Model Before Connecting

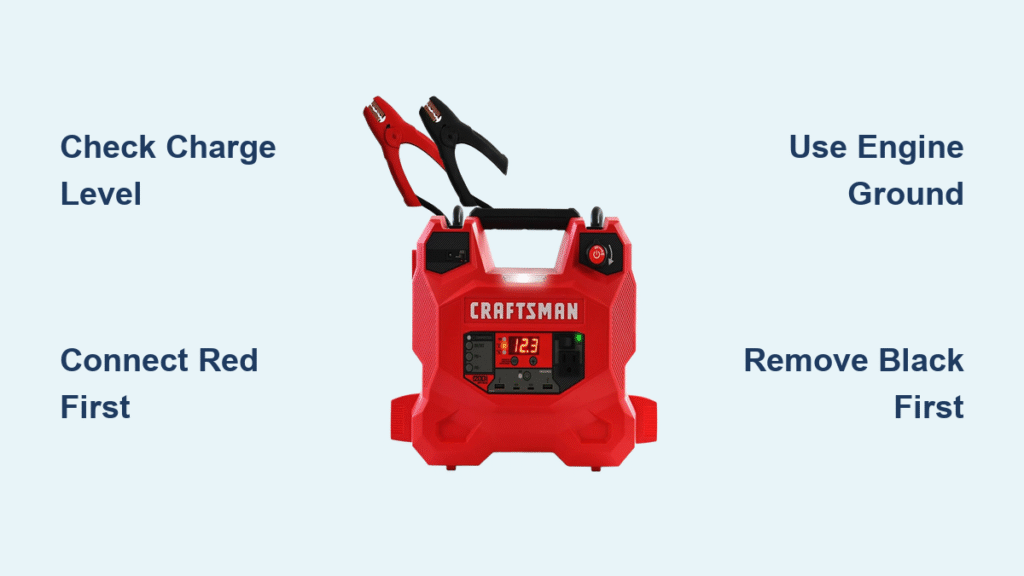
Locate Critical Model Number
Find the white identification sticker on your unit’s bottom or rear panel immediately. Models like CMXCESM259, CMCB7001, and V20 variants have unique power outputs and safety features. Ignoring this step risks using incorrect procedures – the CMXCESM259 requires manual boost activation while V20 models auto-detect low voltage. Check your specific model number before touching any clamps.
Confirm Engine Compatibility Limits
Your Craftsman unit won’t work if mismatched to your engine size. Gasoline engines require models rated for up to 8.0L displacement, while diesel engines need units supporting 6.0L maximum. Verify your vehicle’s engine size in the owner’s manual – exceeding these limits prevents successful jumps and strains the device. The specification label on your jump starter clearly states its engine compatibility range; never assume it fits larger vehicles.
Essential Safety Steps That Prevent Catastrophes
Mandatory Personal Protection Gear
Always wear safety glasses and remove all metal jewelry before starting. Vehicle batteries contain sulfuric acid that can cause severe chemical burns during jump attempts. Keep a dry microfiber cloth within reach to immediately wipe any accidental spills. Skipping eye protection risks permanent vision damage from unexpected sparks or battery acid spray.
Critical Environmental Checks
Never attempt jump-starts in rain, snow, or damp conditions – moisture creates deadly conductivity paths. Work only in well-ventilated areas away from open flames or sparks, as batteries emit explosive hydrogen gas. Position the jump starter at least 18 inches from the battery to prevent accidental short circuits. If you smell rotten eggs (sulfur), stop immediately – this indicates dangerous gas buildup.
Battery Damage Inspection Protocol
Before connecting, inspect your vehicle battery for cracks, leaks, or swelling. Damaged batteries can explode when jump-started. If you see any of these warning signs, do not proceed – replace the battery instead. Also check for excessive corrosion; clean terminals thoroughly with a wire brush to ensure solid connections. Ignoring visible damage risks acid leaks or thermal runaway.
Device Component Overview for Confident Operation
Decode Front Panel Features
The main housing contains critical elements: LED charge indicators, USB ports for device charging, and the boost button (if applicable). Red and black clamps attach to coiled cables – grip these by insulated handles only. Most models include a bright work light at the top for nighttime emergencies. Familiarize yourself with these components during daylight to avoid fumbling in real crises.
Interpret LED Indicator Meanings Correctly
Your jump starter communicates status through light patterns: Four blue LEDs show 25% charge increments (all lit = 100%). A solid green light confirms safe connection and readiness. Flashing red indicates reverse polarity – immediately disconnect and swap clamps. Ignoring red flashes risks permanent damage to your vehicle’s computer systems. Refer to your model’s manual for specific blink codes.
Verify Accessory Kit Completeness
Before first use, confirm your package includes: wall charger, 12V car adapter, and carrying case. Higher-end models add air compressor hoses and inflator needles. Missing accessories compromise functionality – without the wall charger, you can’t recharge the unit after use. Store all components together in the case for instant access during emergencies.
Pre-Jump Battery Assessment Checklist
Check Internal Charge Level First
Press the power button once to activate the LED indicators. Never attempt a jump with fewer than two lit LEDs (below 50% charge). The CMXCESM259 requires all four LEDs for optimal performance on larger engines. If charge is low, connect the wall charger to the micro-USB port – LEDs will flash sequentially during charging. Full recharge takes 4-6 hours.
Recharge Immediately After Use
Post-jump, recharge within 24 hours to maintain battery health. Repeated deep discharges shorten lifespan. Plug into AC power using the included wall adapter – avoid car chargers for primary recharging as they’re slower. All four LEDs will glow solid when fully charged. Never leave charging unattended for over 24 hours to prevent overcharging risks.
Vehicle Preparation Steps That Ensure Success
Critical Pre-Connection Setup
Engage the parking brake and shift to Park (automatic) or Neutral with parking brake (manual). Turn off ignition and remove the key. Disable all accessories – lights, radio, phone chargers – to reduce electrical load. This step is non-negotiable; active systems drain power needed for cranking. Open the hood and locate the battery – some vehicles hide it in trunks or under seats.
Terminal Cleaning for Maximum Power Transfer
Use a wire brush to scrub corrosion from battery terminals until metal shines. Wipe away debris with a dry cloth – moisture causes poor connections. Check vehicle battery cables for cracks or looseness; replace damaged cables before jumping. Clean terminals allow full power transfer, preventing frustrating weak-crank scenarios.
Connection Sequence to Avoid Dangerous Sparks

Correct Clamp Attachment Order
Connect red clamp to positive (+) battery terminal FIRST – the clamp must bite firmly on clean metal. Then attach black clamp to a bare metal engine ground point like an unpainted bolt on the engine block. Never connect black directly to the negative battery terminal – this risks sparks near explosive hydrogen gas. The ground point must be at least 12 inches from the battery.
Identify Safe Ground Points
Look for unpainted metal brackets on the engine block or chassis – avoid plastic-coated or painted surfaces. Good ground points include suspension bolts or alternator brackets. Test connection by wiggling the clamp; if it slips, find another spot. Proper grounding prevents voltage drop that causes failed jump attempts.
Jump-Start Execution Process That Works
Activate Boost Mode Properly
For CMXCESM259 models, press and hold the boost button for 3 seconds until “READY” displays. V20 series often auto-activates when detecting low voltage. Never crank for more than 5 seconds – prolonged attempts overheat the starter motor. Wait 30 seconds between tries to allow cooling. Most engines start within 2-3 attempts if connections are solid.
Monitor Critical Feedback During Cranking
Watch the jump starter display as you turn the key: Voltage below 9.0V triggers automatic shutdown to protect electronics. If the engine sputters but won’t catch, check for loose clamps – vibration during cranking often breaks connections. Stop after 5 failed attempts; repeated tries drain the jump starter below safe operating levels.
Post-Start Disconnection Safety Protocol
Reverse Removal Order Prevents Damage
Remove black clamp from engine ground FIRST, then red clamp from positive terminal. This sequence prevents sparks near the battery. Immediately stow clamps in designated slots on the jump starter housing – never let metal ends touch each other. Coil cables loosely without kinks to avoid internal wire damage.
Immediate Post-Jump Actions
Recharge the jump starter within 24 hours. Drive your vehicle for at least 20 minutes to fully recharge the car battery. If the engine stalls again, your alternator may be failing – visit a mechanic immediately. Store the jump starter at 50-80% charge in a cool, dry place away from extreme temperatures.
Troubleshooting Common Failure Scenarios

No Lights When Power Button Pressed
This indicates critically low internal charge. Recharge immediately using the wall adapter – car chargers won’t revive dead units. If LEDs still don’t illuminate after 30 minutes charging, test the wall adapter on another device. Persistent failure means the internal battery needs replacement.
Reverse Polarity Warning Fix
Flashing red LED with beeping means clamps are reversed. Disconnect immediately – do not attempt to start. Swap clamp positions: red to positive terminal, black to engine ground. Reconnect slowly while watching for sparks; if beeping continues, clean terminals and retry. Never ignore this warning.
Weak Cranking Power Solutions
Ensure clamps bite bare metal – corrosion is the #1 cause of weak cranks. Clean terminals with a baking soda/water solution. Check vehicle battery cables for fraying; replace if damaged. If problems persist after 3 years of use, the jump starter’s internal battery may need replacement.
Maintenance for 5+ Years of Reliability
Monthly Inspection Routine
Check cables for cuts or exposed wires – replace if damaged. Test charge level monthly; recharge if below 50%. Every 3 months, perform a full discharge/recharge cycle to calibrate the battery. Store at 50-80% charge in temperatures between 50-80°F – avoid car trunks in summer.
Emergency Readiness Test
Every 6 months, simulate an emergency jump: Connect to a partially discharged car battery (not fully dead) and attempt starting. Successful cranking confirms readiness. If the engine turns weakly, service the jump starter immediately. A failed test means it won’t work when you need it most.
Quick Reference Emergency Steps
1. Verify 4 blue LEDs showing full charge
2. Attach RED clamp to POSITIVE battery terminal
3. Connect BLACK clamp to ENGINE GROUND (not battery)
4. Crank 5 seconds MAX, wait 30 seconds between tries
5. Remove BLACK clamp FIRST after starting
Critical Warning Signs
– Swollen battery → Do not jump, replace immediately
– Smoking cables → Disconnect instantly, replace unit
– Extreme heat from jump starter → Stop use, allow cooling
– Burning smell → Turn off all power, ventilate area
Keep your Craftsman jump starter charged and accessible in your vehicle year-round. Practice the connection sequence in daylight to build muscle memory for real emergencies. These procedures work for all Craftsman models when followed precisely – your confidence comes from knowing exactly what to do when stranded. Master these steps once, and you’ll never pay for roadside assistance again.