
That frustrating click when your seat belt won’t retract after buckling up isn’t just annoying—it’s a critical safety failure waiting to happen. When frayed webbing, jammed retractors, or post-collision damage compromise your primary safety system, knowing how to change car seat belt components becomes essential knowledge. Modern seat belts contain explosive pretensioners and sensitive locking mechanisms that degrade after impacts or years of use. This guide cuts through the complexity, giving you actionable steps to replace damaged seat belts safely while avoiding costly dealership fees. You’ll learn exactly when replacement is non-negotiable, the true cost differences between DIY and professional services, and vehicle-specific techniques that prevent dangerous installation errors.
Critical Safety Scenarios Demanding Seat Belt Replacement
Why Post-Crash Replacement Is Non-Negotiable
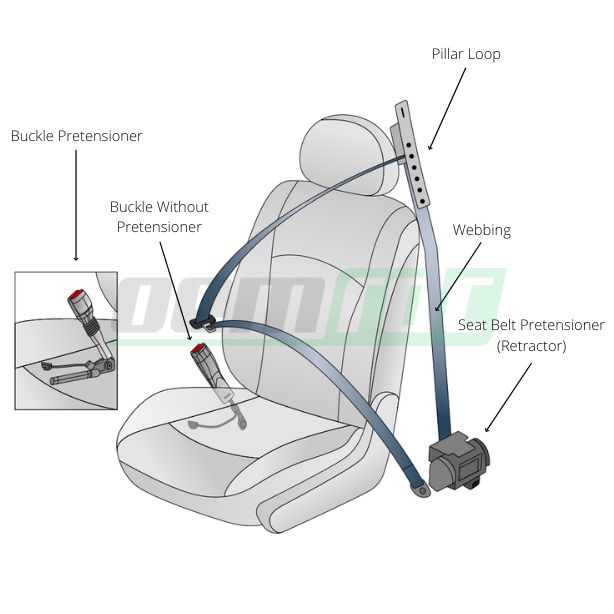
Your seat belt’s pretensioner—a pyrotechnic device that locks the belt during collisions—sustains microscopic stress fractures even in minor fender benders. Never skip replacement after any impact, no matter how small the visible damage appears. These hidden failures cause catastrophic belt retraction failure during subsequent crashes. Insurance typically covers full replacement costs, making professional refusal financially irresponsible. If your vehicle’s airbag warning light illuminates post-accident, treat this as an emergency signal that your seat belt system requires immediate attention before driving again.
Recognizing Dangerous Webbing Damage
Weekly visual inspections prevent life-threatening failures. Stop using your seat belt immediately if you spot any of these critical warning signs:
– Frayed edges where the belt rubs against door frames or trim
– Exposed inner threads indicating structural compromise
– Burn holes from cigarettes or hot objects weakening fibers
– Stiff sections that won’t flex smoothly through guides
Diagnosing Mechanical Failures
Test your seat belt’s functionality monthly by performing these checks:
– Sudden-jerk test: Yank the belt sharply—it must lock instantly
– Retraction test: Pull fully extended belt should rewind smoothly
– Buckle test: Insert latch with audible click, then verify release button functions
– Height adjuster test: If equipped, move shoulder anchor through full range without sticking
Cost-Saving Replacement Strategies Compared

Professional Webbing Restoration Services
Instead of replacing entire assemblies, specialized services like SafetyRestore.com ($75) rebuild your original unit using new webbing while preserving functional retractors and pretensioners. This approach delivers 90% savings compared to $500+ dealership quotes while maintaining OEM safety standards. Mail-in services require 3-5 business days turnaround—perfect for non-critical repairs. Always verify the provider uses automotive-grade nylon webbing meeting FMVSS 209 standards, as inferior materials stretch dangerously during impacts.
Salvage Yard Seat Belt Sourcing
Used seat belts from junkyards cost under $20 but require careful vetting. Focus on low-mileage donor vehicles with no front-end damage history. Before purchasing:
1. Test retractor operation by pulling the belt rapidly
2. Verify buckle latches with solid resistance
3. Inspect webbing for UV fading (indicates sun damage)
4. Confirm identical mounting points to your vehicle
Many GM, Ford, and Toyota models share seat belt systems across 5+ year ranges—check compatibility charts before removal.
DIY Complete Assembly Replacement
New OEM assemblies ($50-$200) include all components but require precise installation. Calculate your true cost by adding:
– $35 torque wrench (if not owned)
– $20 specialty sockets (Torx T50 common)
– 2-3 hours labor time
The satisfaction of installing a life-saving system correctly outweighs minor cost differences for most enthusiasts. Always order parts using your VIN to guarantee color matching and mounting configuration.
Essential Tools for Flawless Seat Belt Replacement

Must-Have Core Toolkit
Skip metal screwdrivers that scratch dashboards—plastic trim tools prevent $200+ interior repairs. Your non-negotiable toolkit includes:
– Wide-bladed plastic pry bars (for clip retention points)
– 10-17mm socket set with universal joint
– Digital torque wrench (critical for 25-35 lb/ft specs)
– Magnetic parts tray (to track tiny fasteners)
– Work light with magnet base (for dark pillar areas)
Vehicle-Specific Specialty Tools
European cars often require triple-square sockets (XZN pattern), while Japanese models frequently use Torx T45-T50 bolts on pretensioners. Check forums for your specific make/model before starting—using improper tools strips bolt heads, creating expensive complications. Rent specialty sockets from auto parts stores if needed rather than risking damage.
Non-Negotiable Safety Preparations Before Starting
Airbag System Disabling Protocol
One misstep here risks accidental airbag deployment causing severe injury. Follow this sequence exactly:
1. Park on level ground with parking brake engaged
2. Disconnect negative battery terminal using 10mm socket
3. Wait 15 minutes for airbag capacitors to fully discharge
4. Test by turning ignition on—no warning lights should illuminate
Never skip the waiting period; residual power can trigger pretensioners during retractor work.
Workspace Optimization Tactics
Maximize efficiency with these pro tips:
– Slide seats fully rearward to access lower anchor bolts
– Place towels over seats to prevent tool scratches
– Take sequential photos with your phone during disassembly
– Label fasteners in zip bags with masking tape tags
– Cover floor with drop cloth to catch metal shavings
Front Seat Belt Replacement: Step-by-Step Execution
Pillar Trim Removal Without Damage
Start at the B-pillar base where the seat belt anchors. Gently pry the lower plastic cover using two trim tools to locate hidden clips—most panels release upward. For upper sections, insert tools at seam intersections and twist slowly to avoid breaking plastic retainers. If encountering resistance, reposition tools rather than forcing; many panels have hidden screws behind rubber plugs.
Bolt Removal Sequence That Prevents Errors
Follow this critical order to avoid component damage:
1. Lower buckle bolt: 15mm socket near seat track (slide seat forward)
2. Shoulder guide bolt: Torx T50 behind pillar trim (note spacer washers)
3. Retractor bolts: 17mm upper/lower mounting points (unplug electrical connector first)
Pro tip: Support retractor weight while removing final bolt turn to prevent dropping into pillar cavity.
Webbing Routing: Avoiding Costly Twists
Twisted webbing causes 80% of retraction failures post-installation. Before tightening bolts:
– Lay belt flat on seat to verify no spirals
– Feed through all guides in original path order
– Pull firmly to tension webbing before final torque
– Verify smooth retraction 3x before reassembling trim
Rear Seat Belt Replacement Simplified
Cushion Removal Technique for Sedans
Push the rear seat cushion backward toward the trunk while lifting upward—this releases spring hooks. For wagons/SUVs, check if shoulder belts route through headliner channels requiring panel removal. Always support the cushion weight to avoid damaging seat frame brackets during reinstallation.
Triple-Verification Before Final Assembly
After mounting new belt:
1. Test operation from both outboard seating positions
2. Verify center belt doesn’t interfere with outboard anchors
3. Confirm no webbing rubs against seat frame edges
Critical: Reinstall cushion by aligning front hooks first before pressing down rear section.
1999 Pontiac Sunfire Driver’s Side: Real-World Application
GM-Specific Removal Shortcuts
This common GM platform requires these model-specific steps:
1. Remove driver seat (4x 15mm bolts) by sliding fully rearward
2. Extract plastic sleeve plug from B-pillar with flathead tool
3. Pull carpet retainer pins straight up using pliers (they snap if yanked sideways)
4. Release upper trim panel by prying at bottom edge first
GM vehicles often have rust-prone mounting points—spray bolts with penetrating oil 10 minutes before removal.
Torque Specifications That Prevent Failures
Never guess torque values—these Sunfire-specific specs are safety-critical:
– Seat side bolt: 47 N.m (35 lb/ft)
– B-pillar bolts: 38 N.m (28 lb/ft)
– Retractor bolts: 40 N.m (30 lb/ft)
Under-torquing causes rattles and stress fractures; over-torquing cracks mounting brackets.
Mandatory Post-Installation Safety Verification
5-Point Functionality Checklist
Before driving, perform these life-saving tests:
1. Slow-pull test: Belt retracts smoothly without jerking
2. Emergency lock test: Sharp yank locks belt within 2 inches of movement
3. Buckle release test: Press button with one finger—should disengage easily
4. Webbing path inspection: No visible twists from buckle to retractor
5. Warning light test: Illuminates for 6 seconds after ignition on
Visual Inspection Red Flags
Reject your installation if you see:
– Webbing pinching at guide openings
– Misaligned trim panels creating gaps
– Exposed mounting hardware through fabric
– Stiff retraction requiring manual assistance
– Electrical connector gaps near pretensioner
Troubleshooting Common Installation Problems
Fixing Trim Panel Gaps and Squeaks
Most gaps occur from missed retainers—recheck by pressing panel edges while listening for click sounds. For persistent squeaks, apply silicone lubricant to clip stems before reinsertion. Never force panels; broken clips require replacement from dealer parts departments.
Avoiding the #1 Installation Mistake
Twisted webbing causes immediate retraction failure. Fix it by:
1. Loosening all mounting bolts
2. Fully extending belt to identify twist location
3. Rotating retractor until webbing lies flat
4. Retesting retraction before final torque
This 2-minute check prevents hours of disassembly later.
Final Safety Imperatives
Replacing your seat belt isn’t a convenience—it’s a non-negotiable safety requirement when damage appears. Whether you choose professional webbing restoration, salvage yard parts, or full DIY replacement, never compromise on torque specifications or pretensioner safety protocols. A properly installed seat belt reduces fatality risk by 45% in frontal crashes according to NHTSA data. Before trusting your life to a new belt, perform the emergency lock test 10 times minimum. If you encounter stripped bolts or persistent airbag warnings, stop immediately and consult a certified technician—your safety isn’t worth risking for $50 in tool costs. Remember: that 30-minute repair could be the difference between walking away from a crash and becoming a statistic. Test every component thoroughly, and drive with confidence knowing your life-saving system works flawlessly.


