
That coffee spill from your morning commute has become a permanent passenger. Your child’s juice box explosion last Tuesday left a sticky map of your road trip. The dog’s muddy paw prints chronicle every park adventure. If you’re searching for how to clean car seat upholstery effectively, you’re not alone—87% of drivers face stubborn interior stains that seem impossible to remove. But expensive professional detailing isn’t your only option. With the right techniques, you can restore your seats to showroom condition using tools already in your garage or pantry.
This practical guide delivers proven car seat upholstery cleaning methods for every material—fabric, leather, and vinyl—using affordable household items and targeted products. You’ll discover exactly which solutions work (and which ruin your seats), plus critical mistakes to avoid that could cost hundreds in repairs. Most importantly, you’ll learn time-saving techniques that cut cleaning time by 70% while preventing mold, odors, and permanent damage.
Identify Your Seat Material Before Cleaning
Check Seat Labels and Manual First
Your vehicle’s owner manual holds crucial cleaning instructions in the interior specifications section, usually near the back. If you’ve misplaced it, inspect the sides and undersides of seats for hidden fabric tags revealing material composition. These often hide under seat bottoms or along backrest seams. Fabric seats feel textured and absorb liquids immediately—press a damp cloth to confirm quick absorption. Leather offers a smooth, supple surface with visible natural grain patterns and a slight coolness to the touch. Vinyl mimics leather but feels distinctly plastic-like and resists liquid absorption, causing droplets to bead up initially.
Test Cleaners in Hidden Spots
Never skip this critical step: Apply your chosen solution to a hidden area like behind the headrest or under the seat cushion. Wait 15 minutes to check for color fading, texture changes, or material damage. This simple precaution prevents permanent discoloration—especially vital for leather and delicate fabrics. If you notice any adverse reaction, select a gentler alternative before proceeding. Remember, manufacturer-approved cleaning methods always trump generic household hacks.
Deep Vacuum Before Any Liquid Application

Remove All Debris Systematically
Clear floor mats, child seats, and loose items first. You’ll be shocked by what accumulates under seats—forgotten fries, pens, and even missing jewelry. Use your hands for large debris, then switch to a high-powered vacuum. Focus on seams, crevices, and seat tracks where dirt hides. Work methodically from top to bottom and left to right to avoid missing spots.
Master Vacuum Techniques for Each Material
Start with a crevice tool for tight spaces between seats and along tracks. For fabric seats, use a brush attachment with gentle, consistent strokes in one direction—never scrubbing back and forth, which grinds dirt deeper. Leather seats require a soft brush attachment to avoid scratches. Pro tip: Vacuum twice—your first pass lifts surface debris, while the second captures particles loosened by initial cleaning. This prevents redepositing dirt during liquid cleaning.
Fabric Seat Cleaning Methods That Actually Work
DIY Solutions for Everyday Stains
Create a dish soap solution with one teaspoon of mild dish soap (no bleach or degreasers) per two cups warm water for general cleaning. For odors, mix one cup white vinegar, a squirt of dish soap, and one gallon hot water—the vinegar neutralizes smells without harsh chemicals. Grease stains need a baking soda paste (two parts baking soda to one part water) applied directly, left for 15 minutes, then vacuumed before full cleaning.
Hand Cleaning Without Damage
Work in 2×2 foot sections to prevent oversaturation. Apply solution with a soft-bristled brush using cross-hatch motions—up, down, left, right—to lift dirt from all fabric angles. Maintain light pressure; heavy scrubbing damages fibers. Wipe residue with a clean microfiber towel (yellow shows dirt best), checking for transfer. Repeat until the towel stays clean. Critical: Never soak fabric—excess moisture causes mold and musty odors.
Power Cleaning for Embedded Grime
For heavily soiled seats, attach a gray light-duty brush to a drill for delicate fabrics or yellow medium-duty for standard cleaning. Set to low speed and work in small cross-hatch sections—two to four passes typically remove deep-set dirt. Immediately wipe with a microfiber towel to assess progress. This method cuts cleaning time dramatically compared to hand scrubbing. For professional results, use a dual-action polisher with upholstery attachment at speed setting 3.
Leather Seat Care That Prevents Cracking
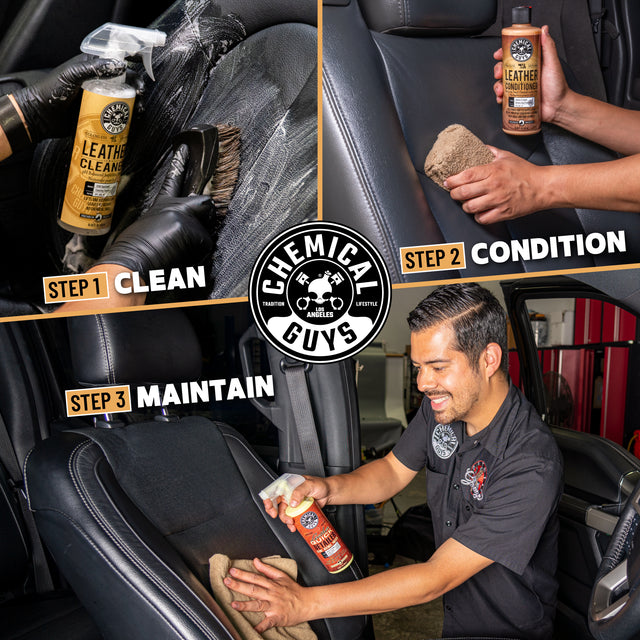
Daily Maintenance Routine
Leather needs gentle care to avoid drying and cracking. Vacuum first with a soft brush attachment. Mix pH-neutral soap (never dish soap) with warm water, then wipe gently following the leather’s natural grain. Dry immediately with a clean microfiber cloth—water spots cause permanent damage. This weekly ritual prevents dirt buildup that leads to costly repairs.
Deep Cleaning Without Stripping Oils
Test any leather cleaner on a hidden spot first. Apply per manufacturer directions in small sections. For grease stains, use leather degreaser sparingly—overuse strips natural oils. Non-negotiable step: Always condition leather after cleaning. Conditioner replaces lost oils and prevents cracking, especially in dry climates. Apply every 3-6 months based on usage and sun exposure.
Vinyl Seat Restoration Without Damage
Safe Cleaning and Disinfection
Vinyl tolerates more aggressive cleaning than leather but still requires care. Mix warm water with a few drops of dish soap. Wipe with a damp microfiber cloth, using a soft brush for textured areas. Rinse with a clean damp cloth to remove soap residue, then dry thoroughly to prevent water spots. For disinfection, use a 1:4 white vinegar-to-water solution—never bleach, ammonia, or hydrogen peroxide, which cause cracking and discoloration.
Eliminate Stubborn Odors at the Source
Baking Soda Deep Treatment
After cleaning, sprinkle baking soda liberally over seats and carpets. For light odors, wait 15 minutes; for smoke or pet smells, leave overnight. Vacuum thoroughly with a brush attachment. Pro tip: Place an open box of baking soda under the seat for ongoing freshness—replace monthly. For organic odors (food, vomit), use enzyme cleaners that break down odor molecules rather than masking them.
Proper Drying Prevents Costly Mold
Air Circulation Techniques
After cleaning, open all doors and windows. Position fans to create cross-ventilation directly targeting seats. In humid climates, add a portable dehumidifier. Critical: Never close your vehicle until seats feel completely dry to the touch—press a paper towel against hidden crevices to check. Damp fabric breeds mold within 24 hours, causing health risks and permanent odors.
Create a Realistic Maintenance Schedule
Frequency Based on Real-World Use
Deep clean light-use vehicles (single driver, no kids/pets) every 3-6 months. Heavy-use vehicles (families, pets, work trucks) need monthly attention. Address spills immediately—every minute counts for stain prevention. Implement a weekly routine: quick vacuum plus spot checks. Keep a microfiber cloth and mild cleaner in your glove compartment for instant spill response.
Prevention Strategies That Save Money
Apply fabric protector spray after deep cleaning—it creates an invisible barrier giving you time to blot spills. Use waterproof seat covers during beach trips, pet transport, or meals in the car. Park in shade or use sunshades to prevent UV damage that fades fabric and cracks leather/vinyl.
Essential Tools and Products

Budget Starter Kit
- Microfiber towels (yellow for maximum dirt visibility)
- Soft-bristled brush or old toothbrush for precision work
- Shop vacuum with crevice and brush attachments
- Mild dish soap (blue Dawn works best for general cleaning)
- White vinegar for natural disinfection
Avoid These Costly Cleaning Mistakes
Disasters That Ruin Seats Forever
Never use household cleaners like Windex or laundry detergent—they contain harsh chemicals that destroy automotive materials. Oversaturation causes mold and water stains; use minimal moisture and test absorption first. Skipping spot tests leads to permanent discoloration even with “safe” products—formulas change without warning. Mixing products creates dangerous chemical reactions; use one solution at a time. Paper towels scratch leather and vinyl permanently—always use microfiber.
When Professional Help Makes Financial Sense
Situations Beyond DIY Repair
Seek professionals for severe ink or bleach stains, delicate vintage materials, or persistent odors indicating deep contamination. Leather restoration requiring color matching and steam extraction for heavily soiled vehicles also warrant expert intervention. If cleaning attempts worsen stains or damage materials, stop immediately—further DIY efforts could devalue your vehicle.
Clean car seat upholstery isn’t just about appearance—it preserves your vehicle’s value, eliminates health hazards, and extends interior lifespan. By matching your cleaning method to your specific seat material and soil level, you avoid costly damage while achieving professional results. Start with immediate spill response and consistent light maintenance—the coffee stain that started this journey will become your next success story. Implement these techniques monthly, and your seats will stay fresh, functional, and resale-ready for years. Remember: the best how to clean car seat upholstery strategy is the one you actually do consistently.


