

Your hands shake as you wrestle the infant carrier into the back seat for the first time. That terrifying statistic echoes in your mind: nearly half of all car seats are installed incorrectly, putting children at risk. But ISOFIX installation eliminates dangerous guesswork with its mechanical anchor system and foolproof visual indicators. Forget confusing seat belt threading—this guide delivers the exact sequence to achieve rock-solid ISOFIX security in less time than it takes to brew coffee. You’ll learn how to verify your vehicle’s anchors, position the seat correctly, and confirm a life-saving installation with just three critical checks.
Confirm Your Vehicle Has Working ISOFIX Anchors
Skip this step and you’ll waste precious time installing a seat that won’t secure properly. Modern vehicles universally include ISOFIX anchors, but their location and condition vary significantly. Don’t assume compatibility based on your car’s age—some models omit center seat anchors entirely.
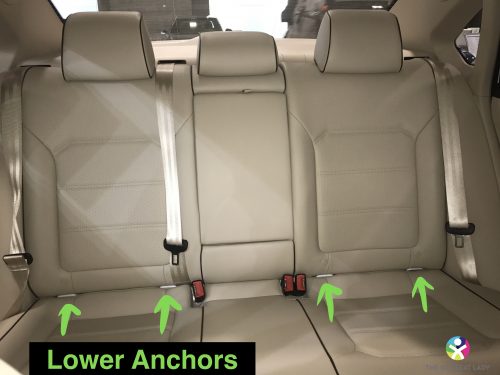
Where to Find Hidden Anchor Points in 30 Seconds
Slide your fingers deep into the crevice where the seat back meets the cushion. Feel for cold, rigid metal bars running horizontally—not flexible seat frame components. Most anchors sit 2-4 inches below the seatback’s top edge. Check for embroidered labels reading “ISOFIX” or “LATCH” on the seat fabric, but never rely solely on these. In SUVs and hatchbacks, boot-area anchors may secure top tethers, so verify your car seat manual’s specific requirements. If you find no metal bars after thorough searching, consult your vehicle manual’s child safety section—some anchors require removing seat covers.
Critical Anchor Verification Before Installation
Never install without confirming these three conditions:
– ✅ Both anchor bars feel solid and immovable when tugged
– ✅ No debris (crumbs, coins, fabric) blocks anchor access
– ✅ Anchor positions align with your car seat’s required spacing
Older vehicles may have corroded anchors—run a cloth along the metal to check for flaking rust. If anchors feel loose or damaged, contact your dealership immediately. Safety depends on these anchors being permanently welded to your car’s chassis.
Position Your Car Seat for Maximum Safety
Choosing the wrong seating position creates installation failures before you even clip in. While the rear passenger side offers easiest curbside access, your vehicle’s anchor configuration may force alternatives. Never assume all rear seats support ISOFIX.
Optimal Seating Locations (Ranked by Safety)
Rear passenger side: Best for most installations—anchors typically strongest here, and furthest from traffic in collisions.
Rear driver side: Acceptable alternative but check for seat contour interference.
Center rear seat: Only use if your vehicle manual explicitly confirms ISOFIX compatibility—most lack proper anchors here.
Crucially, verify top tether anchor location before positioning. For seats requiring top tethers (like many Group 1 models), the anchor must sit directly above your chosen seat position. In sedans, these often appear as metal loops in the rear shelf; in SUVs, check the cargo area wall behind the seats. If the tether anchor doesn’t align with your seat position, switch sides immediately.
Connect ISOFIX Clips to Anchors in One Motion
This is where 90% of installation errors occur. Twisted clips or partial engagement creates catastrophic failure points. The metal arms must engage both anchors simultaneously with full insertion—no wiggling or “close enough” connections.
Step-by-Step Clip Engagement Sequence
- Extend connectors fully: Pull the ISOFIX arms from their storage position until they lock outward
- Position seat precisely: Place car seat directly over anchors with clip arms vertical
- Apply body-weight pressure: Lean into the seat base with your hip—not just hands—while pushing backward
- Listen for dual confirmation: You must hear two distinct clicks (one per side) within 2 seconds
- Verify visual indicators: Both sides must show solid green—no red visible anywhere
Critical mistake to avoid: Forcing clips when misaligned. If you don’t hear two clicks, disconnect completely and restart. Partial engagement often shows red indicators partially covered—a deadly false sense of security. If clips resist, check for seat fabric bunched under the base.
Secure Top Tether Anchors When Required
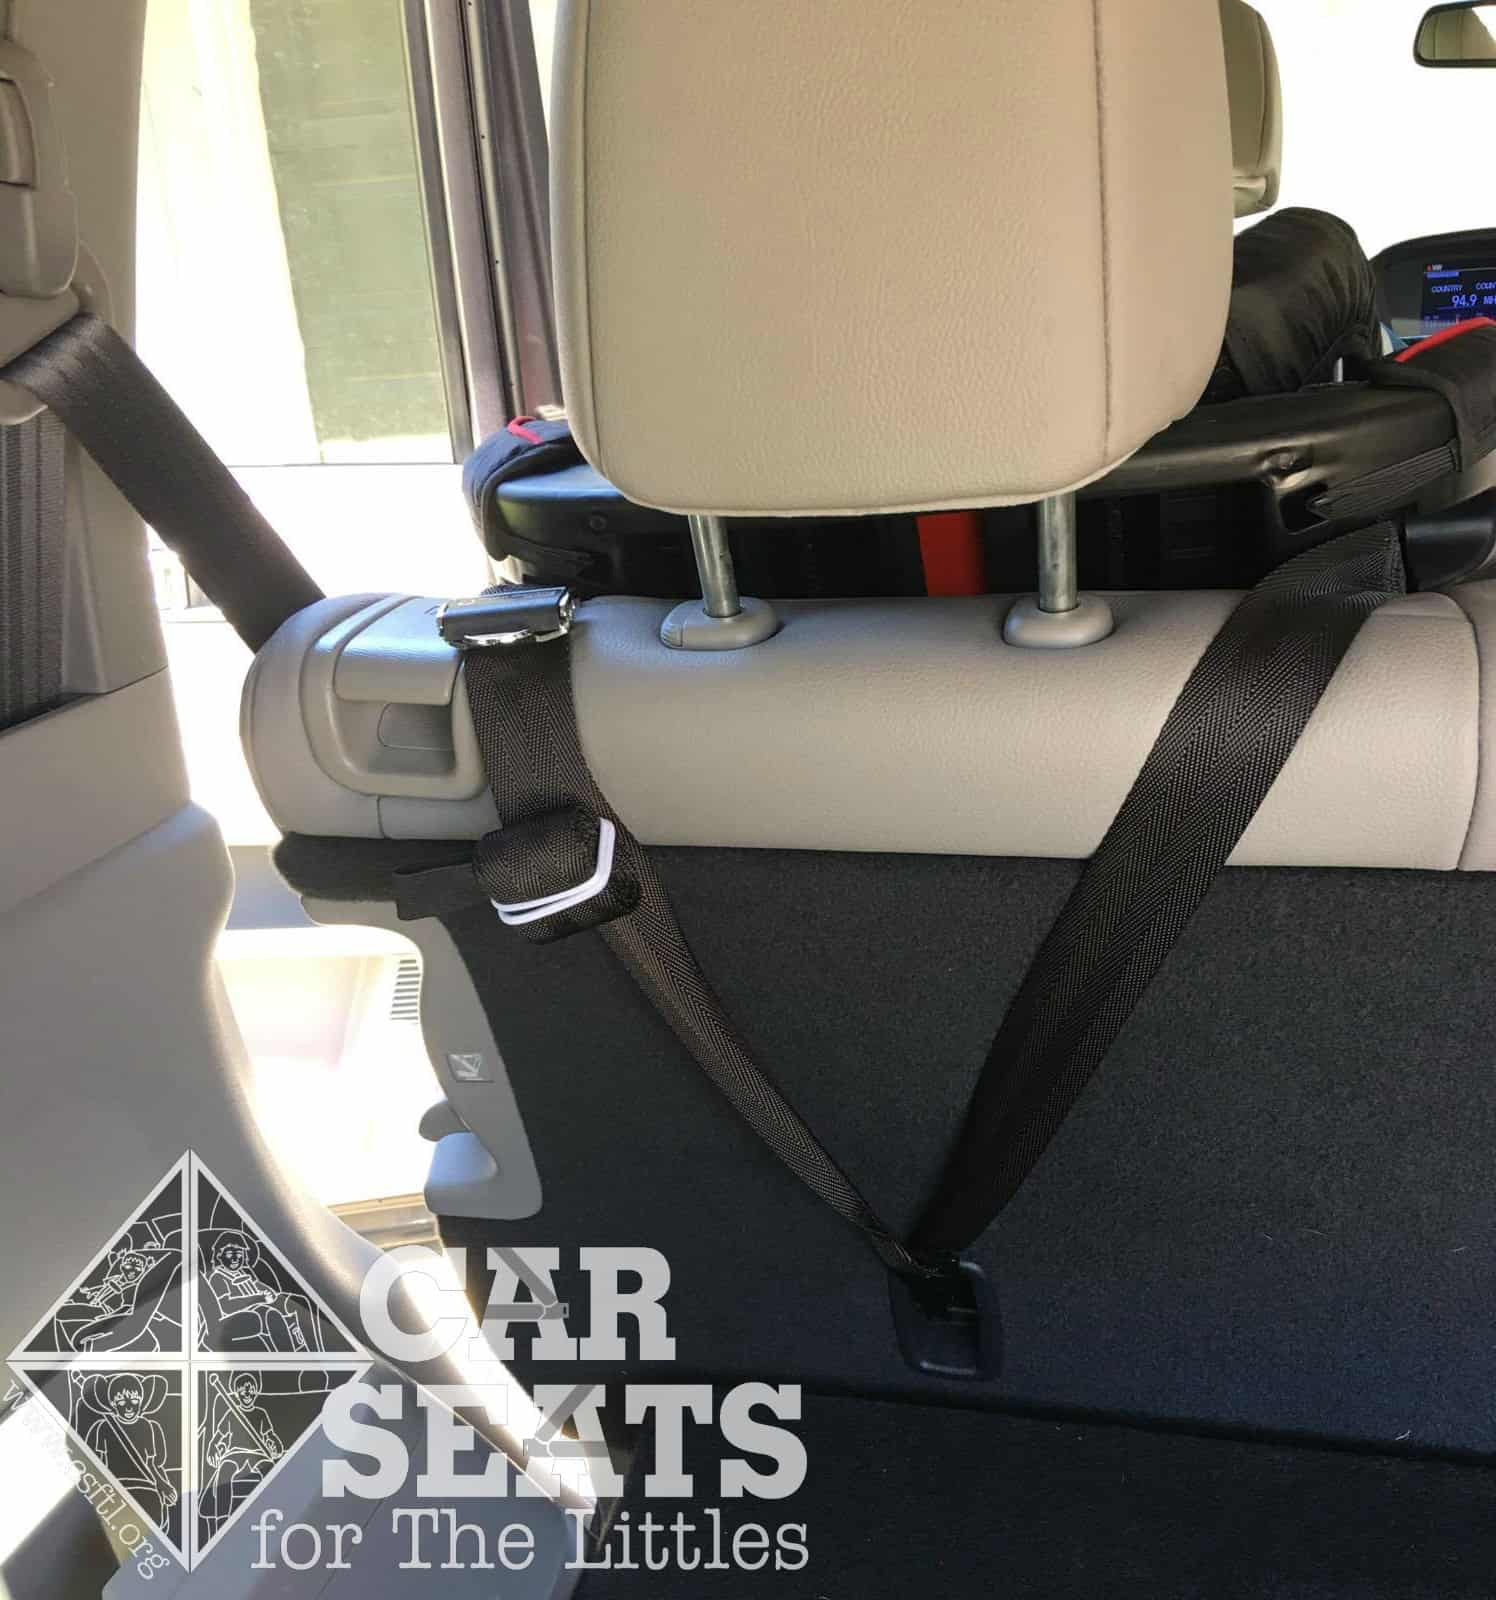
Seats without support legs (like many convertible models) demand top tether use. Skipping this turns your ISOFIX seat into a dangerous projectile during front impacts. The tether strap must be taut with zero slack—imagine tightening a guitar string.
Top Tether Installation Without Twists
- Locate anchor: Find the metal loop labeled “Tether” in your vehicle’s rear shelf or cargo area
- Route strap correctly: Pass the tether over the headrest (never under), following car seat manufacturer diagrams
- Attach and tension: Clip to anchor, then pull the strap’s release lever while yanking upward until fully taut
- Final test: Try pinching the strap vertically—no slack should exist between tether and car seat
Pro tip: Stand outside the vehicle when tensioning. Your body weight pulling downward creates superior tension than seated efforts. If the tether won’t tighten fully, check for twists in the strap—these prevent proper locking.
Perform the 3-Point Safety Verification Test
Never assume clicks and green lights guarantee security. Real-world testing catches subtle errors that endanger lives. Conduct these checks every time you reinstall the seat—even if it’s the same vehicle.
Mandatory Post-Installation Checks
Visual indicator inspection: Both sides must show unbroken green windows with zero red visible. Squint to check for hairline red edges—a common sign of partial engagement.
Inch test for movement: Grasp the seat at the belt path (where lap belt would sit). Shake firmly side-to-side and front-to-back. Acceptable movement: less than 1 inch (2.5 cm) in any direction. More movement means reinstallation is required.
Angle verification: For infant carriers, use the built-in level indicator to confirm 30-45° recline. An upright angle risks airway obstruction during travel—especially critical for newborns.
Red flag: If indicators turn red when tightening harness straps, the seat base is overloaded. Discontinue use and consult manufacturer guidelines.
Attach Car Seat to ISOFIX Base (For Travel Systems)
This two-stage system (base + carrier) creates unique failure points. Parents often assume the carrier “clicks” securely when it hasn’t fully engaged with the base. Always verify carrier-to-base connection separately from base-to-vehicle.
Carrier-to-Base Connection Protocol
- Align carrier feet: Position the carrier’s support legs over the base’s receiving slots
- Apply downward pressure: Press straight down with palms on carrier handle until two clicks occur
- Test release mechanism: Pull the carrier’s release handle to confirm it disengages smoothly
- Final stability check: Gently rock carrier side-to-side—no movement should transfer to the base
Critical warning: Never carry the carrier while attached to the base. The connection isn’t designed for lifting forces and may unexpectedly release. Always detach before moving your child.
Fix Common ISOFIX Connection Failures Immediately
When clips won’t engage or indicators stay red, panic sets in—but solutions are usually simple. These fixes resolve 95% of installation failures without professional help.
Red Indicator Emergency Protocol
If one side shows red:
– Disconnect completely and wipe anchor points clean
– Reposition seat 1 inch toward the working side
– Re-engage with firm, straight-back pressure (no rocking motion)
If both sides show red:
– Check for seat belt buckles trapped under base
– Ensure no clothing or blankets block anchor access
– Verify ISOFIX arms are fully extended (some retract automatically)
If clicks occur but movement exceeds 1 inch:
– Apply body weight while reinstalling—many seats need >50 lbs of pressure
– Install on a different seat position (some vehicle seats are too deeply contoured)
– Use manufacturer-approved padding only (never folded towels)
Never force connections—damaged clips compromise safety permanently. If failures persist after three attempts, contact your car seat manufacturer.
Monthly Maintenance for Lifelong Safety
ISOFIX anchors degrade from heat, debris, and corrosion. A seat that installed perfectly last month may now be dangerously loose. Monthly checks prevent silent failures.
Essential Safety Maintenance Routine
Before every trip:
– Glance at visual indicators (green = good)
– Perform quick tug test at belt path
– Ensure harness straps lie flat with no twists
Monthly deep check:
– Clean anchor points with dry cloth to remove dust buildup
– Test clip release buttons for smooth operation
– Inspect ISOFIX arms for cracks or deformation
– Verify vehicle anchors don’t wobble when tugged
After vehicle service:
– Recheck all connections (mechanics often dislodge seats)
– Confirm no tools or debris were left in anchor areas
– Test installation even if base wasn’t moved
Replace immediately if you notice rust on anchor bars, stiff clip mechanisms, or faded visual indicators. Safety degrades silently—never assume “it’s been fine for years.”
✅ Final Installation Checklist
– Both ISOFIX anchors confirmed solid and clean
– Dual audible clicks heard during installation
– Unbroken green indicators visible on both sides
– Less than 1-inch movement during tug test
– Top tether secured with zero slack (if required)
– Correct recline angle for infant carriers
– Harness straps snug with no twists
Mastering ISOFIX installation takes one focused attempt. That initial 7-minute investment creates a lifetime of secure travels—no second-guessing, no dangerous errors. Your child’s safety hinges on these precise mechanical connections, not luck or guesswork. Now that you’ve verified every click, every indicator, and every inch of movement, you can drive with unshakeable confidence. The next time you hear that reassuring double-click, you’ll know exactly why it matters.


