
Your toddler just screamed, “I had an accident!” Or your dog whined one second too late. Now you’re staring at a wet patch spreading across your car seat, and that sharp ammonia smell is already hitting your nose. Don’t panic—urine removal is 90% about what you do right now. I’ve helped hundreds of parents and pet owners salvage their seats using these exact methods. The clock starts ticking the moment it happens: urine reaches foam padding in under 10 minutes, locking in odors that linger for months if mishandled. But act fast with these material-specific protocols, and you’ll eliminate both stain and smell permanently.
This isn’t guesswork. I’ll show you exactly how to identify your seat type in 30 seconds, which household items actually work (no magic potions), and critical mistakes that turn a small spill into permanent damage. You’ll learn why vinegar helps cloth seats but ruins leather, why baking soda alone fails for old stains, and how to clean child car seats without compromising safety. Most importantly, you’ll have your car smelling fresh again before dinner.
Blot Before It Soaks: Your Critical First 10 Minutes
Urine penetrates seat foam within minutes, making odor removal nearly impossible later. Your only goal right now: extract liquid before it hits the padding. Grab these immediately: thick paper towels, rubber gloves, and a spray bottle filled with plain water. Speed is non-negotiable—delaying 5 minutes doubles the cleanup time.
Why pressing beats rubbing: Rubbing grinds urine deeper into fibers and perforations. Instead, fold 5-6 paper towels into a thick pad and press straight down with firm, steady pressure. Replace towels the second they show moisture. For perforated leather or cloth seats, lightly mist the area with water after initial blotting—this lifts residual urine from foam capillaries. Repeat until towels come away nearly dry.
Pro tip for leather seats: Use a microfiber cloth instead of paper towels. Paper fibers can scratch coated surfaces, creating micro-tears where odor lingers. Work from the stain’s outer edge inward to avoid spreading contamination. If you skip this step, no cleaner will reach the foam saturation—and you’ll be smelling it for years.
Identify Your Seat Material in 60 Seconds (Avoid Costly Mistakes)

Using the wrong cleaner destroys seats. A single drop of vinegar on perforated leather can etch the finish, while steam cleaning Alcantara fabric melts the fibers. Do this test before grabbing any solution: Sprinkle a dime-sized water drop on a hidden area (like under the seat fold). Watch for 30 seconds:
- Beads up? → Non-porous surface (leather or vinyl). Risk: Urine pools on top but seeps through seams.
- Soaks in instantly? → Cloth upholstery. Risk: Immediate foam saturation.
- Beads then slowly soaks? → Perforated leather. Highest risk: Urine floods foam through tiny holes.
Critical visual check: Shine a flashlight sideways across the seat. On perforated leather, you’ll see clusters of pinprick holes—this needs enzymatic treatment inside those holes. Vinyl seats often have visible stitching channels where urine pools; focus cleaning there first. Never assume: luxury cars like BMWs use “semi-aniline” leather that reacts badly to vinegar. When in doubt, skip DIY and use a professional-grade enzymatic cleaner.
DIY Solutions That Actually Work (No Grocery Store Runs)
Skip expensive products. These household mixes target urine chemistry, but only when matched to your seat material. Never combine vinegar and baking soda—they neutralize each other. Use sequentially: vinegar for initial cleaning, baking soda later for residual odor.
Vinegar & Soap Mix for Cloth/Vinyl Seats
Why it works: Vinegar’s acetic acid neutralizes ammonia odors while soap lifts stains.
Formula: 2 cups cold water + 1 tbsp white vinegar + 1 tbsp dish soap (like Dawn).
Application: Dip a microfiber cloth, wring until barely damp. Dab from edge to center—never rub. Alternate with dry towels until stain vanishes. Air-dry in sunlight for 1 hour; UV rays kill odor bacteria. Time estimate: 25 minutes total.
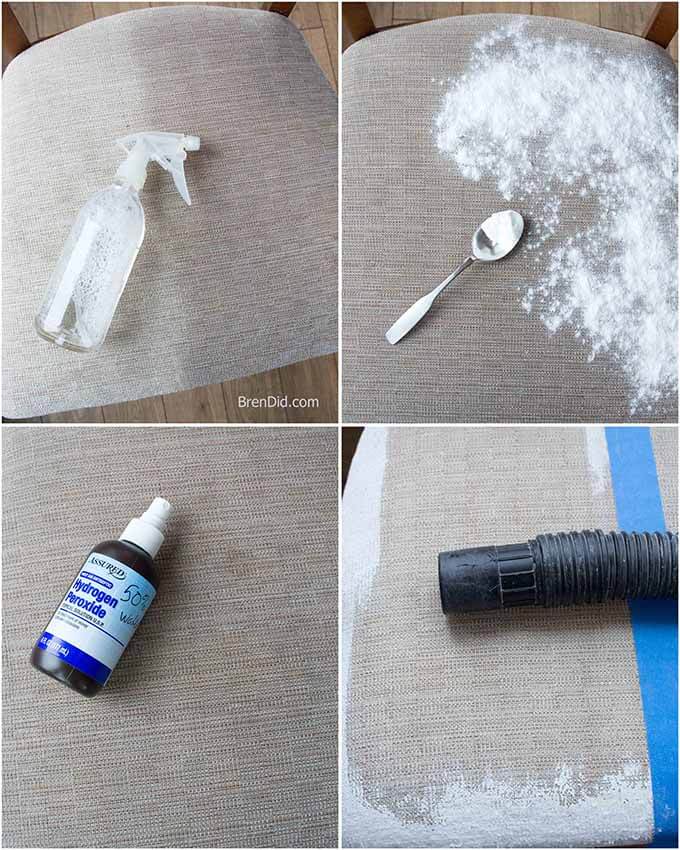
Hydrogen Peroxide Power for Stubborn Stains
Why it works: Peroxide oxidizes urine pigments; baking soda draws out residue.
Formula: 10 oz 3% hydrogen peroxide + 3 tbsp baking soda + 2 drops dish soap.
Process: Mix in bowl (foam will subside in 2 minutes). Spray on stain, wait 60 minutes—do not wipe. Dab with damp cloth, then blot dry. ⚠️ Warning: Test on hidden spot first; peroxide bleaches some dyes. Only use on cloth/vinyl—never leather.
Enzymatic Cleaners: The Only Fix for Lingering Odor
Household cleaners mask smells; enzymes destroy them by digesting urea and uric acid crystals. This is non-negotiable for accidents older than 2 hours or recurring odors. Nature’s Miracle or Rocco & Roxie contain protease enzymes that break down urine at a molecular level—something vinegar can’t touch.
Application secret: Saturate the stain until damp, not dripping. For perforated leather, spray directly into holes. Let dwell 15 minutes (60+ minutes for old stains). Critical mistake: Never follow with vinegar—it kills enzymes. Blot excess, then place a dry towel over the area weighted with books overnight to pull residue from foam. Air-dry with car A/C on max for 2 hours. If you skip enzymes, that “clean” seat will reek when heated by summer sun.
Leather Seat Rescue: Avoid Cracking & Discoloration
Leather demands surgical precision. One misstep causes white water rings or brittle cracking. Never spray cleaners directly—apply to a microfiber cloth first. For non-perforated leather (smooth surfaces like Mercedes seats):
- Mix 1 drop Dawn dish soap in ½ cup distilled water
- Dampen cloth, wipe entire seat panel (not just the stain) to prevent rings
- Rinse with water-dampened cloth
- Dry immediately with clean microfiber
- Apply leather conditioner (like Lexol) to restore oils
For perforated leather: After blotting, spray enzymatic cleaner into the holes. Wait 10 minutes, then blot. Condition only the surface—never let conditioner seep into perforations where it traps moisture. If you see white residue, it’s urine salts—reapply enzymes and dwell 2 hours.
Child Car Seat Deep Clean Without Compromising Safety
This is where 90% of parents make dangerous errors. Harsh chemicals weaken harness straps, failing safety tests. Always:
– Remove seat from car first
– Video disassembly for reassembly
– Check manual for washing limits
Harness straps: Wipe only with a cloth dampened in water + 1 tsp vinegar. Never submerge, scrub, or use soap—it degrades webbing strength. For buckles, rinse under lukewarm water, shake dry, and click repeatedly to clear residue. Fabric covers: machine-wash only if manual allows (use cold water, no spin cycle). Air-dry straps in sunlight for 2 hours—UV sanitizes without chemicals. Critical: If urine soaked into the seat base, replace foam inserts; it’s a safety hazard.
Drying Strategy That Prevents Mold in 2 Hours
Trapped moisture breeds mold in seat foam, causing worse odors. Park in direct sunlight with doors and trunk open—this creates a convection current. Place fans blowing across (not into) seats to evaporate moisture without pushing it deeper. Run car A/C on “fresh air” mode at max for 45 minutes; it dehumidifies 10x faster than heat. For indoor drying, lay bowls of baking soda under seats overnight—activated charcoal works better but costs more. If you smell mustiness after drying, urine reached subflooring; call a professional.
Prevention: Never Deal With This Again
Waterproof neoprene seat covers ($25 on Amazon) stop 95% of accidents from reaching upholstery. For kids, use portable potty liners (like Travel John) that convert cup holders into mini-toilets. For dogs, train them to “go” before rides using a specific command word—reward with treats immediately after. Keep an emergency kit in your trunk: enzymatic cleaner, microfiber towels, and a small handheld vacuum. Schedule potty breaks every 2 hours on road trips; kids and dogs rarely hold it longer.
When to Call a Professional (Save $300 in Seat Replacement)
DIY fails when urine soaks into seat rails or subflooring. Call a mobile detailer if:
– Odor returns after 3 cleanings
– You see mold growth under seat fabric
– It’s a luxury vehicle (Range Rover, Tesla) with delicate materials
Professionals use truck-mounted hot water extraction that pulls contaminants from foam 3x deeper than home methods. They also inject enzymes directly into padding with needle wands—something you can’t replicate. Expect $150-$250, but it’s cheaper than replacing a $600 seat.
Critical Mistakes That Make It Permanent
Never do these:
– Use bleach—it reacts with urine to create toxic chlorine gas
– Scrub aggressively—frays cloth fibers, embedding stains
– Apply heat too soon—sets protein stains (like urine) permanently
– Mix vinegar and baking soda—they cancel each other’s cleaning power
– Ignore child seat manuals—one wrong wash voids safety certifications
That lingering “clean” smell? It’s urine crystals reactivating. Reapply enzymes and let dwell 24 hours—this always works when done right. Keep this guide saved; next time an accident happens, you’ll fix it in minutes, not weeks. Your car deserves to smell like new again—starting today.


