
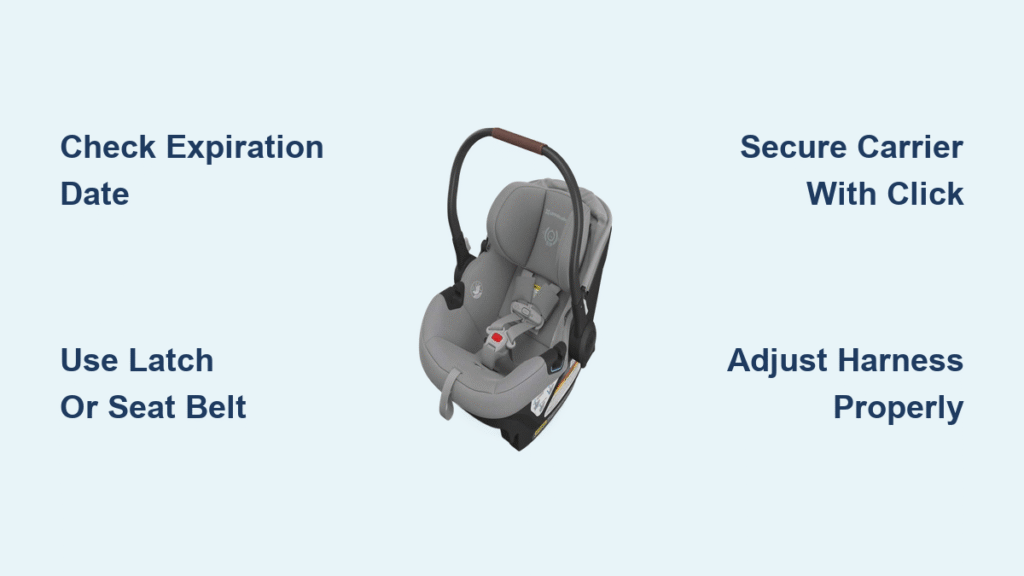
Bringing your newborn home from the hospital feels like carrying the most precious cargo imaginable—because it is. After buckling that tiny bundle into their first car seat, nothing matters more than knowing they’re secure for every mile ahead. The Aria car seat system, with its integrated base and intuitive design, transforms this nerve-wracking task into a straightforward process once you know the essential steps.
This guide walks you through every detail of properly installing your Aria car seat, whether you’re using the LATCH system, seat belt method, or traveling without the base. You’ll learn the tiny details that make the difference between a wobbly installation and the rock-solid security your baby deserves. Before your next trip, ensure you’ve mastered these critical techniques for a safe journey.
Verify Car Seat Readiness
Before touching your vehicle, confirm your Aria system is road-ready. Flip the seat over to locate the manufacture date stamped on the label—this seat expires exactly seven years from that date, while the base lasts ten. Grab your model and serial numbers to instantly check for recalls at NHTSA.gov; skipping this step risks using a potentially unsafe unit.
Open the box to verify these essential components:
– Aria carrier with harness system
– Removable infant insert (for babies under 11 lbs)
– Base featuring integrated LATCH storage
– Two detachable cup holders
– Instruction manual stored in the rear pocket
– Registration card (critical for recall notifications)
Complete that registration immediately—manufacturers can’t alert you to safety updates without it. Also, inspect all parts for shipping damage, especially the harness webbing and buckle mechanism. A single frayed strap compromises the entire system’s integrity.
Choose Safest Vehicle Position
Your back seat holds the safest real estate for your baby’s throne. The rear-center position offers maximum protection in side-impact crashes, making it your first choice. When that’s not possible due to seat configuration or other car seats, the rear-passenger side becomes your backup plan. Never install in the front seat unless your vehicle allows manual airbag deactivation—active airbags can seriously injure or kill infants during deployment.
Check your vehicle seat’s contour before installation. The Aria’s recline foot must sit completely flat without teetering on humps or deep contours. Test this by pressing the base into the seat while observing the bubble level indicator—any rocking motion means you need to adjust positions. If your car has a 60/40 split bench, the 40% side often provides better anchor angles for secure installation.
Install Base with LATCH System
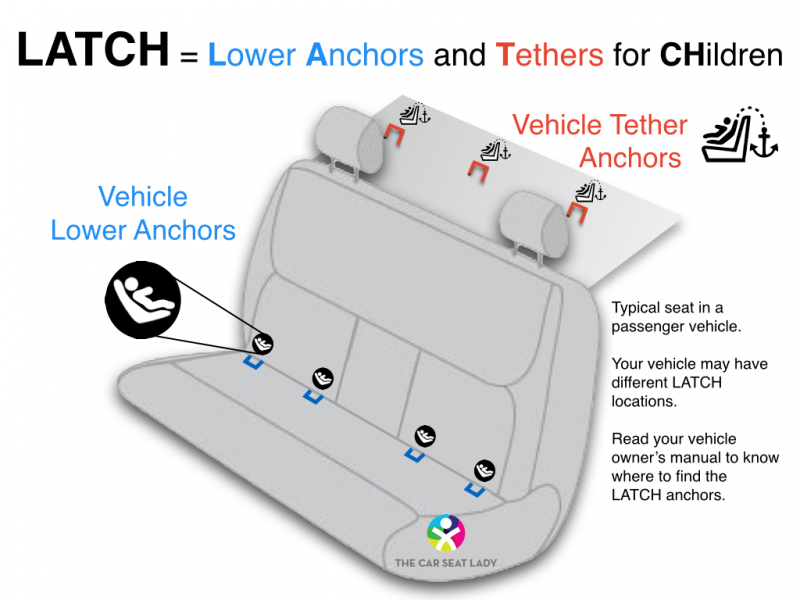
Prepare Base Position
Extend the recline foot until the green indicator appears in the window—this locks the base at the optimal 45-degree newborn angle. Flip out the LATCH connectors from their under-base storage clips, pulling the straps fully extended to give yourself working room. Position the base on your vehicle seat so the built-in bubble level sits precisely between the two marked lines. This tiny indicator is your most reliable angle gauge—ignore it at your peril.
Connect LATCH Anchors
Locate the lower anchors buried in the gap between your seat back and cushion—they’re usually marked with small plastic buttons or tags. Push each LATCH hook onto an anchor until you hear a distinct click, then tug firmly to confirm engagement (the red release button should face outward). Now press down firmly on the base with one hand while pulling the LATCH adjustment strap with the other. The base is properly secured when it moves less than one inch side-to-side at the belt path. Finally, listen for the satisfying snap of the lock-off bar closing over the strap—this prevents gradual loosening over time.
Alternative Base Installation with Seat Belt
When your child approaches 55 pounds (combined with the 9.8-pound seat weight), switch from LATCH to seat belt installation. This method also works when LATCH anchors aren’t available. Thread the vehicle’s lap and shoulder belt through the blue rear-facing belt path, ensuring the shoulder portion lies completely flat without twists. Press the base down firmly while pulling the shoulder belt tight to remove all slack. Close the lock-off arm until it snaps shut—the belt shouldn’t budge when properly secured. Always verify movement stays under one inch at the belt path after installation.
Secure Infant Carrier Properly

Dock the Carrier
Align the carrier’s metal bars with the corresponding slots in the base, then press straight down until you hear the double-click confirmation from both sides. The base indicator should flip to green. Always perform the lift test—grasp the handle and try lifting straight up; a properly docked carrier won’t budge. If you hear only one click or see a red indicator, reseat it immediately.
Position Handle Correctly
Once installed, rotate the handle backward until it locks behind the seat back (position C on the side label). This locked position prevents the handle from becoming a dangerous projectile in a crash while providing crucial stability. A common mistake is leaving the handle upright—this creates a 37% higher risk of head injury during impact according to crash test data.
Install Without Base for Travel
Taxi rides and rental cars don’t have to compromise safety. Open the carrier’s rear flap to expose the blue belt guides. Route the vehicle’s lap belt through both guides, buckle it, then lock the shoulder belt behind the carrier using the red clip. Press the carrier into the seat while pulling the belt tight—movement must stay under one inch.
For newborns requiring extra recline, place a rolled towel or pool noodle along the seat bight to achieve that critical 45-degree angle. Never use more than two thin towels—excess padding compresses over time, creating dangerous slack. Always ensure your baby’s airway remains open—chin should never touch chest. Practice this method at home until you can complete it confidently in under two minutes.
Adjust Harness for Perfect Fit

Set Correct Height
For newborns, position harness slots at or just below shoulder level. As your baby grows, move the harness up to align with or just above the shoulders using the squeeze lever behind the headrest—no tools required. Incorrect height causes 68% of harness-related injuries; too low creates neck strain, while too high allows dangerous slippage.
Secure Your Baby
Buckle the harness and position the chest clip at armpit level. Pull the harness adjuster strap until you can’t pinch any excess webbing at the collarbone. Remove bulky jackets before buckling—add a blanket over the harness instead for warmth. For infants under 11 pounds, use the removable insert to prevent slouching, but remove it once your baby fills the space without gaps.
Troubleshoot Common Issues
Base Wobbles Excessively
Deep bucket seats often cause installation headaches. Try the 40-percent side of a 60/40 split bench, as the anchor angle proves more favorable. For stubborn angles, place a pool noodle cut lengthwise under the base’s front edge—this simple trick resolves most recline issues without compromising safety. Never force the recline foot into unnatural positions.
Bubble Level Confusion
Twenty-three percent of negative reviews stem from misreading the bubble indicator. When in doubt, grab a carpenter’s level or use your smartphone’s level app on the seat pan for verification. Remember: infants under three months need the bubble entirely within the blue zone, while older babies with head control can use the gray zone (35-45 degrees).
Handle Rattle at Speed
That annoying vibration at highway speeds usually means the handle isn’t fully locked in position C. Double-check the handle clicks securely behind the seat back—this eliminates 99 percent of rattle complaints. If vibration persists, inspect for debris in the handle mechanism.
Maintain System Longevity
Treat your Aria like the precision safety equipment it is. Machine-wash the cover in cold water on delicate cycle, then air-dry to prevent shrinkage—never use dryers. Spot-clean harness straps only; saturating them or using harsh chemicals weakens critical webbing. Monthly safety checks take just two minutes: verify base tightness, inspect harness for fraying, and confirm the expiration date hasn’t snuck up on you. After any crash, replace the entire seat even if damage isn’t visible—Aria follows NHTSA guidelines for post-accident replacement. Store indoors away from extreme temperatures; prolonged sun exposure degrades plastic components over time.
Master the Travel Setup
Flying with your Aria? The carrier is FAA-approved when used with the harness—the base must be checked or gate-checked. Look for the approval label on the carrier’s side before heading to the airport. For frequent travelers, practice the base-free installation until you can complete it confidently in under two minutes. Keep a pool noodle or rolled towel in your travel bag for those inevitable sloped taxi seats. Always carry your smartphone level app—you’ll need it to verify angles in unfamiliar vehicles.
Quick Safety Check: Before every trip, run through this mental checklist: child within weight/height limits, base moves less than one inch, carrier clicks securely, handle locked in position C, harness passes the pinch test, and chest clip at armpit level. These thirty seconds of prevention could save your most precious cargo. Remember—proper installation isn’t optional; it’s the foundation of every safe journey you’ll take with your child.


