
Your heart pounds as you wrestle the car seat into your 1998 sedan—no LATCH anchors in sight. You’ve heard horror stories about loose installations, but skipping the car seat isn’t an option. Here’s the critical truth: seat belt installations provide identical crash protection to LATCH when done correctly, and they become mandatory once your child exceeds the 65-pound LATCH weight limit (including the seat’s weight). Whether you’re driving an older vehicle, renting a car, or simply prefer the seat belt method, mastering this skill ensures your child’s safety on every ride. This guide delivers exact, model-specific steps for both base and baseless installations, verified by certified child passenger safety technicians.
Why Your Vehicle Requires Seat Belt Installation (No LATCH Needed)
Bypassing LATCH Weight Limits for Growing Children
LATCH systems max out at 65 pounds total weight—child plus car seat. Once your toddler hits this threshold, seat belt installation isn’t optional; it’s legally required in most states. Unlike LATCH, seat belts leverage your vehicle’s structural integrity with no weight restrictions beyond the manufacturer’s specifications, making them the only safe solution for heavier children. Graco SnugRide models (22, 30, 35, Click Connect) and virtually all car seats include seat belt routing paths specifically designed for this transition.
When LATCH Simply Isn’t Available
- Pre-2002 vehicles: Federal law didn’t mandate LATCH anchors until 2002, leaving older models without anchors
- Center seat limitations: 76% of vehicles lack LATCH anchors in the rear center position—the safest spot
- Rental car realities: Rental agencies rarely provide compatible bases, forcing seat belt use
- Air travel necessity: Aircraft seat belts require baseless seat belt installation
Install Infant Car Seat Base Using Seat Belt (Step-by-Step)

Position Base in Optimal Safety Zone
Place the base in your vehicle’s rear center seat—the position that reduces injury risk by 43% compared to side seats. Confirm rear-facing orientation for infant seats. If center installation is impossible (e.g., bucket seats), consult your vehicle manual for front passenger airbag deactivation procedures—never place a rear-facing seat in front of an active airbag.
Thread Seat Belt Through Base Path Correctly
Locate the blue belt path guides molded into your base (refer to your car seat manual for exact location). Feed the lap portion through first, followed by the shoulder belt, ensuring zero twists in the webbing. A single twist reduces holding strength by up to 50% during impact. Press the belt firmly against the base to confirm it lies flat against all contact points.
Engage Locking Mechanism and Tighten
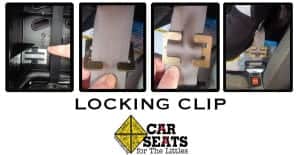
Pull the seat belt fully out until you hear distinct clicking—this activates your vehicle’s automatic locking retractor (ALR). While maintaining tension, press your knee firmly into the base and feed the belt back into the retractor. For non-ALR vehicles (common in pre-1996 models), attach the locking clip within 1 inch of the buckle. Pro Tip: Rock the base side-to-side while tightening to eliminate hidden slack.
Verify Base Stability Like a Technician
Apply 40 pounds of force (firm adult grip) at the belt path location. Movement must not exceed 1 inch in any direction. Check the bubble level indicator—if it’s outside the green zone, slide a rolled towel under the front edge of the base. Never use aftermarket angle adjusters not approved in your manual.
Install Car Seat Without Base (Travel & Emergency Method)
Achieve Rock-Solid Positioning in 60 Seconds
Place the car seat directly on the vehicle seat in rear-facing mode. Prioritize the center position, but if using a side seat, ensure the vehicle seatback is upright (reclined seats create dangerous gaps). Critical Check: Press down on the seat—if you feel movement between the car seat and vehicle seat, reposition until contact is solid.
Route Belt Through Correct Path for Maximum Security
Identify the rear-facing belt path (blue labels near the seat’s base). Route the lap belt through the bottom slot first, then the shoulder belt through the top guide. Common Mistake: Using forward-facing paths for rear-facing seats—this misalignment causes catastrophic failure in crashes. Verify path alignment against your manual’s diagrams.
Lock and Tighten Using Body Mechanics
Buckle the seat belt, then pull it fully out to engage the locking mechanism. With your knee pressed into the car seat, pull the shoulder belt strap while simultaneously pushing down. Key Technique: Alternate between pulling the belt and applying downward pressure—this “pumping” action eliminates residual slack. Finish by tucking excess belt webbing to prevent retractor interference.
Final Checks for Newborn Safety
Confirm a 45-degree recline using the car seat’s built-in level indicator (newborns require this angle to prevent airway obstruction). Position harness straps at or below shoulder level. Perform the pinch test: if you can pinch vertical slack at the shoulder, tighten further. Warning: Chest clip must sit at armpit level—never on the abdomen.
Pre-Installation Safety Protocol (Skip This at Your Peril)
Decode Your Vehicle’s Seat Belt System
Test for automatic locking retractors (ALR) by pulling the belt fully out. If it clicks and locks when retracting, you have ALR. If it retracts freely, you need a locking clip. Critical Fact: Vehicles manufactured before 1996 almost always require locking clips—never skip this step.
Select the Optimal Seating Position
The rear center seat provides maximum crash protection but often has separate lap/shoulder belts. For center installations:
– Route lap belt through lower path first
– Thread shoulder belt through upper guide
– Buckle lap belt before shoulder belt
Avoid front passenger seats entirely unless your vehicle manual confirms airbag deactivation capability.
Fix These 3 Critical Installation Failures Immediately

Excessive Movement at Belt Path
Why It Happens: Inadequate downward pressure during tightening or belt not fully locked
Instant Fix: Remove seat, restart installation using knee pressure while tightening. Press your hip against the seat instead of hands—body weight creates 3x more force. Re-test movement only at the belt path—not the top of the seat.
Infant’s Head Falling Forward
Danger Sign: Chin touching chest compromises airway during sleep
Solution: Slide a tightly rolled towel under the base’s front edge (never under the child). For baseless seats, adjust vehicle seatback angle per manual instructions. Never use aftermarket head supports that alter recline.
Seat Belt Won’t Stay Tight
Common Cause: Non-ALR vehicle without locking clip
Resolution: Attach the locking clip within 1 inch of the buckle. Position clip perpendicular to the belt webbing. If belt still slips, switch to a different seating position—some vehicle seats have better belt geometry.
Professional Verification Checklist You Must Perform
Monthly Safety Inspection Routine
- Movement test: Apply firm pressure at belt path—exceeding 1 inch movement requires reinstallation
- Angle verification: Recheck level indicator after temperature changes (heat expands materials)
- Harness tension: Repeat pinch test weekly as children grow
- Belt condition: Inspect for fraying near retractor—replace immediately if damaged
When to Demand Professional Help
Visit a certified Child Passenger Safety technician (find locations via NHTSA website) if:
– You drive a pre-1996 vehicle
– Your car seat model is over 6 years old
– You’ve been in any collision (even minor)
– Monthly checks reveal recurring instability
Special Cases: Older Cars and Travel Scenarios
Conquering Pre-1996 Vehicle Challenges
Older vehicles lack ALR systems, making locking clips non-negotiable. Always:
– Use the clip within 1 inch of the buckle
– Route lap belt through lower path first
– Buckle lap belt before shoulder portion
– Schedule professional installation—improper routing causes 68% of failures in vintage cars
Air Travel and Taxi Hacks
For aircraft installations:
– Use seat belt without base
– Ignore lap belt retractor noise—it’s normal
– Position seat in window position away from exits
Carry a locking clip in your diaper bag for taxis/rideshare. Practice baseless installation at home until you can secure the seat in under 90 seconds.
Master Seat Belt Installation in 5 Minutes
Installing a car seat without LATCH isn’t just possible—it’s often the safer long-term solution. The difference between life and death lies in achieving absolute stability at the belt path through proper locking and relentless tightening. Remember: seat belt installations have lower misuse rates than LATCH because they demand deliberate engagement with vehicle mechanics. Test your installation monthly using the 1-inch movement rule, and never skip the recline check for newborns. When in doubt, seek certified technician help—your local fire station offers free inspections. Your child’s safety doesn’t depend on LATCH anchors; it depends on your commitment to perfecting this critical skill. Start practicing tonight—you’ll gain confidence that no rental car or aging vehicle can shake.


