
Installing a car seat like the Chicco KeyFit 30 can feel overwhelming, especially if you’re a new parent juggling baby gear and safety concerns. You’ve just brought home your little one, and the last thing you want is to fumble with straps and bases while worrying if everything’s secure. The good news? With the right steps, Chicco KeyFit 30 installation is straightforward and can be done in under 30 minutes using either the LATCH system or your vehicle’s seat belt. This guide will walk you through a quick baseline method to get you on the road safely right away.
Beyond the basics, this comprehensive Chicco KeyFit 30 car seat installation guide dives deep into preparation, detailed phases for both LATCH and seat belt methods, common pitfalls to avoid, and post-install testing. By the end, you’ll have the confidence to install it correctly every time, ensuring your infant’s safety on every trip. We’ll cover tools, safety tips, troubleshooting, and pro advice to make the process foolproof—no more second-guessing.
What You’ll Need for Chicco KeyFit 30 Installation
Before starting, gather these essentials to streamline the process. The Chicco KeyFit 30 comes with its own base, LATCH connectors, and instructions, but you’ll need a few household items for a secure fit. Always refer to your vehicle’s owner manual and the car seat’s manual for model-specific details—the KeyFit 30 fits infants 4-30 pounds and up to 30 inches tall, rear-facing only.
Here’s a handy table of required and recommended items:
| Item | Quantity | Specifications |
|---|---|---|
| Chicco KeyFit 30 Base | 1 | Included with car seat; anti-rebound bar for added stability |
| LATCH Connectors | 1 set | Included; rigid or flexible straps for vehicles with LATCH anchors |
| Vehicle Seat Belt | 1 | Lap/shoulder belt (avoid using just lap belt if possible) |
| Leveling Tool | 1 | Built into the base; or use a separate bubble level for verification |
| Seat Belt Lock-Off Clip | 1 | Included with base; locks the belt in place during installation |
| Blanket or Towel | 1 | For leveling on sloped seats; rolled towel works best |
| Wrench or Socket Set | 1 | For tightening LATCH if needed (optional, but handy) |
| Smartphone or Timer | 1 | For the 1-minute lock-off timer during seat belt install |
These tools ensure a tight, wobble-free installation, which is critical for safety. If your vehicle lacks LATCH (common in older models), stick to the seat belt method.
Preparing for Installation and Safety Considerations
Proper preparation sets the stage for a hassle-free Chicco KeyFit 30 installation. Start by choosing the right spot in your vehicle: the rear-facing position behind the passenger seat is ideal for easy access, but avoid the front seat due to airbag risks. Park on a level surface, turn off the engine, and remove any clutter from the seat area. This takes about 5-10 minutes and prevents distractions.
Safety first—warning: never install a car seat in a moving vehicle or without double-checking compatibility. The Chicco KeyFit 30 is compatible with most vehicles, but confirm via the NHTSA’s car seat checker tool (nhtsa.gov). Key considerations include:
– Recline Angle: The seat must be at a 30-45 degree angle; use the built-in level indicator.
– Airbag Awareness: Rear-facing seats amplify front airbag dangers—keep them in the back.
– Temperature Check: Install in moderate weather; extreme heat can damage plastic components.
– Child Fit: Ensure your baby is under the weight/height limits before use.
If you’re installing multiple seats, space them at least 2 inches apart. Read both manuals thoroughly— the KeyFit 30’s quick-reference guide is user-friendly but assumes basic knowledge. If you’re unsure, practice without the baby first.
Step-by-Step Chicco KeyFit 30 Installation Process
We’ll break this into three logical phases: vehicle prep, base installation, and seat securing. The entire process should take 20-40 minutes, depending on your method. Always aim for less than 1 inch of movement at the belt path when done. Choose LATCH for vehicles with anchors (post-2002 models) or seat belt for others.
Phase 1: Vehicle Preparation
Get your car’s seating area ready to accommodate the Chicco KeyFit 30 base securely.
- Clear the Area: Remove headrests, cup holders, or mats from the chosen rear seat. This ensures a flat surface.
- Check for LATCH Anchors: Locate the metal bars between the seat cushion and backrest (often under plastic covers). If absent, proceed to seat belt method.
- Level the Surface: If the seat slopes, roll a towel under the base’s front edge to achieve the proper recline. The KeyFit 30’s bubble level will confirm this—aim for the bubble between the marked lines.
- Disable Passenger Airbags if Needed: For taxis or older vehicles, consult your manual; this isn’t typical for standard installs.
Tip: Time yourself here—preparation is 80% of success. If the seat is leather, consider a non-slip mat to prevent sliding.
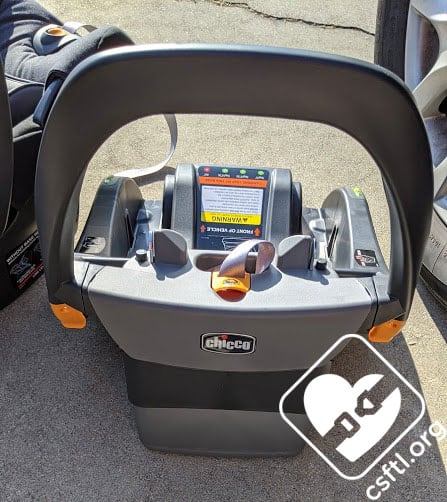
Phase 2: Installing the Base

The base is the foundation; install it first for stability. We’ll cover both LATCH and seat belt options.
LATCH Method (Recommended for Most Vehicles)
This uses the car’s lower anchors for a rigid connection, ideal for the KeyFit 30’s lightweight design (under 10 pounds).
- Position the Base: Place the base on the seat, aligning the LATCH bars with your vehicle’s anchors. The belt path should face the rear.
- Attach Connectors: Hook the rigid LATCH straps (or flexible if included) onto the anchors. Push firmly until they click— you’ll hear an audible snap.
- Tighten the Straps: Pull the adjustment strap at the front of the base to remove slack. Use your knee to press down while tightening for a snug fit. The base should move less than 1 inch side-to-side.
- Lock It In: Engage the lock-off clip if using seat belt hybrid, but for pure LATCH, skip to leveling. Takes about 10 minutes.
Warning: If the LATCH strap won’t tighten fully, your vehicle may not be compatible—switch to seat belt.
Seat Belt Method (For Non-LATCH Vehicles)
Use your vehicle’s lap/shoulder belt for a universal fit.
- Route the Belt: Thread the seat belt through the base’s belt path (marked in blue), buckling it normally. Position the base as far back as possible against the vehicle seatback.
- Lock the Belt: Hold the belt taut and engage the lock-off clip on the base (squeeze the levers to clamp). For vehicles without automatic locking retractors, use the 1-minute rule: pull the belt, let it retract slowly for 60 seconds to lock.
- Tighten and Level: Press down on the base with your body weight while pulling the belt tighter. Adjust the recline foot (under the base) to match the level indicator.
- Secure Excess Belt: Tuck any loose belt into the lock-off or vehicle compartment. This method takes 15 minutes max.
In both cases, wiggle the base: forward/back and side-to-side movement should be minimal. If not, reinstall.
Phase 3: Securing the Infant Car Seat
Once the base is set, snap in the carrier— the KeyFit 30’s “SuperCinch” feature makes this easy.
- Align and Click: Lift the carrier’s handle (in carry position) and align the red connectors with the base’s slots. Push down firmly until you hear a loud click— the level indicators will turn green.
- Tug Test: Pull up on the carrier to ensure it’s locked. It shouldn’t lift more than a quarter-inch.
- Adjust Recline: Fine-tune the base’s recline foot if the carrier shifts. For newborns, add a rolled blanket under the shell (not under baby) for support.
- Harness Setup: Before placing baby, loosen the 5-point harness, set the chest clip at armpit level, and ensure the crotch buckle is threaded correctly. Buckle baby in snugly—no more than two fingers between harness and chest.
Important: Never use after a crash without replacement; the KeyFit 30 has built-in indicators for impact damage.
Post-Completion Testing and Troubleshooting

After installation, verify everything with these tests to confirm your Chicco KeyFit 30 car seat installation meets federal safety standards (FMVSS 213).
- Movement Check: Grasp the base at the belt path and push/recline. Less than 1 inch of give is acceptable; more means reinstall.
- Level Confirmation: Double-check the bubble level on uneven roads—re-test after driving.
- Harness Fit Test: Place baby in; the harness should be tight, with the clip at collarbone and straps below shoulders.
- On-the-Road Test: Drive a short distance and listen for rattles. Stop and readjust if needed.
Common issues and fixes:
– Wobbling Base: Re-tighten LATCH or belt; add padding for uneven seats.
– No Click Sound: Clean connectors and retry; if persistent, check for base damage.
– Recline Too Steep: Extend the recline foot fully (three positions available).
– LATCH Incompatibility: Switch to seat belt— the KeyFit 30 excels here with its lock-off clip.
If tests fail, remove and restart. The NHTSA recommends professional inspection at a certified station (find via safekids.org).
Pro Tips for Chicco KeyFit 30 Users
Elevate your installation game with these expert insights to maximize safety and convenience:
- Use the Anti-Rebound Bar: Always extend it for rear-facing installs—it reduces rotation in crashes by up to 70%, per Chicco’s testing.
- Practice Swaps: The KeyFit 30 clicks in/out in seconds; master this for quick errands or stroller compatibility (pairs with Chicco Bravo).
- Avoid Seat Protectors: They can interfere with fit—use a thin towel instead.
- Winter Install Hack: Pre-warm the car seat in cold weather to avoid stiff straps; never leave baby unattended.
- Rotation Trick: For tight spaces, rotate the base 180 degrees during install, then flip back.
- Maintenance Must: Clean the base monthly with mild soap; inspect harness for frays.
- Travel Tip: The KeyFit 30 is FAA-approved for flights—practice airport installs.
Steer clear of mistakes like over-tightening (can warp the base) or installing forward-facing too soon (wait until 2 years/weight limit).
When to Seek Professional Help
While DIY Chicco KeyFit 30 installation is doable, some situations call for experts. Signs include: persistent wobble after multiple tries, vehicle-specific quirks (e.g., captain’s chairs), or if you’re installing in a rideshare/taxi.
Look for certified technicians via the Safe Kids Network or local fire stations—they’re free and provide hands-on checks. Expect $50-100 for paid services at auto shops like Pep Boys. The KeyFit 30 has a 1-year warranty; contact Chicco support (chiccousa.com) for defects. If post-crash, always replace—insurance often covers it.
Frequently Asked Questions
Q: Can I install the Chicco KeyFit 30 without the base?
A: Yes, for taxis or quick trips, use the seat belt method directly through the carrier’s paths (European belt mode). However, the base provides better stability and ease—avoid base-less installs for daily use, as they increase movement risk.
Q: How do I know if my vehicle is LATCH-compatible?
A: Check your owner’s manual or the lower seat cushions for exposed anchors. Vehicles made after September 2002 typically have them in at least two rear positions. Use the NHTSA vehicle-car seat fit guide online for confirmation.
Q: What’s the proper recline angle for newborns?
A: Aim for 30-45 degrees using the built-in level. For preemies under 4 pounds, add the Chicco newborn insert (included) and consult a pediatrician for head support.
Q: How often should I recheck the installation?
A: After every ride, major potholes, or seat adjustments. Monthly full inspections are ideal, especially if switching vehicles.
Q: Can the KeyFit 30 be used in the center seat?
A: Yes, if your vehicle has a LATCH bar there or use seat belt. It’s the safest spot, but ensure no side airbag interference.
Q: What if the harness is too loose?
A: Tighten via the front adjuster while pressing the chest down. It should lie flat without pinching skin—rethread if the baby has outgrown slots.
Q: Is the KeyFit 30 compatible with all strollers?
A: It clicks into Chicco strollers seamlessly, but adapters ($30-50) are needed for brands like Uppababy or Bugaboo. Check compatibility lists on retailer sites.
Q: How do I uninstall the base for cleaning?
A: Release LATCH by pressing the red buttons or unclip the seat belt lock-off. Lift straight up—takes 2 minutes; air-dry before reinstalling.
Safely Install Your Chicco KeyFit 30 Today
With this guide, you’ve got everything to master Chicco KeyFit 30 car seat installation:
– Essential tools and prep steps for a solid foundation
– Detailed LATCH and seat belt methods with phase-by-phase instructions
– Testing protocols and troubleshooting for peace of mind
Following these steps ensures your infant rides securely, reducing crash injury risks by up to 70% according to NHTSA data. Take the time to install correctly—you’re protecting what matters most. Head to your vehicle now and give it a go; practice makes perfect.
Have you installed your Chicco KeyFit 30 yet? Share your tips or challenges in the comments to help other parents. If this guide saved you time, bookmark it for future reference!
(Word count: 1,856)


