
Installing a Cosco kids car seat can feel overwhelming, especially if it’s your first time ensuring your little one’s safety on the road. You’ve probably stared at the straps, buckles, and confusing instructions, wondering if you’re doing it right to prevent any accidents. The good news? With a few straightforward steps, you can achieve a secure Cosco kids car seat installation that meets federal safety standards—often in under 30 minutes. Start by always consulting your specific model’s manual, as variations exist between rear-facing infant seats and forward-facing boosters.
In this comprehensive guide, we’ll go beyond the basics to cover everything from tools and preparation to detailed installation phases for different orientations. Whether you’re using the LATCH system or a seat belt, we’ll provide multiple methods, safety tips, and troubleshooting for common hiccups. By the end, you’ll feel confident that your Cosco car seat is rock-solid, giving you peace of mind for every family drive.
What You’ll Need for Cosco Kids Car Seat Installation
Before diving in, gather the right tools and materials to make the process smooth and error-free. Cosco car seats are designed for easy setup, but having everything ready prevents frustrating trips back to the garage. Refer to your model’s manual (available on the Cosco website or included in the box) for exact specs, as requirements can vary by model like the Scenera NEXT or Comfy Carry.
Here’s a handy checklist in table form:
| Item | Quantity | Specifications |
|---|---|---|
| Cosco Kids Car Seat | 1 | Your specific model (e.g., rear-facing for infants 4-35 lbs or forward-facing for toddlers 22-65 lbs) |
| Vehicle Owner’s Manual | 1 | Check LATCH compatibility and seating positions |
| Car Seat Manual | 1 | Digital or printed; download from doreljuvenile.com if lost |
| LATCH Connectors (if applicable) | 2 | Included with most Cosco models; for vehicles with LATCH anchors |
| Seat Belt (vehicle’s) | N/A | Lap-shoulder belt for non-LATCH installs; ensure it’s not locked |
| Blanket or Towel | 1 | For leveling the seat on uneven vehicle floors (rear-facing only) |
| Wrench or Socket Set | 1 | For tightening LATCH straps if needed (5/16-inch size common) |
| Level Tool | 1 | Built-in bubble level on many Cosco seats or a smartphone app alternative |
| Pen and Paper | 1 | To note recline angles or strap positions for future reference |
Important: Never use aftermarket accessories unless approved by Cosco. All installations must comply with NHTSA guidelines to ensure the seat withstands crash forces up to 3,300 pounds.
Preparing Your Vehicle for Car Seat Installation
Proper preparation is key to a safe and hassle-free Cosco kids car seat installation. Skipping this can lead to improper fit, which is a leading cause of installation errors—up to 80% of seats are installed incorrectly, according to the National Highway Traffic Safety Administration (NHTSA). Take 10-15 minutes to set up your space.
Safety Considerations First
Always park your vehicle on a flat surface, engine off, and keys removed to avoid accidental movement. If installing in the rear seat (recommended for kids under 13), ensure airbags are deactivated if front-seating an infant—though rear is always safer. Wear gloves if the weather is extreme to avoid slipping.
Warning: Never install a car seat in a seat with active side airbags, as they can deploy and cause injury. Check your vehicle’s manual for approved positions—typically the center rear for best protection.
Cleaning and Clearing the Area
Remove any trash, coats, or bulky items from the seating area to create a clean, flat surface. Wipe down the seat with a mild cleaner to remove debris that could interfere with the base. For rear-facing installs, measure your vehicle’s seat angle; if it’s sloped more than 30 degrees, use a rolled towel or pool noodle under the front edge to level it (but not under the LATCH base).
Checking Compatibility
Verify your vehicle supports the car seat: Look for the LATCH symbol (a car icon with straps) on the seat’s lower anchors. If your car is pre-2002, it may lack LATCH, so default to seat belt installation. Test-fit the empty seat first— it should not move more than 1 inch side-to-side or front-to-back when tugged at the belt path.
Step-by-Step Cosco Kids Car Seat Installation Guide
Now for the heart of the process: the installation itself. Cosco car seats support both LATCH (Lower Anchors and Tethers for Children) and seat belt methods, with rear-facing for newborns and forward-facing for older kids. We’ll break it into phases for clarity, assuming a standard model like the Cosco Scenera. Total time: 20-40 minutes. Always double-check the harness after buckling your child.
Phase 1: Unboxing and Initial Setup
Unpack the car seat and inspect for damage—return it if anything’s bent or frayed. Adjust the recline to the correct position (most Cosco seats have 3-4 settings; use the one matching your child’s height/weight from the manual).
- Remove any packaging and locate the LATCH straps or belt guides.
- Set the seat to the appropriate orientation: Rear-facing for infants (back to the dashboard) or forward-facing (facing front).
- Adjust the harness straps: For rear-facing, they should be at or below the child’s shoulders; for forward-facing, at or above. Thread them through the slots and buckle loosely for now.
Pro Tip: If your model has a chest clip, position it at armpit level. This phase takes about 5 minutes and prevents mid-install headaches.
Phase 2: Rear-Facing Installation (For Infants 4-35 lbs)
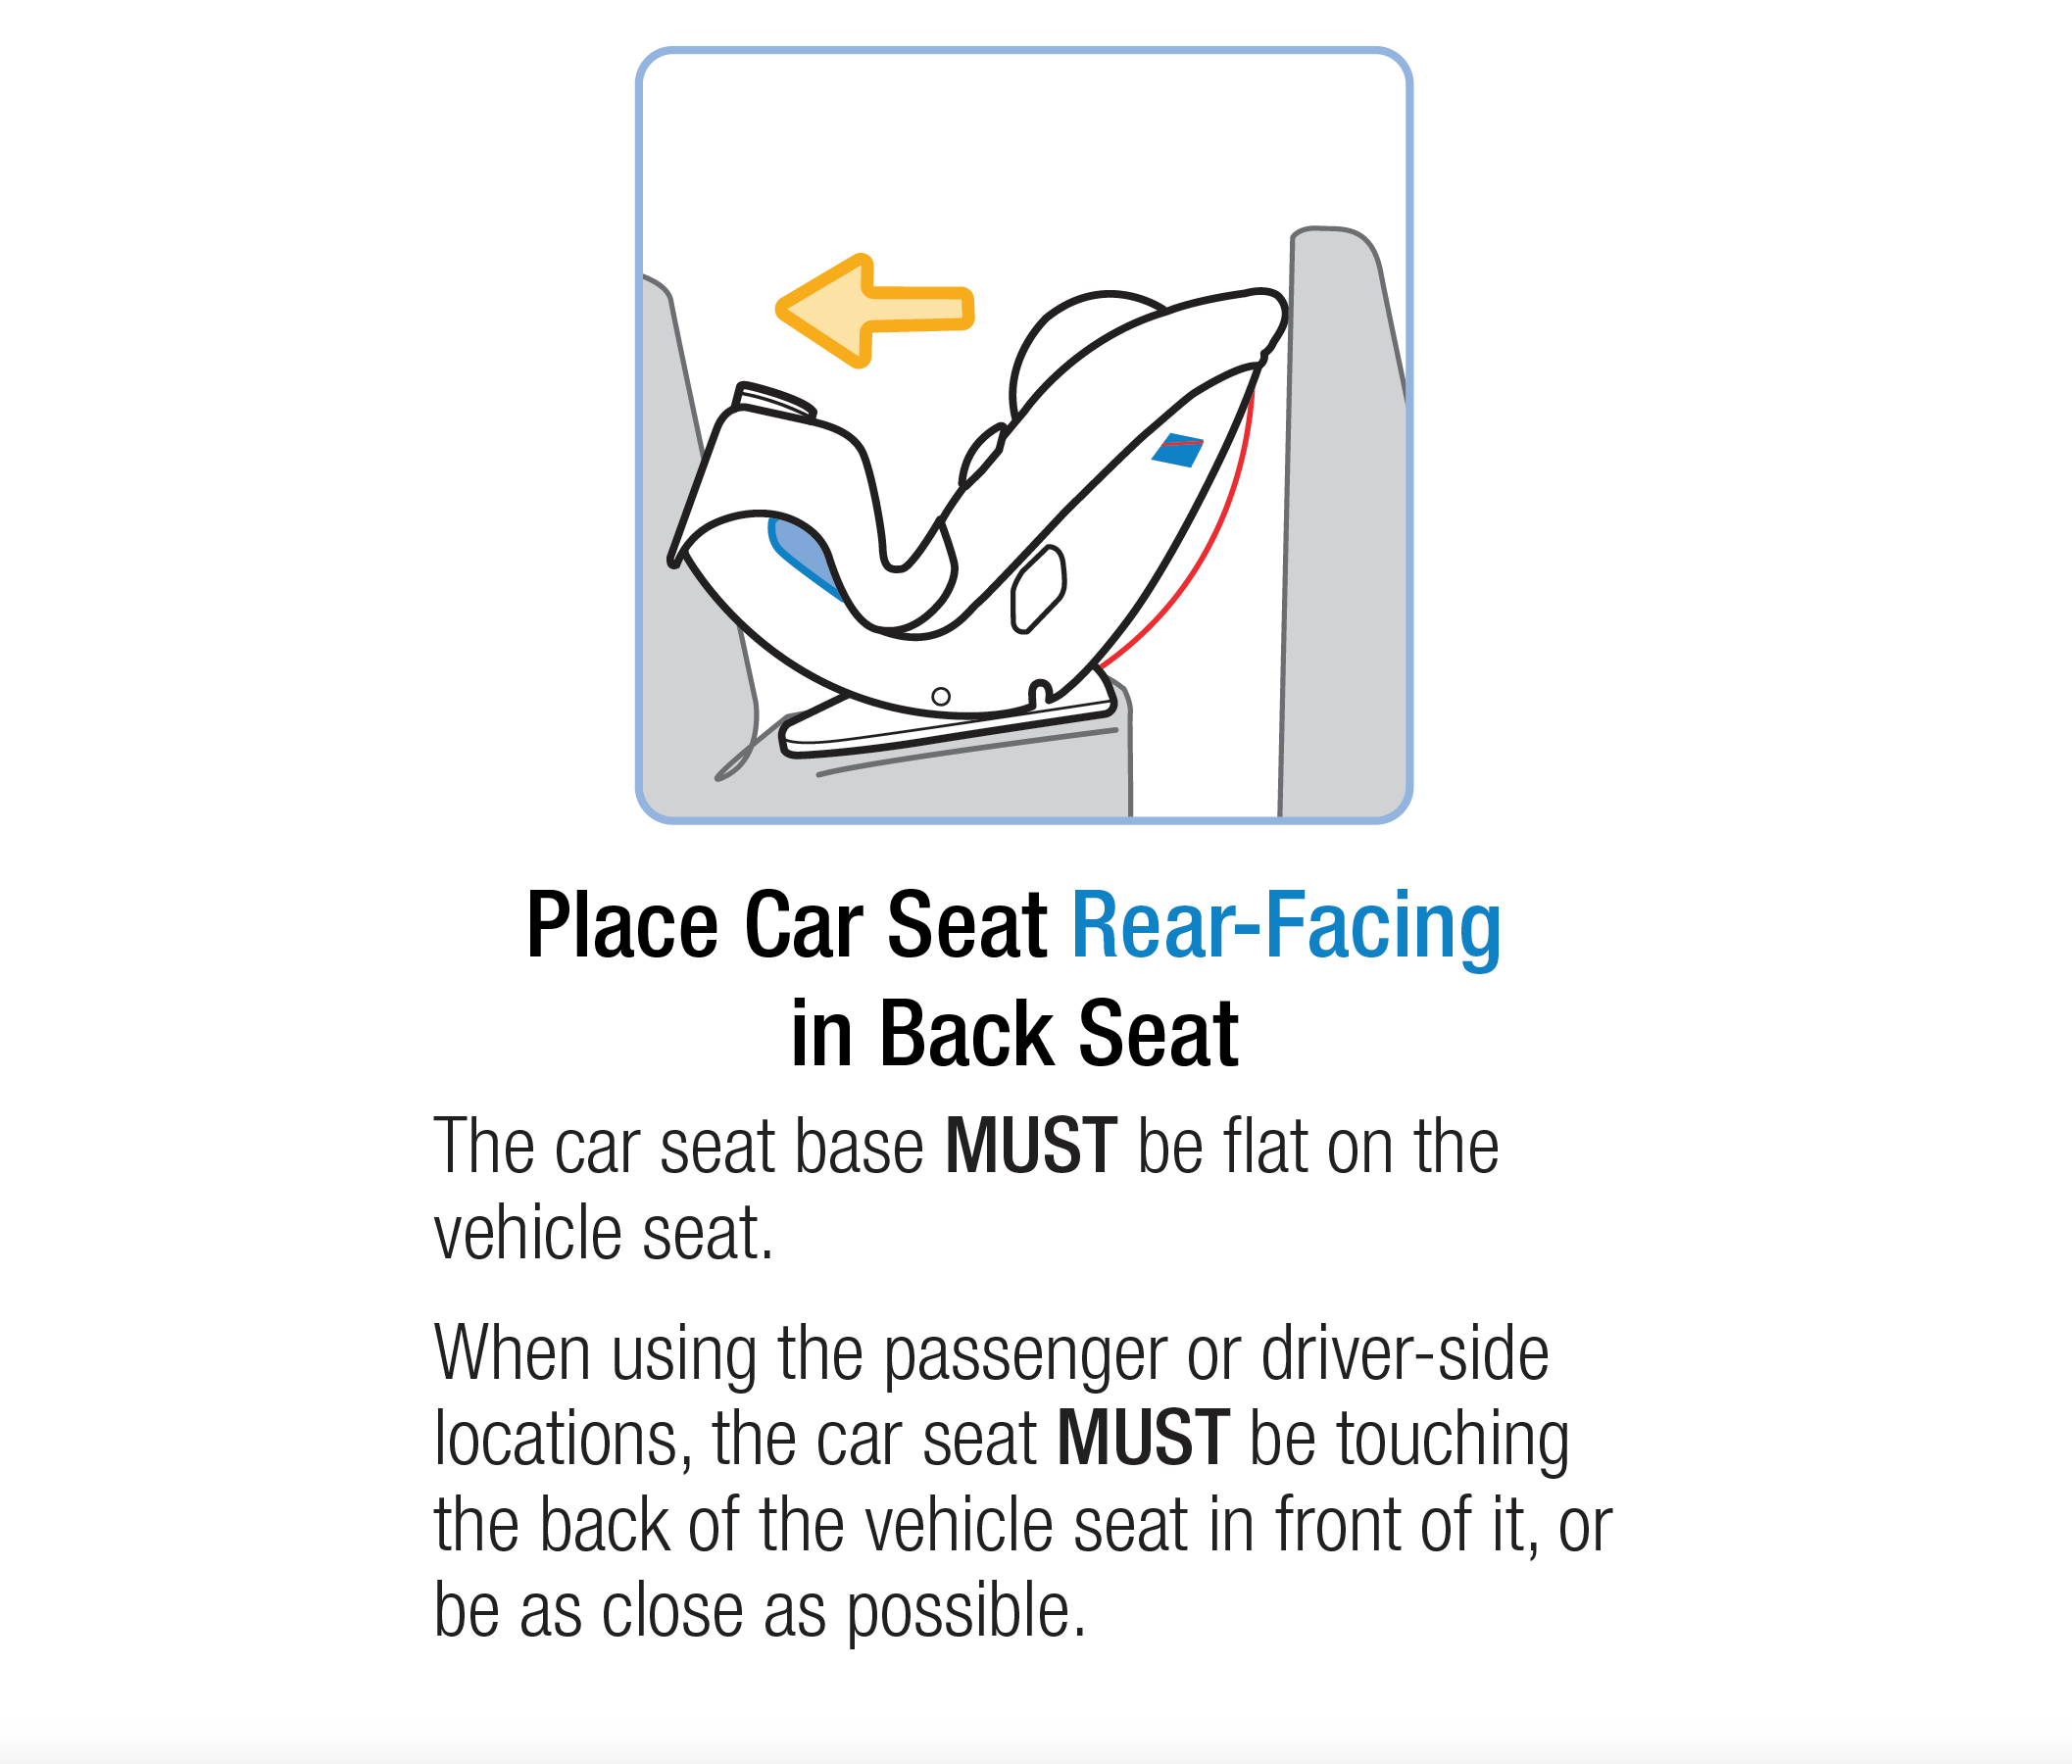
Rear-facing is the safest for babies, distributing crash forces across the back and head. Use the center rear seat if possible for optimal side-impact protection.
Using LATCH for Rear-Facing
- Locate the LATCH anchors in your vehicle (usually between the seat cushions or on the seatback).
- Attach the lower LATCH straps to the anchors, ensuring a click—pull firmly to confirm.
- Tighten the straps using the adjustment mechanism until the seat is snug; it shouldn’t wiggle more than 1 inch.
- Recline the seat to the correct angle (use the built-in level—aim for green zone).
- Secure the top tether (if your model has one) to the vehicle’s tether anchor behind the seat.
Using Seat Belt for Rear-Facing (If No LATCH)
- Route the lap-shoulder belt through the rear-facing belt path (blue guides on most Cosco seats).
- Buckle the belt, then feed the shoulder portion back through the guide.
- Lock the belt (pull the shoulder strap fully, then tug the lap belt tight—your vehicle may have a lock-off clip).
- Push down firmly on the seat while tightening to remove slack.
Warning: Do not twist the belt. If it won’t lock, consult your vehicle manual for the “locking mode.”
This phase typically takes 15 minutes. For forward-facing, skip to Phase 3, but ensure the child is at least 2 years old and 22 lbs.
Phase 3: Forward-Facing Installation (For Toddlers 22-65 lbs)

Once your child outgrows rear-facing (check weight/height limits), switch to forward-facing with a top tether for stability.
LATCH Method for Forward-Facing
- Position the seat forward and attach LATCH lower straps as in Phase 2.
- Tighten until snug, then connect the top tether to the anchor (essential—reduces head movement in crashes by 40%, per NHTSA).
- Adjust the recline to the middle position and set harness straps at/above shoulders.
Seat Belt Method for Forward-Facing
- Thread the belt through the forward-facing path (red guides).
- Buckle and lock as before, then attach the top tether.
- Test for movement: Grab the seat at the belt path and shake—no more than 1 inch.
If using as a booster (high-back or backless for kids 40-100 lbs), simply secure the seat with the belt and have your child buckle up independently.
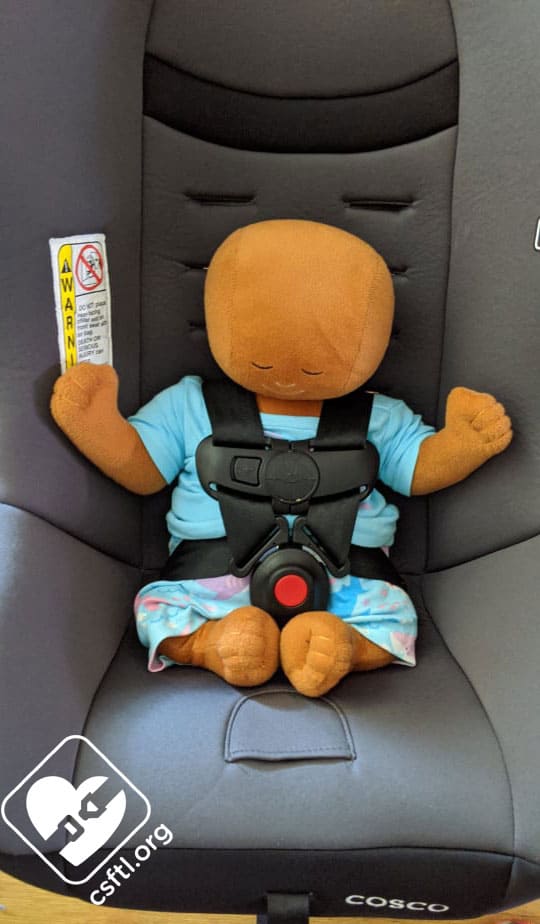
Phase 4: Securing Your Child
- Place the child in the seat, ensuring clothes aren’t bunching under straps.
- Thread arms through harness, pull straps snug (pinch test: You shouldn’t pinch fabric at the collarbone).
- Fasten the chest clip and buckle—straps should lie flat without twists.
- Tug on the harness to confirm tightness.
Post-Installation Testing and Troubleshooting
Once installed, test rigorously to mimic real-world use. Drive around the block and check for shifts after 5-10 minutes.
Basic Testing
- Side-to-Side Wiggle: Grip the seat at the top and base; movement over 1 inch means re-tighten.
- Front-to-Back Pull: Tug at the belt/LATCH path—slack indicates improper locking.
- Harness Check: With child seated, ensure straps are flush and the chest clip is level.
Common Troubleshooting
- Seat Won’t Tighten: Slack LATCH? Use the wrench to adjust. For belts, ensure no twists and try the “push-down” technique while pulling.
- Uneven Recline: Add/remove towel under the front; never under the entire base.
- LATCH Won’t Click: Clean anchors and try a different angle—some vehicles have rigid lower bars.
- Error After Crash: Replace the seat if involved in any moderate collision (per Cosco policy).
If tests fail, uninstall and retry. For persistent issues, visit a free NHTSA-certified inspection station (find one at nhtsa.gov).
Pro Tips for Cosco Kids Car Seat Installation
To elevate your setup from good to great, incorporate these expert insights from certified child passenger safety technicians:
- Register Your Seat: Sign up at coscobaby.com for recall alerts—takes 2 minutes and could save lives.
- Avoid Common Mistakes: Don’t place heavy items on the seat during install; they can throw off leveling. Also, never use the seat without the base if it’s a detachable model.
- Optimize for Growth: Mark harness heights on the seat with tape for quick adjustments as your child grows.
- Weather-Proof It: In hot climates, cover the seat with a breathable fabric when parked to prevent harness degradation.
- Multi-Vehicle Use: If switching cars, practice installs in each to account for variations—LATCH spacing differs by model.
- Enhance Comfort: Add a thin mat under the seat for vibration absorption on long trips.
- Stay Updated: Check for firmware or strap updates on the Cosco site annually.
These tweaks can extend your seat’s usability and ensure it performs at peak safety levels.
When to Seek Professional Help
While DIY Cosco kids car seat installation is straightforward, some situations call for experts. Signs include: Your vehicle lacks clear LATCH anchors, the seat shifts despite multiple tries, or you’re adapting for special needs (e.g., larger vehicles or multiples).
Look for certified technicians via Safe Kids Worldwide or local fire stations—they offer free checks. Expect $50-100 for paid services, though most are complimentary. If under warranty (typically 1 year), contact Cosco support at 1-800-544-1107 for guidance or replacement parts. Always verify the provider’s NHTSA certification to avoid subpar advice.
FAQ
Q: How long does Cosco kids car seat installation take for beginners?
A: For first-timers, plan 30-45 minutes including reading the manual and testing. With practice, it drops to 10-15 minutes. Start with LATCH if available for quicker setup.
Q: Can I install a Cosco car seat in the front seat?
A: Only for kids over 13 or in vehicles without rear seats, and with passenger airbags off. Rear installation is always safer to avoid airbag injuries.
Q: What’s the difference between LATCH and seat belt installation for Cosco seats?
A: LATCH uses built-in anchors for a rigid connection, ideal for lighter seats (under 65 lbs total). Seat belts work for heavier setups or older vehicles, providing similar security when locked properly. Both are NHTSA-approved if done right.
Q: Do all Cosco models come with LATCH?
A: Most do since 2002, but check your manual—budget models like the Pronto may rely more on belts for booster mode.
Q: How do I know if the installation is correct without a professional?
A: Use the 1-inch rule: No more than 1 inch of movement in any direction. Also, the built-in level should show proper recline, and the harness should pass the pinch test.
Q: What if my child’s legs are too long for rear-facing?
A: Keep rear-facing until at least age 2 or the maximum height/weight (e.g., 40 inches/35 lbs on Scenera). Legs dangling is safer than forward-facing too soon.
Q: Can I wash the Cosco car seat covers during installation?
A: No—install first, then spot-clean if needed. Full washing requires disassembly post-setup; follow manual for machine-safe parts.
Alternative Solutions for Car Seat Installation
If LATCH or belt methods don’t fit your vehicle, consider these options. For example, some parents opt for base-only systems or universal adapters.
| Solution | Pros | Cons | Best For |
|---|---|---|---|
| Universal LATCH Extender | Adds reach for awkward anchor spots; easy clip-on. | May void warranty if not Cosco-approved; extra cost ($20-30). | Vehicles with recessed anchors like SUVs. |
| Seat Belt Tensioner Clip | Helps lock belts in older cars; inexpensive ($10). | Not needed for modern vehicles; can complicate routine. | Pre-2002 cars without LATCH. |
| Switching to a Base-Only Model (e.g., Cosco Comfy Carry Elite) | Quick snap-in for multiples; portable. | Base must stay in one vehicle; higher upfront cost. | Families with two cars. |
| Professional On-Site Install Service | Expert verification; handles complications. | Scheduling required; potential fees. | High-anxiety parents or complex vehicles. |
Compare based on your needs—stick to Cosco-compatible items to maintain safety ratings.
Enjoy Safe Travels with Your Cosco Kids Car Seat
You’ve now mastered the ins and outs of Cosco kids car seat installation, from gathering tools and prepping your vehicle to phased setups and thorough testing. Key takeaways include:
– Prioritizing rear-facing for infants and always using the top tether forward-facing.
– Double-checking for less than 1 inch of movement and proper harness fit.
– Incorporating pro tips like registration and avoiding common pitfalls for long-term reliability.
Following this guide ensures your setup meets or exceeds safety standards, protecting your child in every journey. Take action today: Install or recheck your seat, then hit the road with confidence.
Have you installed a Cosco kids car seat before? Share your tips or challenges in the comments below to help other parents! If issues persist, describe your setup for tailored advice.


