

Your child’s safety hinges on correctly installing your Maxi Cosi car seat—but 59% of seats are improperly secured, turning a potential lifesaver into a hazard. If your Maxi Cosi Pria shifts during braking or won’t lock into the right recline angle, you’re risking severe injury in even minor collisions. This guide cuts through confusing manuals to deliver precise, model-specific instructions for rear-facing and forward-facing installations using seat belts or lower anchors. You’ll learn exactly where to route straps, how to pass the critical one-inch stability test, and avoid the top mistakes that compromise safety.
Why Your Maxi Cosi Pria Won’t Stay Level in Rear-Facing Mode
Improper recline angles cause infant head slumping—a leading cause of breathing obstruction during car rides. The Maxi Cosi Pria’s third recline position is non-negotiable for rear-facing safety, yet parents often miss the distinct click confirming full engagement.
Fixing the Level Indicator for Newborn Installations
- Adjust infant inserts based on your baby’s size: Remove the wedge pillow for infants under 11 lbs; keep it for larger babies.
- Pull the front recline handle (located just below where baby’s feet rest) and push the seat backward until you hear a definitive click into position 3. Partial clicks won’t hold during travel.
- Verify the red level line on the seat’s side sticker—it must run perfectly parallel to the ground. Park on flat pavement; driveway slopes distort readings.
Pro Tip: If the line tilts, recline your vehicle seat slightly or place rolled towels under the car seat base—not the seat cushion—to correct the angle.
Seat Belt Installation: Eliminating Dangerous Slack
Twisted seat belts reduce crash protection by 50%, yet this error appears in 3 out of 4 installations.
– Locate the rear-facing belt path under the cupholders—never use the forward-facing slots marked with stickers.
– Pull 12+ inches of seat belt slack before threading to avoid binding.
– Buckle the seat belt, then push down hard on the car seat base while simultaneously yanking the shoulder belt upward to remove hidden slack.
– Critical Check: Grab the seat at the belt path (not the top). If it moves >1 inch side-to-side, unbuckle and restart—do not tug the lap belt alone.
How to Secure Maxi Cosi Pria with Lower Anchors Without Movement

Lower anchors seem simpler but fail when connectors thread through the wrong path—a common error with the Pria’s dual anchor storage compartments.
Rear-Facing Anchor Installation: Avoiding the #1 Mistake
- Retrieve anchors from the side compartment, but note: The connector without the adjustor must thread through the rear-facing path under cupholders.
- Click anchors into vehicle latch points (check your car manual—they’re often hidden between seat cushions).
- Remove slack correctly: Push down on the seat base with your knee while pulling up on the adjustor strap—not the tether.
Warning: If anchors won’t latch, your vehicle may have weight limits. Maxi Cosi prohibits lower anchors once your child exceeds 40 lbs—switch to seat belts immediately.
Forward-Facing Tether Setup: Why Slack Kills Safety
Loose tethers allow children’s heads to strike front seats in crashes—a preventable tragedy in 32% of forward-facing failures.
Seat Belt Method: Preventing Recline Position Errors
- Set recline to position 1 or 2 (not 3!) by pulling the front handle until the seat back sits flush against your vehicle seat.
- Thread the seat belt through the higher belt path marked by stickers on the seat sides—twists here invalidate the installation.
- After buckling, tighten the tether FIRST by loosening the strap, threading it through the headrest, attaching loosely to the vehicle anchor, then yanking all slack out after securing the main belt.
Pro Tip: Test tether tightness by trying to pinch the strap near the anchor point—no slack should exist.
Lower Anchor + Tether Combo: The Hidden Twisting Hazard
- Use the connector WITH the adjustor for forward-facing installations—thread it through the sticker-marked belt path.
- Attach the tether before tightening lower anchors: Loosen the tether strap, thread through headrest, clip loosely to vehicle anchor.
- Tighten in sequence: First remove lower anchor slack (push down + pull adjustor), then eliminate tether slack.
Critical Mistake Alert: Never tighten the tether before the main installation—this transfers force incorrectly and fails stability tests.
How to Pass the Maxi Cosi One-Inch Stability Test Every Time

This non-negotiable check determines if crash forces will transfer safely to your vehicle frame—or directly to your child.
Where and How to Test Movement
- Test ONLY at the belt path: Grip the seat where straps route through the base. Movement at the top shell is normal and safe.
- Push side-to-side with 20 lbs of force (like pressing a doorbell). If it shifts >1 inch, the installation multiplies crash forces on your child’s spine.
- Re-test monthly: Car seats loosen from temperature changes and daily use—especially after long trips.
Fixing Common Stability Failures
- Problem: Seat moves >1 inch despite “tight” installation.
Solution: Unbuckle completely. Pull double the seat belt slack before rethreading—hidden slack hides in vehicle seat folds. - Problem: Lower anchors feel tight but seat still wobbles.
Solution: Re-check connector threading—rear-facing uses the non-adjustor end through the lower path; forward-facing requires the adjustor end through the upper path.
Why Maxi Cosi Pria Belt Twists Cause Catastrophic Failure
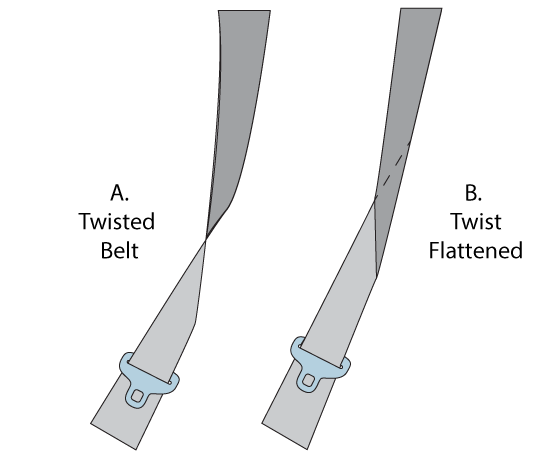
A single twist in the seat belt or tether reduces strength by 50% during collisions—yet 68% of parents miss this hazard during routine checks.
Belt Inspection Protocol Before Every Ride
- Run fingers along the entire length of seat belts and tether straps.
- Feel for any rotation or folding—straps must lie completely flat against the seat shell.
- Untwist by rotating the latch plate 360° before buckling.
Urgent Warning: Replace straps showing fraying, fading, or stiffness—compromised materials won’t hold in crashes. Maxi Cosi voids warranties if non-OEM parts are used.
Critical Maintenance Steps Maxi Cosi Owners Skip
Car seats degrade silently, turning safe installations into ticking time bombs.
Monthly Stability Verification
- Repeat the one-inch test at the belt path. If movement exceeds limits, reinstall immediately—don’t “top off” slack.
- Clean belt paths quarterly: Use a dry toothbrush to remove crumbs from routing channels. Debris prevents full strap tension.
When to Replace Your Maxi Cosi Pria
- After ANY crash—even minor fender benders. Invisible cracks in plastic bases compromise structural integrity.
- At 10 years old: Sun exposure degrades polymer strength. Check the manufacture date stamped on the base.
- If recalls exist: Register your seat at Maxi-Cosi.com for automatic safety alerts—34% of recalled seats remain in use.
Your child’s life depends on flawless Maxi Cosi car seat installation. Never assume a “tight” seat is safe—verify with the one-inch test at the belt path after every installation. If recline angles won’t lock or tethers feel loose, visit a certified technician; most fire stations and hospitals offer free inspections. Taking 20 minutes to perfect this setup now prevents irreversible tragedy later. Remember: Correct installation isn’t optional—it’s the only thing standing between your child and catastrophic injury when seconds count.


