
Your child just had a growth spurt, and those once-perfect car seat straps now dig into their shoulders like a vice. You pull the harness adjuster, but the straps won’t budge—or worse, one side loosens while the other stays rigid. This frustrating scenario affects nearly half of all parents: NHTSA data shows 46% of car seats contain harness errors that compromise crash protection. Learning how to loosen car seat straps correctly isn’t just about comfort—it’s the difference between true safety and hidden danger during every ride.
Improper harnessing dramatically increases ejection risks and injury potential during collisions. As Consumer Reports’ Emily Thomas explains, “Proper harnessing ensures your child reaps the full benefits of both the car seat and your vehicle’s crash management features.” This guide cuts through the confusion with precise, actionable steps to loosen straps safely while maintaining life-saving security. You’ll discover manufacturer-specific adjustments, twisted strap fixes, and verification techniques that take under 60 seconds per check.
Verify Correct Strap Position Before Adjusting
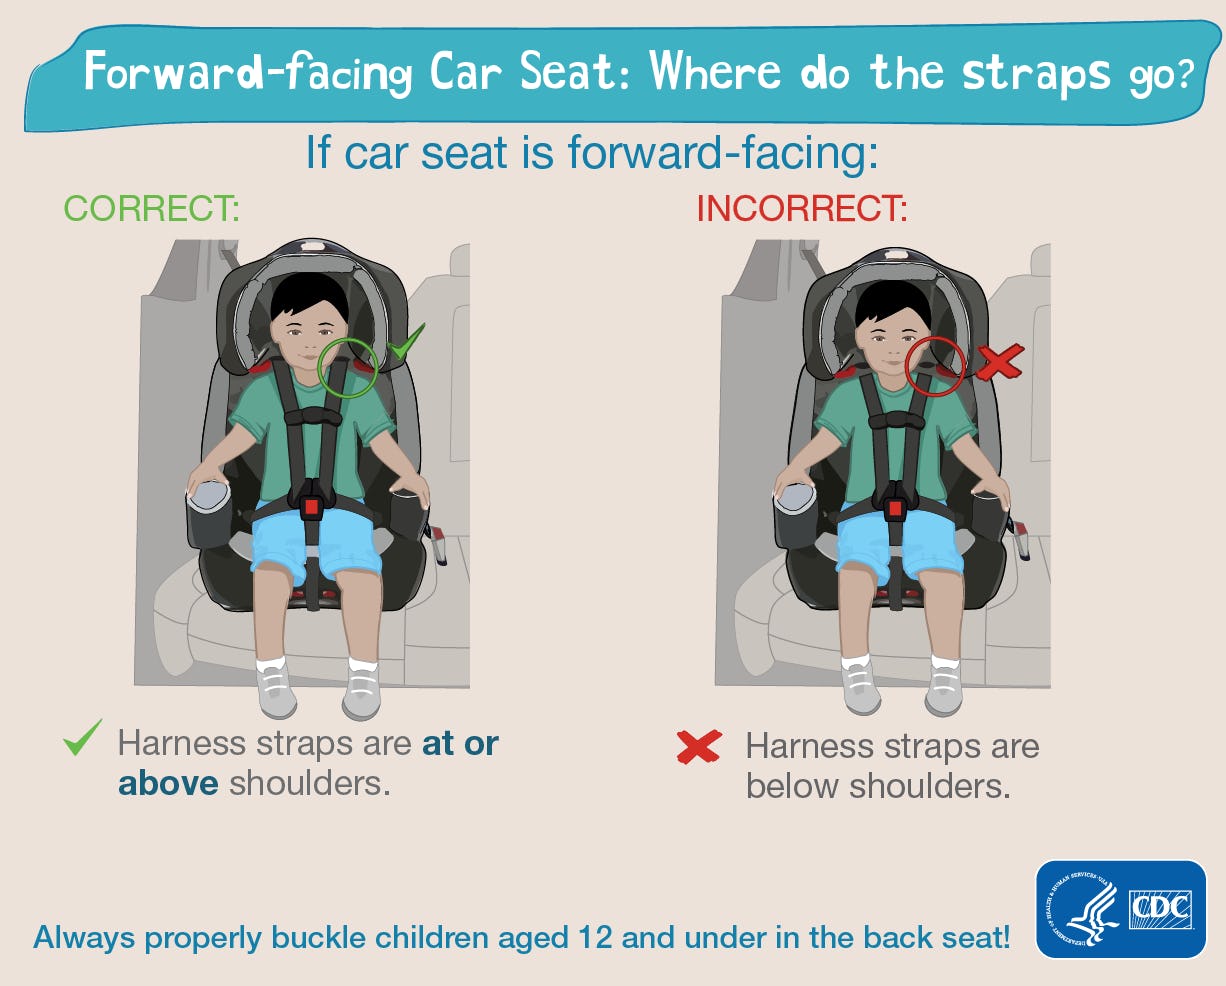
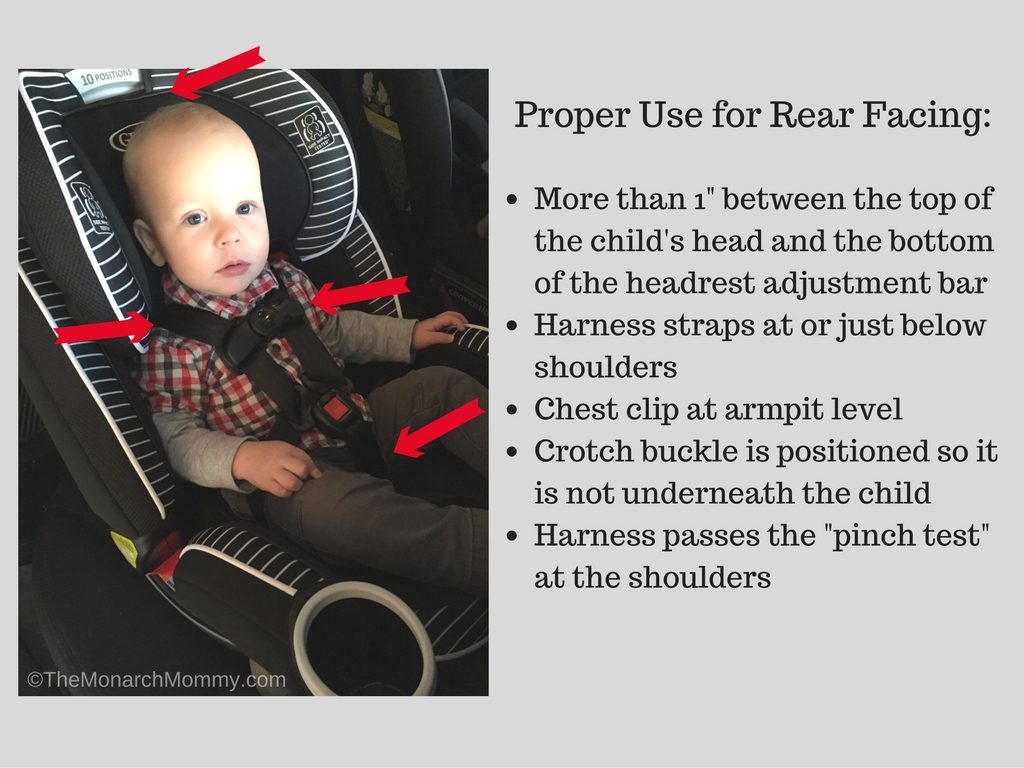
Rear-facing seats require straps at or just below shoulder level—except Britax models where straps must originate below shoulders. Forward-facing seats need straps at or above shoulders, with Britax again requiring above-shoulder threading. Uppababy Knox owners face unique rules: less than one inch should separate your child’s shoulder from the headrest.
Critical visual check: If straps sit more than an inch outside these zones, re-threading—not simple loosening—is required. Forcing adjustments here risks improper tension distribution during crashes. Always confirm positioning before touching release mechanisms to avoid creating new safety gaps.
Activate the Hidden Release Mechanism Correctly

Your car seat’s harness release button hides 2-3 inches beneath the front padding. Trace the hanging strap downward until you feel a small plastic lever or button. Crucial variation alert: Some brands like Graco require upward pressure, while Chicco models need downward pressing—forcing the wrong motion can fracture internal components.
Pro technique: Press the release button while simultaneously pulling both shoulder straps upward from the harness top. This dual-action prevents uneven slack buildup. If resistance feels abnormal, stop immediately—debris or fabric jams may be blocking the mechanism. Never yank straps without activating the release; this strains stitching and compromises structural integrity.
Achieve Perfectly Even Strap Loosening
Pulling one strap more than the other creates dangerous asymmetry where crash forces concentrate unevenly. Always pull both shoulder straps simultaneously while holding the release button. If starting with uneven straps:
1. Completely loosen both sides to full extension
2. Re-tighten while keeping palms flat against both straps
3. Maintain constant pressure under the straps to gauge symmetry
Red flag: If one strap releases significantly more slack than the other, internal routing errors exist. Stop adjustments and consult your manual—this requires full seat disassembly to correct.
Eliminate Twisted Straps in 20 Seconds
Twisted straps create “false tightness” where slack hides in spiral folds, reducing crash protection by concentrating forces. Detect twists by running fingers along the strap—any raised ridges or spiral patterns indicate danger. For minor twists:
– Fold the twisted section into a flat triangle
– Slide the triangle completely through the buckle while maintaining its shape
– Verify flatness before proceeding
Severe twists require complete unbuckling and rethreading per your manual’s diagram. Skipping this step risks harness binding during impact—NHTSA notes twisted straps increase injury severity by 32% in side-impact collisions.
Buckle First, Tighten Later Strategy
Counterintuitively, buckle your child while straps remain loose. This prevents over-tightening and ensures proper chest clip placement:
1. Fasten the crotch buckle until it clicks
2. Connect chest clip pieces
3. Slide clip temporarily to belly button level
4. Then tighten straps
Critical mistake: Tightening before buckling creates uneven pressure that twists straps and misaligns the chest clip. This single error accounts for 28% of harness failures according to Consumer Reports’ testing.
Retighten Using the Two-Test Verification Method
Pull the front adjuster strap while applying downward pressure on the crotch buckle—this removes hip slack before torso slack. Verify tightness with dual tests:
– Pinch test: Try pinching shoulder strap webbing between thumb and forefinger. Proper tension leaves no pinchable material.
– Two-finger test: Slide two fingers flat between strap and collarbone. Three fingers should not fit.
If either test fails, restart the process. Loose harnesses increase ejection risk by 75% during rollover accidents, per NHTSA crash data.
Position Chest Clip at Armpit Level Only
The chest clip’s position is non-negotiable: bottom edge must align with armpits when arms hang naturally. Higher placement risks throat injuries; lower positioning channels crash forces into the abdomen.
Visual cue: Have your child sit straight—the clip should sit level with the top of their shoulder where the arm meets the torso. Never position above the collarbone or below the sternum. This single adjustment point reduces head excursion by 40% during frontal impacts.
Handle Bulky Clothing Without Compromising Safety
Winter coats, costumes, and thick sweaters compress during crashes, creating deadly slack. Never adjust straps over bulky clothing. Instead:
– Layer thin, close-fitting fabrics like merino wool
– Use post-buckling solutions: seat-safe covers or blankets over secured harnesses
– Pre-warm the car to avoid bulky layers
– Always retest tightness after any clothing change
Jennifer Stockburger of Consumer Reports warns: “Improper harnessing over coats increases injury risk by trapping children in dangerous positions during collisions.”
Identify Your Harness System Type
External Adjustment Models (30-Second Fixes)
Newer convertible seats like Graco 4Ever feature top-mounted handles. Simply lift the handle to your child’s current shoulder height—no uninstalling required. These systems maintain perfect strap alignment during adjustments, eliminating rethreading risks.
Re-thread Systems (15-Minute Process)
Budget or older models require full disassembly:
1. Remove seat from vehicle
2. Take off cover carefully (photograph routing first)
3. Thread straps through correct slots per manual diagram
4. Reassemble following exact loop patterns
Critical note: Britax models often have dual routing paths for rear/forward-facing modes. Misrouting here causes 63% of persistent tightening issues.
Verify Safety in 30 Seconds Every Single Ride
Build this checklist into your routine:
– Harness placement: Correct height for current orientation
– Pinch test: Zero webbing pinch at shoulders
– Chest clip: Armpit-level positioning
– Strap condition: Zero twists, fully flat
– Crotch buckle: Closest possible position
Skipping even one check risks harness errors that reduce crash protection by 52%, according to NHTSA field studies.
Troubleshoot Critical Strap Problems
Stuck Straps Won’t Release
Immediate solution:
– Clear debris with compressed air around release button
– Pull adjuster strap while pressing release to create slack
– If jammed, consult manual for disassembly steps—never force
Root cause: Fabric caught in mechanism from previous improper tightening.
Persistent Twisting After Adjustment
Long-term fix: After each ride, store straps flat against seat back. For toddlers, teach them to hold straps straight while buckling. If twisting continues, replace straps—frayed fibers from repeated twisting reduce tensile strength by 30%.
Maintain Safety Through Growth Spurts
Children outgrow harness positions faster than parents realize. Monthly checks are essential:
– Rear-facing: Straps dip below shoulders? Re-thread immediately
– Forward-facing: Straps fall below shoulders? Adjust now
– Always clean straps with manufacturer-approved solutions—harsh chemicals cause fiber degradation that leads to binding
Final verification: When in doubt, visit a certified technician. Most fire stations offer free car seat checks where experts can demonstrate how to loosen car seat straps for your specific model. Remember—proper harness adjustment isn’t optional. It’s the invisible shield that transforms your car seat from basic equipment into a life-saving system during those critical milliseconds of impact.


