
That jagged rip along your driver’s seat bolster isn’t just an eyesore—it’s actively getting worse with every entry and exit. If you drive a Subaru Outback, you’re not alone; Early-Gen 5 models are especially prone to side-bolster cracks along the entry/exit crease. Before you assume expensive dealership visits are your only option for how to repair torn leather car seat damage, know that most tears under three inches can be fixed at home with proper technique. This guide delivers exactly what you need—a clear roadmap to permanent repairs that last, whether you’re facing a minor split or significant damage.
Small Tear Repair Under 1 Inch
Why Small Tears Are Your Best DIY Opportunity
Tears smaller than an inch represent the sweet spot for home repairs. These typically occur on genuine leather surfaces (soft with natural texture) rather than vinyl (plastic-like with uniform pattern). Most side bolsters actually use vinyl, which repairs more easily than leather due to its consistent composition. If your tear hasn’t penetrated completely through the material, you’re looking at a 30-60 minute repair that costs under $50.
Step-by-Step Adhesive-Filler Method

This automotive-approved technique creates an invisible repair that flexes with your seat movement.
Essential materials:
– 3M Leather & Vinyl Repair Kit (PN 08579)
– 400-grit sanding sponge
– Isopropyl alcohol (50% solution)
– Hair dryer
Proper execution sequence:
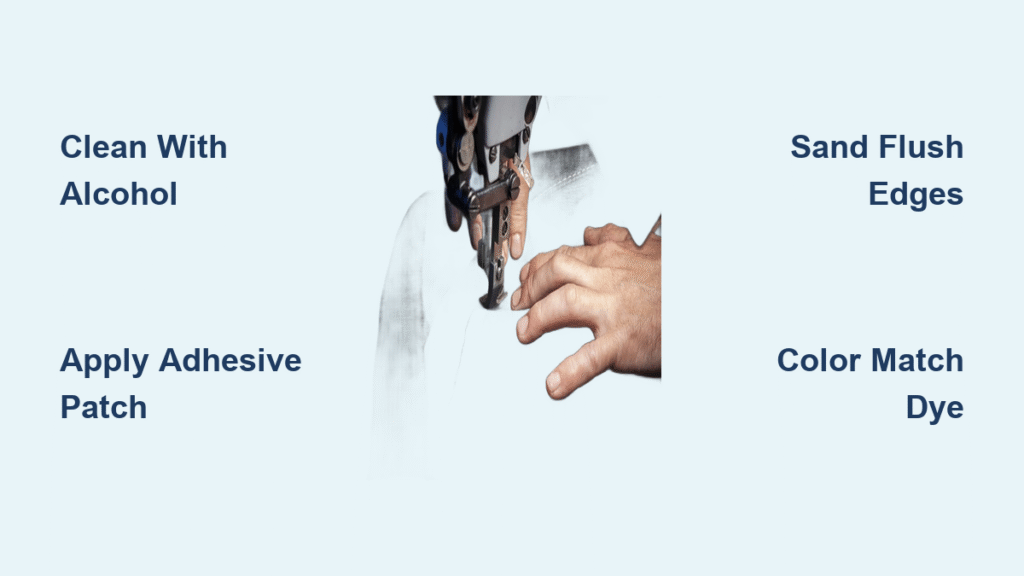
1. Clean thoroughly with isopropyl alcohol and allow 15 minutes to dry completely
2. Trim loose threads using sharp scissors—don’t pull or you’ll enlarge the tear
3. Insert backing patch under the tear using tweezers; center it precisely
4. Apply adhesive beneath torn edges and press firmly for 60 seconds
5. Build filler in 2-3 thin layers, curing each with a hair dryer for 30 minutes
6. Sand flush with 400-grit paper until perfectly level with surrounding material
7. Color match using kit dyes with a stippling motion to blend seamlessly
8. Seal with clear coat and allow 4 hours curing time before use
Critical tip: Work in a warm environment—cold temperatures cause leather to contract, potentially reopening your repair during the process.
Medium Tear Solutions (1-3 Inches)
When to Choose Invisible Stitching Over Patching
Straight tears on low-stress areas like seat backs respond exceptionally well to invisible stitching. However, avoid this method on driver’s bolsters that flex during entry/exit—the constant movement will reopen stitched repairs.
Required tools:
– Curved upholstery needle (size 18)
– Polyester thread color-matched to your seat
– Thin leather backing patch
– Fabric glue
Professional-grade invisible stitch technique:
1. Insert backing patch under tear and glue perimeter
2. Use curved needle for ladder stitch across tear edges
3. Pull gently to close gap without puckering
4. Dab flexible leather glue along seam
5. Finish with dye/conditioner blend
Warning: Always test thread color on a hidden seat area first—OEM dyes vary significantly between production batches, and visible mismatch looks worse than the original tear.
Patch Method for High-Stress Areas
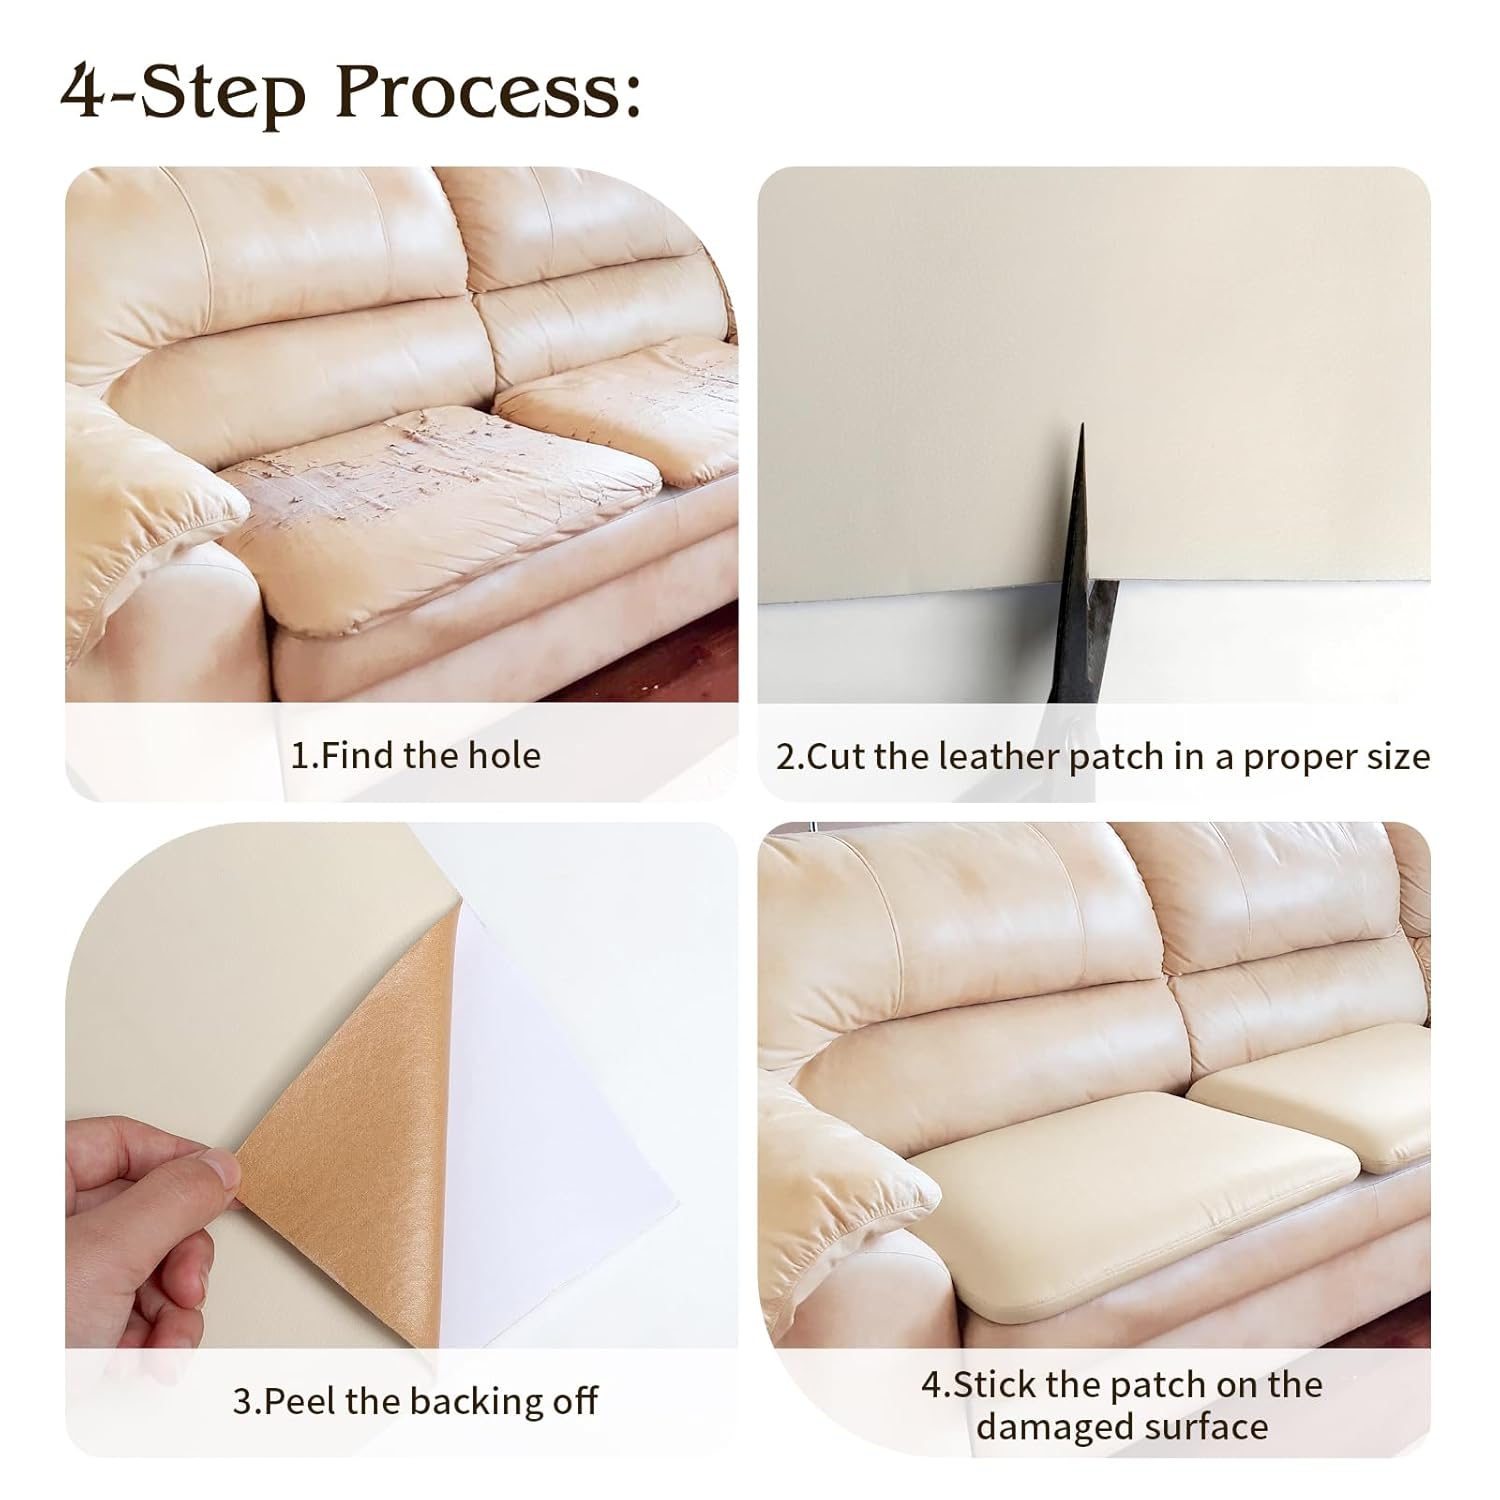
When stitching won’t hold due to constant flexing, a properly applied patch becomes your permanent solution.
Patch cutting specifications:
– Make patch ½-1 inch larger than hole on all sides
– Round corners to prevent lifting
– Match material type (leather for leather, vinyl for vinyl)
Professional application process:
1. Insert wax paper behind hole to prevent glue seepage into foam
2. Apply contact cement to patch perimeter and seat surface
3. Position patch carefully and press firmly
4. Weight for 8 hours for maximum adhesion
5. Edge-dye visible border with matching leather pen
Large Tear Professional Solutions (Over 3 Inches)
Understanding Your Professional Repair Options
When tears exceed three inches or expose underlying foam, DIY becomes risky. Professional re-skinning costs $265-400 but typically lasts 3-5 years compared to months for home repairs.
What reputable shops actually do:
– Remove entire seat cover
– Replace damaged panel with new matching material
– Steam and stretch to factory contours
– Color-match using OEM dye codes
OEM Replacement vs. Aftermarket Upgrades
Dealership replacement runs $700-800 per seat but provides factory-perfect results. Consider this when:
– Multiple cracks radiate from main tear
– Underlying foam shows compression damage
– Seat heater functionality is compromised
– Your vehicle is still under warranty
Real case: A 2017 Outback owner received a $500 goodwill coupon from Subaru of America, reducing the $800 OEM replacement cost to $300 with perfect factory match.
Immediate Temporary Fixes That Last
Gorilla Tape Application That Blends In
Black Gorilla Tape costs $12 and lasts 6-12 months when applied correctly.
Professional application secrets:
– Clean area with alcohol first
– Cut tape slightly larger than tear
– Use razor blade to trim excess flush
– Warm tape with hair dryer for better adhesion
Stick-On Vinyl Sheets That Don’t Look Temporary
Amazon sells pre-dyed repair sheets for $25 that last 1-2 years. Choose oval shapes over squares—corners lift first, making square patches obvious within weeks.
Prevent Future Tears Before They Start
Daily Habits That Extend Seat Life
- Slide less, lift more when entering/exiting to reduce bolster stress
- Empty back pockets of keys and tools before sitting
- Use sunshade religiously—UV exposure drops surface temps 40°F
- Condition every 6 months with Lexol or Leather Honey
Proven Product Recommendations
- UV blocker: 303 Aerospace Protectant (apply monthly)
- Conditioner: Leather Honey (one treatment lasts 6 months)
- Protector: Neoprene seat cover for daily drivers over 100k miles
Color Matching Made Simple
Finding Your Exact OEM Color Code
Check the driver’s door jamb sticker for paint code—leather dye uses the same color family. When in doubt, mail a swatch to suppliers like LeatherNu for custom matching ($15 service).
Professional Dye Application Technique
- Test on hidden seat area first
- Apply in thin, multiple coats
- Use stippling motion, not brushing
- Blend 2-3 inches beyond repair area
Troubleshooting Failed Repairs
Why Repairs Fail and How to Fix Them
| Issue | Cause | Solution |
|---|---|---|
| Lifting edges | Poor surface prep | Re-sand and use urethane adhesive |
| Color mismatch | Wrong dye lot | Mix custom blend incrementally |
| Cracks spreading | Hardened vinyl underneath | Requires full panel replacement |
| Rough texture | Over-sanding | Apply thin filler coat, re-sand lightly |
Quick fixes:
– Repair feels stiff: Warm with hair dryer and flex seat for 2 minutes
– Color too shiny: Buff gently with 0000 steel wool
– Adhesive seepage: Trim excess with razor before full cure
Real-World Decision Guide
Use this reference to choose your path:
- Tear ≤ 1 inch, low stress: DIY adhesive kit ($30, 1 hour)
- Tear 1-3 inches, visible daily: Upholstery shop re-skin ($350, 1-2 days)
- Multiple cracks with foam exposure: OEM replacement ($700, 3-5 days)
- Budget under $50: Gorilla tape + seat cover ($40, 15 minutes)
- Selling car soon: Stick-on vinyl sheet ($25, 20 minutes)
Proven case: A 2017 Outback with 2-inch driver bolster tear was successfully repaired with a DIY kit on Saturday morning and remained flawless after 18 months of daily commuting.
Essential Repair Shopping List
Complete DIY kit components:
– 3M Leather & Vinyl Repair Kit (PN 08579)
– Fiebing’s Leather Dye (match OEM color code)
– Angelus Leather Conditioner
– 400-grit sanding sponge
– Curved upholstery needles (size 18)
– Polyester thread (100% color-matched)
– E-6000 flexible adhesive
– Wax paper roll
Total cost: $45-60 for complete kit that handles multiple repairs.
Don’t let that growing tear become an expensive problem. Start with the smallest repair that matches your damage—most drivers find the DIY adhesive method handles 80% of cases under two inches. Remember: successful how to repair torn leather car seat projects are 90% preparation and 10% application. Take your time with cleaning and sanding, and even your first attempt will look professional. That small split becomes a five-inch gash faster than you think, especially on the driver’s side where daily pressure accelerates the tear. Act now before the damage spreads beyond economical repair.


