
Transporting your precious newborn or infant can feel overwhelming, especially when you’re worried about every bump in the road. If you’ve ever second-guessed whether your car seat is installed correctly or if the straps are tight enough, you’re not alone—millions of parents make simple mistakes that could compromise safety. The good news? Securing an infant in a car seat properly is straightforward with the right steps, and a quick check of the harness fit can provide immediate peace of mind to ensure your little one is snug and protected from the start.
In this comprehensive guide, we’ll go beyond the basics to cover everything you need to know about choosing, installing, and using an infant car seat. You’ll learn step-by-step instructions, essential safety tips, common pitfalls to avoid, and how to verify everything is secure. By the end, you’ll feel confident that your baby is as safe as possible on every drive, whether it’s a short trip to the pediatrician or a longer journey. Let’s dive in and make car seat safety second nature for you.
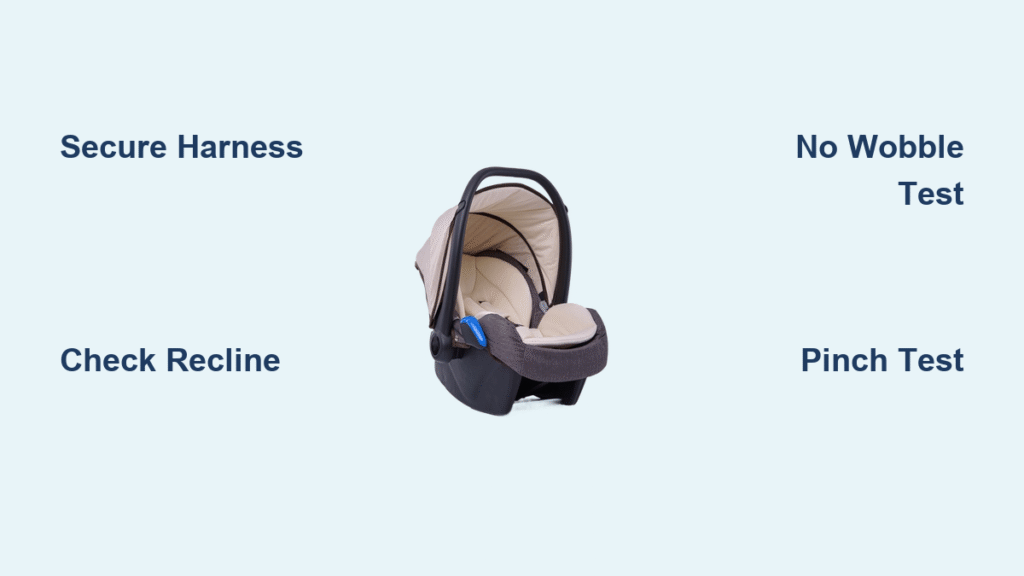
Essential Tools and Materials for Securing Your Infant Car Seat
Before you even touch the car seat, gathering the right tools ensures a smooth installation. Infant car seats are designed for rear-facing use from birth up to around 1 year or 30-35 pounds (depending on the model), and proper setup relies on sturdy anchors and a level base. Here’s what you’ll need—always check your specific car seat manual, as requirements can vary by brand like Graco, Chicco, or Britax.
| Item | Quantity | Specifications |
|---|---|---|
| Infant Car Seat | 1 | Rear-facing only, with 5-point harness; certified for newborns (meets federal standards like FMVSS 213) |
| LATCH Connectors | 1 set | Included with most seats; lower anchors and tethers for vehicles 2002+ |
| Seat Belt (Vehicle’s) | 1 | Lap-shoulder belt; avoid using just the lap belt if possible |
| Level Indicator Tool | 1 | Built into many seats; or use a separate bubble level app on your phone |
| Locking Clip (if needed) | 1 | For older vehicles without LATCH; tightens seat belt |
| Towel or Pool Noodle | 1-2 | Rolled up for leveling on sloped seats (only for front-to-back tilt, not side-to-side) |
| Harness Straps Cover | Optional | Soft padding to prevent irritation on baby’s skin |
Important: Never use aftermarket products like add-on cushions unless specified by the manufacturer—they can interfere with crash protection. If your vehicle lacks LATCH, consult your owner’s manual for seat belt installation methods.
Preparation and Safety Considerations Before Securing Your Infant
Preparation is key to avoiding frustration and ensuring safety. Start by selecting the right car seat: For infants under 1 year, it must be rear-facing to protect their fragile necks and spines in a crash. The American Academy of Pediatrics (AAP) recommends keeping babies rear-facing until at least age 2 or the maximum weight/height limit.
Choosing the Right Location in Your Vehicle
- Install in the back seat, preferably behind the passenger side for easy access.
- Avoid the front seat—airbags can be deadly to infants.
- Ensure the vehicle seat is flat and not reclined more than 10 degrees side-to-side.
Safety Checks and Precautions
- Vehicle Compatibility: Confirm your car has LATCH anchors (look for metal loops between seat cushions) or use the seat belt method. For 2025 models, most vehicles include tether anchors in the rear.
- Car Seat Inspection: Check for expiration dates (usually 6-10 years from manufacture) and recalls via the National Highway Traffic Safety Administration (NHTSA) website—search by model number.
- Clean and Clear the Area: Remove any debris from the vehicle seat. If the car’s seatback is sloped, use a tightly rolled towel or foam pool noodle under the car seat base (front edge only) to level it.
- Warning: Never install on a seat with active airbags facing the rear. Always read both the car seat and vehicle manuals—mismatches can void warranties or reduce effectiveness.
Time Estimate: Preparation takes about 10-15 minutes. Do this in a safe, well-lit area like your driveway, not while driving.
If you’re installing in a new vehicle or after an accident, have it checked by a certified Child Passenger Safety Technician (CPST) through Safe Kids Worldwide.
Step-by-Step Guide to Securing Your Infant in a Car Seat
Now for the core process: We’ll break this into phases—installing the car seat in the vehicle and then securing your baby inside it. These steps follow NHTSA and AAP guidelines for 2025 standards, emphasizing a secure fit that withstands crash forces up to 10 times gravity.
Phase 1: Installing the Car Seat in Your Vehicle
This ensures the seat doesn’t move more than 1 inch at the belt path when tugged. Aim for a 30-45 degree recline for newborns.
- Position the Car Seat: Place it rear-facing in the back seat. If using LATCH, thread the connectors into the lower anchors— you’ll hear a click.
- Attach the Top Tether: For LATCH installs, connect the tether to the vehicle’s anchor behind the seat (usually in the trunk or seatback). Tighten until snug.
- Secure with Seat Belt (Alternative Method): If no LATCH, route the lap-shoulder belt through the car’s seat blue path. Buckle it, then use the lock-off clip or manual locking (pull the shoulder belt all the way out, let it retract slowly).
- Level and Tighten: Use the built-in level indicator. Adjust with towel if needed. Tug the seat at the belt path—it shouldn’t move side-to-side or front-to-back more than 1 inch.
- Lock It In: For seat belt installs, engage the locking mechanism. Double-check all connections.
Time Estimate: 15-20 minutes for first-time install. Test by pushing and pulling vigorously.
Troubleshooting Tip: If it wobbles, re-thread the belt or tether. Uneven leveling? Reposition the towel and recheck the bubble level.
Phase 2: Securing Your Infant in the Car Seat
Once installed, buckling in your baby is about a custom fit—no loose straps or bulky clothing.
Adjusting the Harness and Cradle
- Set the Recline: For newborns, ensure the infant insert (if included) supports their head without slumping.
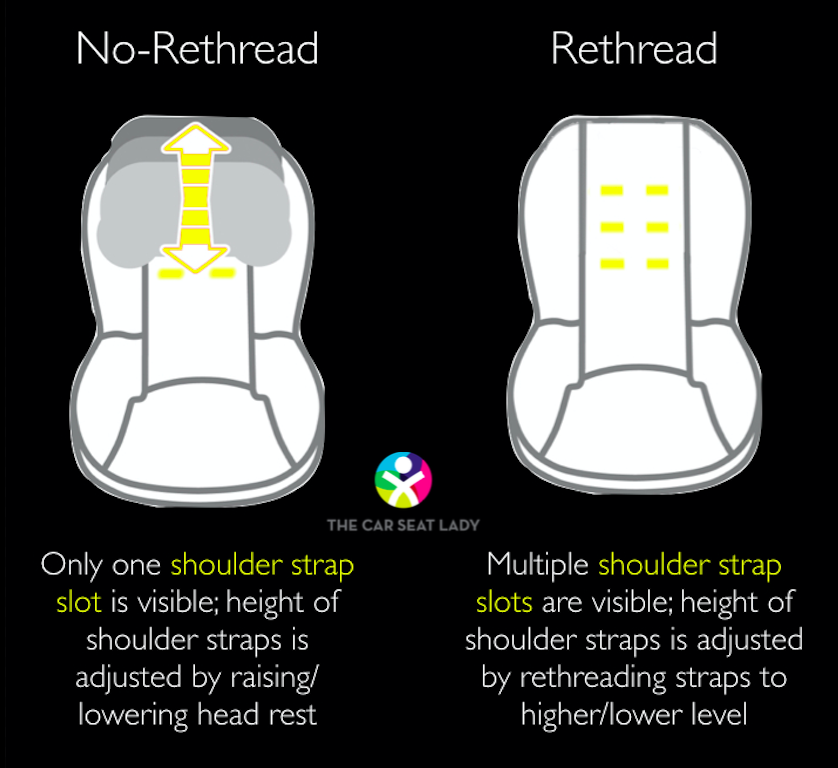
- Position the Harness Slots: Choose slots at or below your baby’s shoulders for rear-facing. The harness must lay flat—no twists.
Buckling Steps
- Dress Appropriately: Baby should wear thin layers—no puffy coats or blankets under the harness, as they compress in a crash and loosen the fit. Add blankets over the straps after buckling.
- Place Baby in Seat: Gently lay your infant in feet-first, ensuring their back is against the seat and head supported.
- Thread the Harness: Bring the straps over the shoulders and between the legs. Buckle the chest clip (it clicks securely) and lower buckle.
- Tighten the Straps: Pull the adjustment strap at the front until you can pinch zero fabric at the shoulders—straps should be snug, not digging in. The chest clip should be at armpit level.
- Check Fit: Baby’s bottom should touch the seat bottom; no more than two fingers should fit under the harness at the chest. Legs can dangle or bend naturally.
Warning: For preemies or tiny infants, use the lowest harness slots and any provided inserts. Never use the handle in “carry” mode while driving—lower it fully.
Time Estimate: 2-3 minutes per buckling. Practice with a doll first to build confidence.
Phase 3: Additional Adjustments for Comfort and Safety
- Install the canopy or hood for sun protection, but ensure it doesn’t block airflow.
- If your seat has a base (detachable), practice removing and reinstalling it for stroller compatibility.
Verifying and Testing the Installation

After setup, verification prevents disasters. The NHTSA estimates 46% of car seats are installed incorrectly, so don’t skip this.
Quick Recline and Movement Test
- Recline Check: Use the level tool—aim for 30-45 degrees. If off, readjust.
- Wiggle Test: Grasp the seat at the harness anchor point and shake. No more than 1 inch of movement? Good. More? Reinstall.
- Harness Test: Buckle an unstrapped heavy bag (like groceries) and test crash-like forces by tugging.
Ongoing Checks
- Before every trip: Inspect for wear, ensure straps aren’t twisted, and re-tighten if needed (straps can loosen over time).
- After 1-2 weeks or 100 miles: Re-inspect, as seats settle.
- Pro Tip: Use the “pinch test” religiously— if you can pinch the harness, it’s too loose.
If tests fail, disassemble and restart. For peace of mind, schedule a free inspection at a local fire station or via NHTSA’s locator.
Pro Tips for Securing Your Infant in a Car Seat
Go beyond the basics with these expert insights from certified technicians to maximize safety and ease:
- Harness Height Hack: Mark your baby’s growth on the seat with a sticker for quick adjustments—infants grow fast, and improper height reduces protection by up to 70% in crashes (per IIHS studies).
- Avoid Common Mistakes: Don’t forget the top tether—it cuts forward movement by 40%. And skip “travel systems” hacks like using the car seat without the base if your vehicle requires it.
- Temperature Control: In hot weather, park in shade and use reflective covers—infant car seats can heat to 140°F inside, risking heatstroke.
- Multi-Vehicle Use: If switching cars, invest in a portable base or practice both LATCH and belt methods.
- Growth Monitoring: Weigh and measure your baby monthly; transition to convertible seats only at the exact limits.
- Emergency Prep: Keep a spare harness clip in your glovebox and know how to release in under 10 seconds.
- Optimization for Sleep: A slight recline helps prevent reflux, but never add unauthorized pillows.
These tweaks can extend usability and reduce stress—remember, a well-secured seat saves lives.
When to Seek Professional Help
While DIY is empowering, some situations call for experts. Signs you need help include: persistent wobbling after multiple tries, incompatible vehicle features (e.g., no LATCH in a luxury SUV), or post-accident checks (even minor fender-benders can warp frames).
Look for a CPST certified by Safe Kids—verify via their website. Expect a 30-60 minute session costing $20-50, often free at events. Check warranty terms; improper install might void coverage from brands like Peg Perego. In 2025, many auto shops offer this as a standard service.
FAQ
Q: How do I know if my infant car seat is expired?
A: Check the manufacturing label on the seat’s side or base for the date—most expire 6-10 years later due to plastic degradation. Even if unused, replace it; expired seats fail crash tests. Search NHTSA for recalls too.
Q: Can I use a towel to level the car seat?
A: Yes, but only a rolled towel or pool noodle for front-to-back tilt in rear seats. Never for side-to-side or under the harness—it can cause instability. Remove it once leveled.
Q: What’s the difference between LATCH and seat belt installation?
A: LATCH (Lower Anchors and Tethers for Children) is easier for most and provides rigid attachment, but use seat belts for center seats or heavier seats (over 65 lbs total). Both are equally safe if done right.
Q: How tight should the harness be for a newborn?
A: Snug enough that the straps don’t move when pinched at the chest, but not so tight it causes discomfort. For newborns, use the infant insert to fill gaps without slack.
Q: Is it safe to leave my baby in the car seat outside the car?
A: Only for short periods (under 2 hours) on a firm, flat surface—prolonged use risks breathing issues from the recline. AAP advises transferring to a flat crib for sleep.
Q: What if my car doesn’t have LATCH anchors?
A: Use the vehicle’s seat belt method with a locking clip. It’s just as effective; follow your manual for routing. Consult a technician if unsure.
Q: How often should I replace the car seat?
A: After any moderate crash (airbag deployment or visible damage), or at expiration. Otherwise, every 6-10 years. Side-impact tested models last longer.
Alternative Solutions for Infant Car Safety

If a traditional infant carrier doesn’t fit your lifestyle (e.g., frequent public transport), consider these options. Always prioritize rear-facing.
| Solution | Pros | Cons | Best For |
|---|---|---|---|
| Convertible Car Seat (e.g., Graco Extend2Fit) | Grows with child (rear-facing to booster); one purchase lasts years | Bulkier install; less portable without base | Budget-conscious families with older vehicles |
| Travel System Stroller Combo (e.g., Uppababy Vista) | Seamless car-to-stroller transfer; includes base | Higher cost ($400+); heavier | Urban parents on the go |
| Booster with Harness (for toddlers transitioning) | Easier buckling; forward-facing option after 1 year | Not for infants under 1; requires proper height | Growing families needing versatility |
| Ride-Share Adapters | Clips seat to taxis/Ubers without base | Limited compatibility; not for every ride | City dwellers without a personal car |
Compare based on your needs—stick to NHTSA-approved options for compliance.
Keep Your Little One Safe on Every Ride
Securing your infant in a car seat doesn’t have to be a hassle when you follow this guide:
– Gather the right tools and prepare your vehicle thoughtfully
– Install with LATCH or belt for a rock-solid base
– Buckle baby snugly with the pinch test every time
– Verify with tests and seek pros if needed
By prioritizing these steps, you’re giving your baby the best protection against the unthinkable, aligning with 2025 safety standards that could save lives. Take action today—install or recheck your setup before your next drive, and breathe easier knowing you’ve got this.
Have you mastered securing your infant in a car seat? Share your tips or questions in the comments to support other parents! If issues persist, describe your setup for tailored advice.


