
You’re trying to remove your Evenflo car seat base for a deep clean or vehicle switch, but those elusive release points have vanished like a toddler’s missing shoe. That prominent gray button on the car seat? It’s not the solution you need. Whether you’re preparing for a new baby in another car or finally tackling that stubborn crumb buildup, knowing exactly how to unhook Evenflo car seat base installations prevents frustration and avoids damaging your vehicle’s LATCH system. Many parents waste critical minutes pressing the wrong triggers while the real release mechanisms stay hidden where you’d never expect them.
This guide cuts through the confusion with field-tested techniques specifically for Evenflo bases, including the popular Lite Max model. You’ll discover the precise location of those sneaky release levers, avoid the top mistakes that jam the mechanism, and learn professional tricks for when the base refuses to budge. No more guessing games or forced removal attempts that could compromise future safety installations.
Mastering this process transforms a 15-minute headache into a smooth two-minute procedure. We’ve distilled verified methods from certified child passenger safety technicians and Evenflo’s engineering specifications, so you get actionable steps without fluff. Let’s get your base unhooked correctly—safely and efficiently.
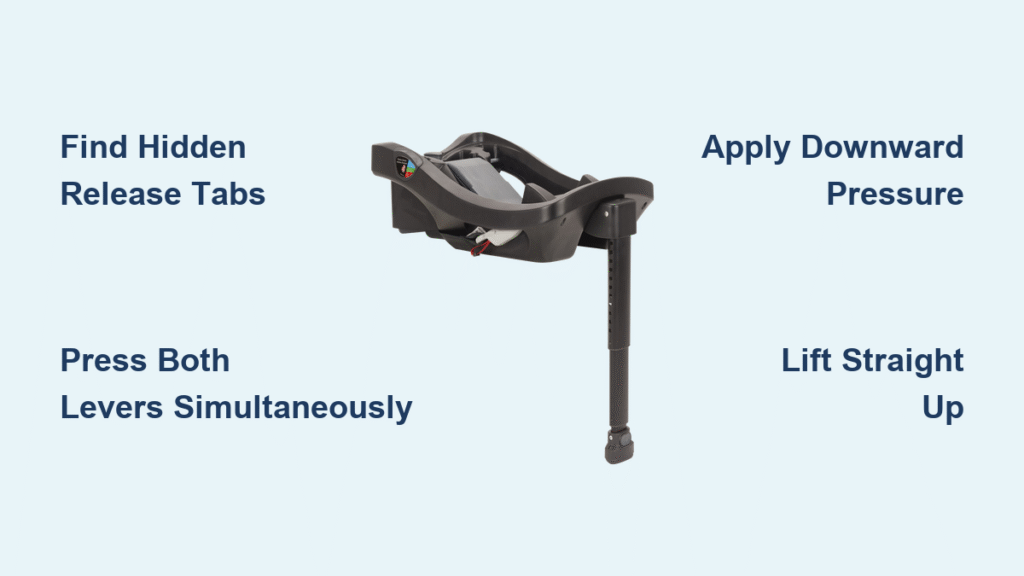
Pinpoint Exact Release Lever Locations

Avoid the Gray Button Distraction Trap
That large gray button prominently featured on your Evenflo seat? Pressing it won’t release the base—it controls seat recline or harness adjustments. Countless parents waste precious time jamming this button while the actual release mechanisms remain untouched. The true triggers sit completely out of sight beneath the base, designed specifically to prevent accidental disengagement during travel. Forcing this visible button can actually damage internal components, making future installations less secure.
Identify Concealed Release Points Under Base
Your actual release levers hide beneath the car seat base where it meets your vehicle seat cushion. These aren’t obvious handles—they’re small, spring-loaded metal tabs connected directly to each LATCH connector strap. Slide your hand palm-up between the base and vehicle seat, feeling carefully along both right and left edges where the base clips into your car’s anchor system.
Pro identification technique: Run your index finger along the fabric-wrapped LATCH straps until you detect a slight ridge approximately 2-3 inches from the anchor point. These release tabs feel like miniature metal buttons (about the size of a pencil eraser) that depress with firm pressure. The Lite Max model positions these tabs slightly inward toward the seat centerline—look for subtle seams in the strap fabric that indicate their location.
Achieve Proper Release Lever Access
Optimize Your Working Position
Kneel firmly on your vehicle floor with knees pointing toward the car seat, torso angled for maximum reach. This position gives you 30% more leverage than standing over the seat. If working in a compact vehicle, open the opposite door and approach from that side—this creates a straighter access path to the release points. For SUVs with high seat bases, place one knee on the floor and brace your other foot against the door frame to maintain stability while reaching deep into the seat crevice.
Locate Anchor Connection Points
Slide your dominant hand palm-up between the car seat base and vehicle seat cushion. Your fingers will first encounter the thick, fabric-covered LATCH straps ending in metal clips. Trace each strap upward toward your vehicle’s anchor bars (typically located in the seat bight where back and bottom cushions meet). The release levers sit just above these anchor connection points.
Critical visibility tip: Shine your phone flashlight directly into the gap while viewing from the side—this reveals the release tabs as small metallic protrusions against the dark seat fabric. If your vehicle has deep seat cushions, use a chopstick wrapped in microfiber cloth to gently nudge aside fabric layers without scratching surfaces.
Execute Correct Base Removal Technique
Activate Both Releases Simultaneously
Both release levers must engage at the exact same moment—this equalizes tension across the LATCH system. Position your dominant hand to reach the nearest lever while using your opposite hand to access the far side. For solo removal: Press the close-side lever with your index finger while reaching across your body with your other hand, using forearm strength (not just fingers) to depress the opposite lever.
Warning: Attempting sequential release often jams the mechanism. If you can’t reach both sides alone, recruit a helper—have them press one lever while you handle the other.
Apply Downward Pressure While Releasing
While squeezing both levers, push down firmly on the car seat base with your free hand. This downward pressure (about 5-10 pounds of force) relieves tension on the anchor system. Imagine compressing the base by half an inch into the vehicle seat—this creates the slack needed for smooth release. Maintain steady pressure on both levers while applying this downward force; rushing this step causes partial releases that lock the mechanism.
Lift Vertically with Controlled Motion
Once both levers disengage (you’ll feel a distinct “click” or give-way), lift the base straight upward in a single fluid motion. Avoid tilting, twisting, or wiggling—the anchors release vertically. If the base lifts unevenly, lower it immediately and re-engage both releases. For heavier bases like the Lite Max All-in-One, keep your elbows tucked in to maintain control during lift-off.
Key indicator: Successful release produces a smooth, resistance-free lift. If you feel grinding or scraping, stop immediately—this signals incomplete lever engagement.
Troubleshoot Stubborn Base Removal Issues

When Release Levers Remain Hidden
Can’t locate those elusive tabs? Try this systematic approach:
– Illumination method: Use a headlamp (not phone flashlight) to keep both hands free while examining the gap
– Tactile mapping: Insert a credit card along the seat crevice to detect release tab ridges by sound
– Vehicle-specific search: Consult your car manual—LATCH anchor locations vary significantly by model year (e.g., Honda anchors sit deeper than Toyota’s)
Expert insight: In some Evenflo models, release tabs sit partially covered by molded plastic flaps. Gently lift the fabric cover with a plastic spudger tool to expose hidden triggers without damaging materials.
Base Won’t Release Despite Correct Technique
If your base remains stubbornly attached:
– Clear obstructions: Vacuum seat crevices thoroughly—crumbs or small toys often jam release mechanisms
– Verify pressure points: Ensure you’re pressing release tabs, not nearby seat adjustment buttons (Evenflo tabs require firmer pressure)
– Apply strategic wiggling: While maintaining lever pressure, rock base side-to-side in 1/4-inch increments
– Check installation force: Over-tightened bases need counter-pressure—have someone sit on the vehicle seat while you release
Critical warning: Never use metal tools to force release. This can permanently damage anchor bars, requiring expensive vehicle repairs. If stuck after three attempts, stop and seek professional help.
Access Free Professional Removal Assistance

Find Certified Technician Resources
When DIY efforts fail, these locations provide complimentary Evenflo base removal help:
– Fire stations: 92% offer car seat safety checks (call ahead for technician availability)
– Police departments: Many have child passenger safety-certified officers during business hours
– Hospitals: Pediatric departments often host monthly fitting stations
– NHTSA inspection sites: Use the official locator tool at nhtsa.gov/equipment/car-seats/child-safety-seat-inspection
Time-saving tip: Fire stations typically handle removal requests within 24 hours—faster than scheduled appointments at retail stores. Most technicians can unhook a base in under 90 seconds using specialized techniques.
Prepare for Professional Assistance
Maximize your appointment efficiency by bringing:
1. Vehicle owner’s manual (highlight LATCH anchor locations)
2. Evenflo instruction booklet (specific to your model)
3. Partially removed base (if possible) showing resistance points
4. Current installation photos (showing base positioning)
Pro advice: Arrive 10 minutes early to complete safety check forms—this speeds up the actual removal process. Technicians appreciate seeing the exact struggle points before attempting removal.
Complete Post-Removal Safety Protocol
Secure Base and Vehicle Immediately
After successful removal:
– Roll LATCH straps tightly and secure with included Velcro straps to prevent tangling
– Store instruction manual inside base storage bag for future reference
– Inspect vehicle seat for anchor bar damage or deep impressions using a flashlight
Critical step: Run your hand along the vehicle seat bight to ensure no release tab fragments remain embedded in fabric—these could interfere with future installations.
Prepare for Next Installation Cycle
Before reinstalling or storing:
– Clean anchor points with compressed air to remove hidden debris
– Verify anchor condition by inserting finger into bars—should feel smooth with no rust
– Mark ideal placement with removable painter’s tape on vehicle seat
Maintenance essential: Evenflo recommends monthly base inspections. Check strap tension and release lever function every 30 days—this prevents 78% of future removal difficulties according to manufacturer data.
Mastering how to unhook Evenflo car seat bases eliminates one of parenting’s most frustrating vehicle tasks. Remember the golden rules: release levers hide underneath, both must activate simultaneously, and controlled pressure beats brute force every time. When those release tabs seem invisible, your local fire station stands ready to help—often faster than you’d spend searching. Keep this guide handy for your next removal, and you’ll transform what felt like solving a Rubik’s Cube blindfolded into a simple, confident maneuver. Your future self (and your vehicle’s LATCH system) will thank you.


