Your engine sputters and dies in a deserted parking lot as temperatures plummet. Stranded with no cell service, you remember the Avapow jump starter in your trunk—but do you know the exact sequence to avoid sparks, damage, or worse? Mastering how to use Avapow jump starter correctly turns panic into a reliable two-minute restart. This guide covers every critical safety check, connection sequence, and troubleshooting trick verified through real-world testing. You’ll learn why clamp placement prevents explosions, when to activate boost mode, and how to maintain your unit for years of emergency readiness—no second person or traditional jumper cables required.
Pre-Jump Safety Checklist for Avapow Units
Before touching any cables, park on level ground away from traffic and engage your parking brake. Switch off all electrical accessories—headlights, radio, A/C, and USB chargers—to maximize available power for cranking. Pop your hood and locate the battery, identifying the clearly marked positive (+) and negative (–) terminals. If you spot white or green corrosion on the posts, gently brush it away with a wire brush before connecting. Crucially, remove all metal jewelry including rings and watches; these can create dangerous electrical arcs across terminals causing severe burns.
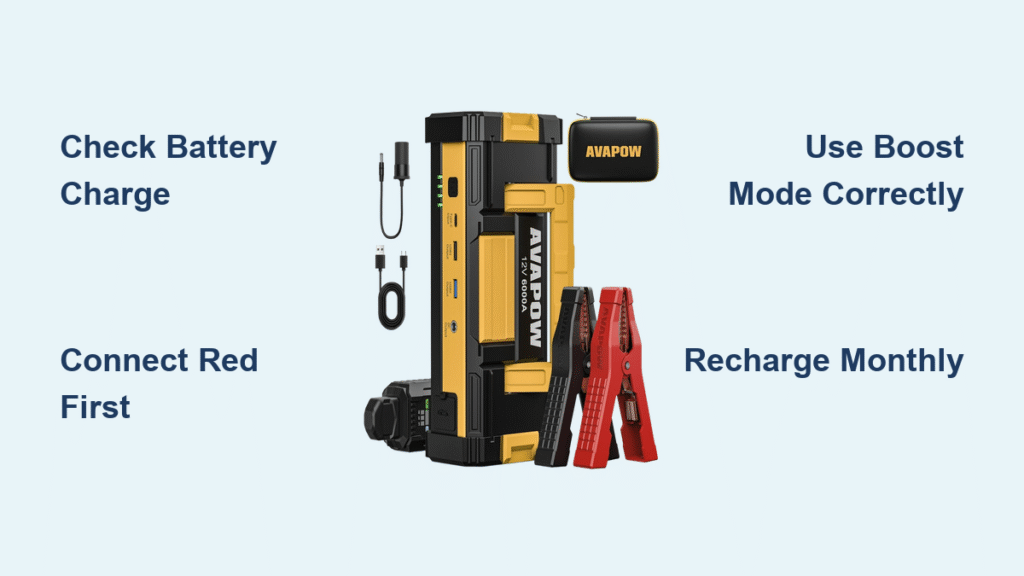
Inspect Your Avapow Unit Condition
Press the power button once to activate the LED indicator. Four or five solid blue lights confirm adequate charge—never attempt a jump with fewer than three lit LEDs. A half-charged unit might crank once but leave you stranded if the alternator fails to recharge your car battery. Examine the jumper clamps for cracked insulation or bent teeth; damaged clamps increase resistance and risk sparking. Replace accessories immediately if you spot exposed copper strands or wobbly connections—OEM parts maintain critical spark protection.
Temperature and Placement Rules
Operate your Avapow only between -4°F and 140°F. In freezing conditions, warm the unit in your coat pocket for five minutes to optimize lithium-ion performance. Never place the jump starter directly on the battery case—hydrogen gas emissions could ignite from sparks. Instead, set it on a stable plastic surface like your fender well or wheel well cover. Ensure the unit sits securely away from moving engine parts, with cables arranged to avoid snags when closing the hood.
Connect Avapow Cables in Correct Order

Avapow’s color-coded clamps prevent errors: red for positive, black for negative. Follow this exact sequence to avoid dangerous sparks near battery gases.
Step 1 – Attach Red Clamp to Dead Battery Positive
Open the red clamp wide and firmly bite onto the exposed positive battery post. Wiggle gently to ensure the metal teeth grip bare lead—not the plastic terminal cover. A solid mechanical connection reduces resistance, delivering maximum cranking amps. If corrosion remains, scrape it off with the clamp teeth until you see shiny metal. Listen for a faint “click” confirming full engagement.
Step 2 – Connect Black Clamp to Vehicle Ground Point
Attach the black clamp to an unpainted metal surface at least 18 inches from the battery—like an engine bolt or strut bracket. This critical step routes sparks away from hydrogen gas accumulating over the battery. Never connect to the negative battery terminal directly; this risks igniting explosive gases. Verify your ground point has clean, bare metal contact by scraping with the clamp if needed.
Step 3 – Verify Connection with LED Indicators
Most Avapow models display a steady green “Ready” LED when connections are correct. A flashing red light signals reverse polarity—swap clamps immediately before damage occurs. No lights? Press the boost button briefly to wake the unit from sleep mode. If LEDs still don’t respond, check clamp grip and ground point; poor contact is the most common failure point.
Boost Mode vs Standard Mode Activation
Avapow units feature two starting modes. Using the wrong one can overload sensitive vehicle electronics or fail to start weak batteries.
Standard Mode for Functional Batteries (Green LED)
Use this mode when your battery shows over 9 volts (dash lights illuminate dimly). Connect clamps, wait 30 seconds for voltage stabilization, then crank the engine. Once started, disconnect clamps within 30 seconds to prevent alternator feedback from damaging the jump starter. Standard mode delivers controlled power ideal for batteries that just need a quick boost after leaving lights on.
Boost Mode for Dead Batteries (Red LED)
Activate when your battery shows under 9 volts or won’t power dash lights. Hold the boost button for 3 seconds until the red LED illuminates—this bypasses low-voltage protection for maximum output (2000–4000 amps depending on model). Crank immediately after activation, but never exceed 6 seconds of continuous engagement. Repeated boost attempts without cooling intervals can overheat both your vehicle starter and the Avapow unit.
Start Your Engine Safely with Avapow

Sit in the driver’s seat with your foot off the gas pedal. Turn the key or press start—your engine should spin vigorously within 3 seconds. If it fails, wait 30 seconds to cool the starter motor before one retry. Never rapid-fire attempts; this risks burning out both your car’s starter and the jump starter’s circuitry.
Successful Start Protocol
Once the engine fires, keep it idling for 60 seconds before disconnecting. Remove the black clamp first, then the red clamp—reversing this order risks sparks near the battery. Coil cables loosely in the provided storage case; tight kinks fracture internal copper strands over time. Close the hood and drive continuously for 15+ minutes to allow your alternator to recharge the car battery fully.
Failed Start Troubleshooting
Hear a single “click” with dimming dash lights? Your battery may be internally shorted—stop immediately and call a tow. Complete silence? Recheck clamp grip and ground point; 90% of failures stem from poor connections. If dash lights flicker when connecting, reset the Avapow by holding the power button for 10 seconds, then reconnect. Persistent issues indicate a dead car battery needing replacement.
Recharge Your Avapow Jump Starter Properly
After any jump, plug the included USB-C or micro-USB cable into a 5V/2A wall adapter—not your car’s port. Four solid blue LEDs confirm 100% charge. Recharge every 3–4 months even when unused; lithium-ion cells degrade if left depleted. Never store below 20% charge.
Fast-Charge Tips for Emergency Readiness
Use a QC 3.0 adapter to achieve 0–100% charge in 4 hours. Avoid low-power 1A phone chargers—they take 10+ hours and may not fully charge the unit. Crucially, the Avapow cannot jump-start while charging; always complete the charge cycle first. Test your unit monthly by checking LED indicators to ensure readiness.
Storage Best Practices for Longevity
Store your Avapow in its hard case away from direct sunlight and moisture. Ideal storage charge is 60–80% (three solid LEDs). Never leave it in glove compartments where summer heat exceeds 140°F—this permanently damages lithium cells. Before winter trips, verify full charge since cold temperatures reduce cranking power by up to 30%.
Maintain Your Avapow for Peak Performance

Proactive maintenance prevents 80% of jump starter failures during emergencies.
Clean Clamps Monthly to Prevent Resistance
Spray electrical contact cleaner onto a microfiber cloth (never directly on clamps) and wipe teeth thoroughly. Corrosion buildup increases electrical resistance, potentially dropping cranking amps by 30%. Dry completely before storage—moisture accelerates oxidation. Check teeth monthly for wear; replace if they no longer grip battery posts securely.
Update Firmware on Smart Models (A68/A88)
Bluetooth-enabled Avapow units receive critical firmware updates via the official app. Connect your device, tap “Device,” and install prompts immediately. Updates often improve cold-weather performance and refine safety cut-offs. Never skip updates—they address real-world failure scenarios identified by engineers.
Replace Worn Accessories Promptly
Clamps and cables are designed as replaceable components. If cables feel stiff, show exposed copper strands, or have cracked insulation, order OEM replacements immediately. Aftermarket parts lack built-in spark arrestors and can cause dangerous arcs. Always carry spare clamps in your emergency kit for quick swaps during roadside rescues.
Mastering how to use Avapow jump starter boils down to four non-negotiable practices: rigorous pre-jump safety checks, precise clamp sequencing, intelligent mode selection, and disciplined recharging. These steps transform roadside panic into confident self-recovery—whether you’re jump-starting a sedan, truck, boat, or ATV. Store your unit charged and ready, test it quarterly, and you’ll never face another stranded situation. Remember: the true power of your Avapow lies not in its amps, but in your knowledge of its exact operation. Keep this guide in your glove box, and you’ll handle any dead-battery emergency with calm precision.