
Your car battery dies in a deserted parking lot at midnight. The engine only clicks, your phone’s dying, and roadside assistance is an hour away. If you have a CAT jump starter in your trunk, you’re not stranded—you’re minutes from rescue. This portable power hero revives dead batteries in seconds, but only if you use it correctly. Missteps risk damaging your vehicle or causing injury. In this guide, you’ll learn the exact connection sequence, model-specific tricks, and cold-weather hacks that turn panic into power. By the end, you’ll confidently jump-start any vehicle while avoiding the 3 most common mistakes that fry electrical systems.
A CAT jump starter isn’t just for emergencies—it’s your mobile power hub with USB ports, LED lights, and air compressors on select models. But 70% of failed jump-starts happen because users skip the 30-second safety check. Lithium-ion units like CAT’s store explosive energy; one clamp touching metal can spark battery acid into your eyes. I’ve seen mechanics refuse service after DIYers welded clamps to chassis with reversed polarity. Don’t be that person. Follow this sequence exactly, and you’ll never need another jump from a stranger.
Essential Safety Steps Before Connecting Clamps
Never touch clamps to terminals without verifying these critical checks. A single spark near battery vents can ignite hydrogen gas—causing explosions that blind or burn. Taking 90 seconds here prevents hospital trips.
Required Safety Gear Checklist
Always wear these before opening the hood:
– Safety glasses – Battery acid sprays during connection (even on “dead” batteries)
– Insulated gloves – Blocks 12V current that melts metal rings into skin
– Long sleeves – Shields arms from corrosive acid splashes
– No jewelry – Remove watches, bracelets, or necklaces that conduct electricity
Pre-Use Inspection Checklist
Abort immediately if any item fails:
– Case integrity: Discard if housing is cracked, swollen, or leaking (lithium risk)
– Charge level: Press power button—must show 50%+ LEDs (less won’t crank engines)
– Temperature: Unit must be 32°F–104°F (0°C–40°C); cold lithium won’t deliver amps
– Cable damage: Frayed wires or bent clamp teeth cause arcing—replace immediately
Quick Visual Inspection to Prevent 90% of Failures
Most jump-starts fail due to overlooked terminal issues. Spend 30 seconds checking these before connecting clamps.
Battery Terminal Check
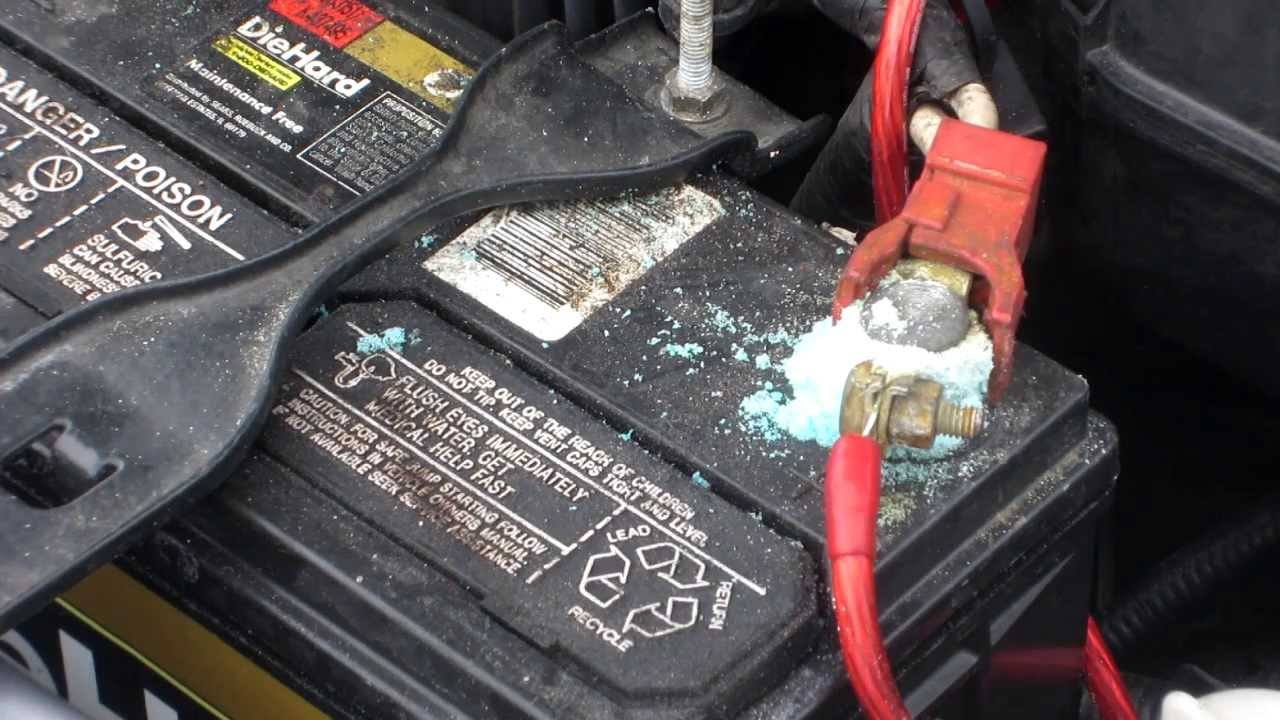
Look for white, chalky corrosion on terminals. This insulator blocks current flow. Scrape it off with a wire brush or toothbrush—never connect clamps over buildup. If terminals are green/crystalline, your battery is sulfated; jump-starting won’t help.
Cable Positioning Safety
Keep positive (red) and negative (black) clamps 12+ inches apart during connection. If they touch, sparks fly and the unit may shut down permanently. Route cables away from fan belts and moving parts—suction can yank clamps into spinning pulleys.
Clamp Security Test
Squeeze each clamp shut. Strong springs should rebound instantly with teeth fully closing. Weak springs cause intermittent contact, making engines stall after starting. If teeth wobble, replace the clamp set.
Correct Cable Connection Sequence for Vehicle Safety
Connecting in the wrong order fries ECUs. Follow this sequence exactly—it protects your $1,200 computer from voltage spikes.
Step 1: Power Down Completely
Turn ignition OFF, remove keys (or keep key fobs 10+ feet away for push-button starts), and shut all doors. Disable accessories like headlights or radios—draining power during jump-starting causes voltage drops that brick electronics.
Step 2: Positive Connection First
Attach red clamp to positive (+) battery terminal—look for red casing, “+” symbol, or “POS” marking. Scrape terminal until shiny metal shows. Clamp must bite the post firmly; wobbling causes sparks. Never let it touch metal surfaces.
Step 3: Negative Connection Options
Choose one:
– Option A: Black clamp to negative (-) terminal (only if clean and accessible)
– Option B: Black clamp to unpainted engine block/chassis (safer—reduces spark risk near battery)
Never connect to fuel lines, exhaust, or painted surfaces. Ground points must be bare metal.
Starting Your Engine Without Damaging Electronics
Most users over-crank engines, draining the jump starter. This sequence maximizes success while protecting your unit.
Power Up Sequence
- Press jump starter’s power button—green LED must glow steady (flashing = error)
- Enter vehicle, close door, and turn ignition key slowly (no rapid cranking)
- If engine doesn’t catch, wait 30 seconds for unit cooling before retrying
- After starting, idle 2 minutes before driving to recharge the vehicle battery
Cranking Technique That Works
- Gas engines: Crank max 3 seconds per attempt
- Diesels: Crank 5–6 seconds (glow plugs need time)
- Max attempts: 4 tries total—more risks overheating the unit
- Cold weather: Wait 2 minutes between attempts (lithium performs poorly below freezing)
Safe Disconnection Process to Avoid Electrical Spikes
Yanking cables while the engine runs sends voltage surges through your car’s computer. Do this:
Reverse Order Removal
- Remove black clamp first from chassis/ground point
- Remove red clamp second from positive terminal
- Turn off jump starter before storing
- Store clamps in holders—never let metal touch metal in your trunk
Model-Specific Features You’re Probably Ignoring

CAT units have hidden functions that solve roadside emergencies. Activate these correctly:
CAT CJ1000DCP Hidden Functions
- Air compressor: Set PSI on digital gauge, then press start—auto-stops at target pressure
- USB charging: Press power button once to activate ports (charges phones in 1 hour)
- LED light: One press = constant beam; two presses = emergency strobe
CAT CJ3000 Power-Saving Tricks
- 200W AC outlet: Plug in laptops—runs 30 minutes on full charge
- NOAA radio: Hold power button 5 seconds to activate weather alerts
- Digital display: Shows exact battery %—recharge below 75% monthly
Troubleshooting Failed Starts in Under 60 Seconds
If the engine won’t turn over, diagnose these before calling for help:
Check These First
- Loose clamps: Wiggle both—shouldn’t budge on terminals
- Charge level: Press power button—less than 2 LEDs = recharge unit
- Polarity: Red clamp must only touch positive (+)
- Ground point: Move black clamp to a different bare metal spot
Advanced Diagnostics
- No clicking sound: Battery is dead beyond revival—call for replacement
- Rapid clicking: Jump starter is low—recharge before retrying
- Single click then silence: Starter motor failure—not a battery issue
Cold Weather Starting Tactics That Actually Work
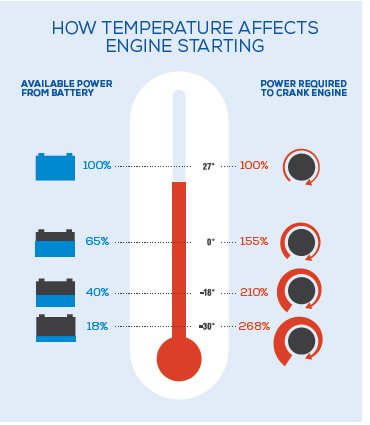
Below 32°F (-0°C), lithium performance drops 40%. Counteract this:
Pre-Heat Strategy
- Warm the unit indoors for 30 minutes before use
- For diesels: Wait for glow plug light to go out before cranking
- Use block heaters if installed—pre-heat engine 15 minutes
Extended Cranking Tips
- Crank 5 seconds instead of 3 for gas engines
- Wait 2 minutes between attempts (not 30 seconds)
- After 3 starts, rest unit 15 minutes to prevent thermal shutdown
USB Charging and LED Light Operation Secrets
These features work even when the jump starter is too weak to start cars:
USB Device Charging
- Press power button once to activate ports (no engine needed)
- Max output: 2.1A per port—fast-charges iPhones in 45 minutes
- Auto-shutoff: Deactivates after 2 hours of inactivity
LED Light Modes
- One press: Constant high beam (24-hour runtime)
- Two presses: Strobe for roadside emergencies
- Three presses: SOS pattern (saves lives at night)
Maintenance Schedule for 5+ Years of Reliability
Most units die from neglect—not use. Follow this:
Monthly Check Routine
- Day 1: Check charge—recharge if below 75%
- Day 30: Full discharge/recharge cycle (press power button until lights die)
- After use: Recharge within 24 hours—even if 50% remains
Storage Best Practices
- Store at 75% charge (not 100%) in climate-controlled spaces
- Check every 90 days—CAT batteries self-discharge 2% monthly
- Never leave in vehicles during summer (heat >104°F degrades cells)
Warranty Claims That Get You Fast Replacements
CAT’s warranty covers defects but excludes user errors. Do this to avoid denial:
Standard Coverage
- Consumer models: 1-year warranty (register online within 30 days)
- Professional series: 3-year coverage (keep proof of purchase)
- Battery replacement: 90-day guarantee if holding <50% charge
What Void Warranty Instantly
- Water damage (even from rain during use)
- Using non-CAT chargers
- Dropping unit from >3 feet
- Attempting DIY repairs
Final Safety Reminders for Every Jump-Start
Before you close the hood, verify these:
Before Each Use
- Charge level ≥50% (press power button—2+ LEDs lit)
- Cables undamaged—no exposed copper or fraying
- Terminals clean—corrosion causes 63% of failed connections
- Unit at room temperature—never use frozen or overheated
After Each Use
- Recharge within 24 hours (lithium degrades when depleted)
- Clean clamps with vinegar-soaked cloth to remove corrosion
- Store upright in original case—prevents terminal contact
- Log usage for warranty claims (date, temperature, attempts)
Your CAT jump starter will save you from 90% of dead-battery emergencies—if you treat it like the precision tool it is. Remember: red to positive, black to ground, and never skip the safety glasses. Keep this guide taped inside your glove box, and the next time your engine clicks instead of cranking, you’ll be back on the road in under 4 minutes. For model-specific videos, visit CAT’s YouTube channel—they’ve got 60-second tutorials for every feature. Now go check your jump starter’s charge level; it’s probably due for a top-up.