You’re stranded in a parking lot with a dead car battery and no one around to help. This happens to millions of drivers every year, but with your NEXPOW jump starter in the glove compartment, you can become your own roadside hero in minutes. Unlike traditional jump-starting methods requiring another vehicle and cumbersome cables, the NEXPOW delivers up to 2500 amps of instant starting power from a compact, portable unit that fits in your hand.
Knowing how to use NEXPOW jump starter properly means the difference between getting back on the road or waiting hours for assistance. These lithium-powered lifesavers work on everything from compact cars to full-size trucks, and with the right technique, you can revive your engine in under 10 minutes with no external help. This guide covers every step from initial setup to advanced troubleshooting, ensuring you never get stuck with a dead battery again.
Inspect Your NEXPOW Unit for Damage Before Attempting Jump Start
Check for Physical Defects That Could Cause Safety Hazards
Before attempting any jump start, examine your NEXPOW unit for cracks in the housing, exposed wiring, or corrosion around the terminals. Press the power button briefly—during the self-test sequence, all LED indicators should illuminate properly. Never use a damaged unit as this creates serious fire and electrical hazards. If you notice any compromised components, replace the device immediately rather than risk dangerous malfunctions during operation.
Confirm Your Vehicle’s Battery Compatibility with NEXPOW
Verify your vehicle uses a standard 12V battery system (found in 99% of passenger vehicles). NEXPOW jump starters work with conventional lead-acid, AGM, and gel cell batteries. If you drive a hybrid vehicle, consult your owner’s manual first as some models require special jump-starting procedures due to their dual-battery systems. Attempting to jump-start an incompatible vehicle could damage both your car’s electrical system and the NEXPOW unit itself.
Position Your NEXPOW Jump Starter in the Optimal Engine Bay Location
Place the unit on a stable, flat surface within your engine compartment, maintaining at least 6 inches of clearance from moving parts like belts, fans, and pulleys. Never set the device directly on the battery or any conductive metal surface that could cause short circuits. The ideal position is on the vehicle’s fender or a clean section of the engine bay away from heat sources. Proper positioning prevents accidental contact with dangerous components while ensuring easy access to connection points.
Connect NEXPOW Cables in the Exact Safety Sequence

Attach Red Clamp to Battery Positive Terminal Correctly
Locate your battery’s positive (+) terminal—typically marked with red coloring or a “+” symbol. Firmly attach the red clamp from your NEXPOW cables, ensuring bare metal contact without paint or corrosion interference. A weak connection here reduces power delivery and may prevent successful starting. If corrosion is present, clean the terminal with a wire brush before connecting.
Secure Black Clamp to Engine Ground Point Safely
Find an unpainted metal surface on the engine block or chassis for the black clamp connection—this serves as your ground point rather than connecting directly to the battery’s negative terminal. This critical step minimizes sparking near the battery, significantly reducing the risk of igniting potentially explosive hydrogen gas emissions. Confirm the connection point is clean and corrosion-free for optimal conductivity.
Activate NEXPOW Unit with Proper Power Sequence
Press and hold the power button for 2-3 seconds until the LED display illuminates. Watch for the sequential lighting pattern that indicates the unit is performing automatic safety checks. A solid green light confirms safe connection and readiness for jump-starting. Never skip this verification step—proceeding without confirmation could result in dangerous electrical issues or failed starting attempts.
Start Your Vehicle Engine Successfully with NEXPOW
Turn your ignition key or press the start button—your engine should crank within 1-2 seconds when using a properly charged NEXPOW unit. If the engine doesn’t start immediately, wait 30 seconds between attempts to prevent overheating both the jump starter and your vehicle’s starter motor. Most NEXPOW models provide 3-4 consecutive start attempts before requiring a mandatory 2-minute cooling break. For diesel engines in cold weather, allow the glow plug cycle to complete before attempting to start.
Safely Disconnect NEXPOW After Engine Starts
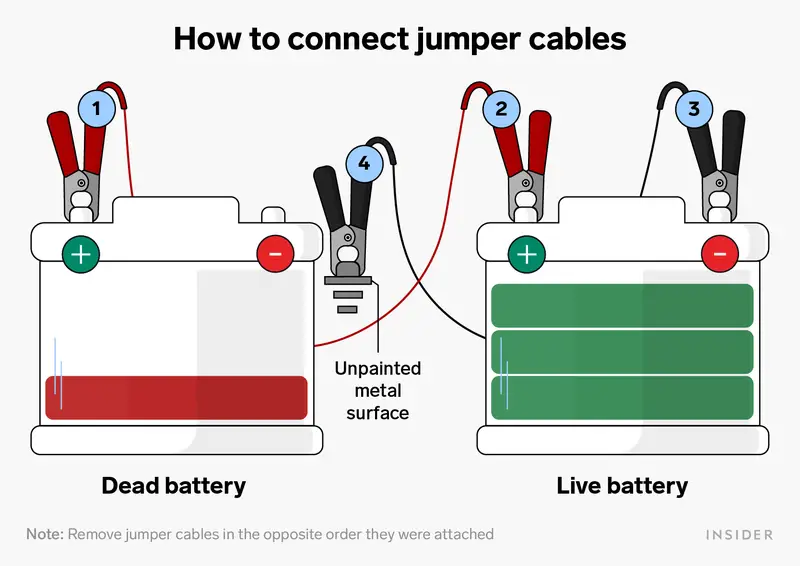
Let your engine idle for 2-3 minutes to stabilize before disconnecting. Remove the black clamp from the ground point first, followed by the red clamp from the positive terminal—this reverse order prevents dangerous electrical arcing. Store the cables carefully, ensuring the clamps don’t touch each other to avoid short circuits. The unit automatically enters standby mode within 30 seconds of disconnection, preserving battery life for future emergencies.
Charge Your Devices Using NEXPOW’s USB Power Bank Feature
Your NEXPOW doubles as a high-capacity power bank with dual USB ports (5V/2.1A and 5V/2.4A outputs). Connect your smartphone, tablet, or GPS device to keep essential electronics powered during roadside emergencies. The intelligent charging circuit automatically detects your device and delivers optimal current—no manual settings required. A fully charged NEXPOW unit can recharge most smartphones 4-6 times, making it invaluable during extended breakdowns.
Activate Emergency LED Lighting During Nighttime Breakdowns
The built-in LED flashlight offers three critical modes for roadside emergencies:
- Standard Mode: 15-20 hours of continuous bright light for under-hood work
- Strobe Mode: High-intensity flashing pattern visible from over 1000 feet away
- SOS Mode: International distress signal following the universal Morse code pattern
This multi-functional lighting system works even when the NEXPOW battery is too low for jump-starting, providing essential visibility and safety signaling when you need it most.
Read NEXPOW’s Digital Display for Precise Battery Status
Premium NEXPOW models feature an LCD display showing exact battery percentage in 1% increments, output voltage during operation (12.6V-12.8V when ready), and specific error codes for troubleshooting. This eliminates guesswork—you’ll know precisely whether your unit has enough charge for a successful jump start rather than wasting time with a depleted device. The display also shows charging status with clear visual indicators.
Maintain NEXPOW Jump Starter for Reliable Emergency Readiness
Perform Monthly Charge Cycles to Prevent Battery Degradation
Charge your NEXPOW every 3-4 months even when unused, as lithium batteries lose 2-3% charge monthly. Never store the unit fully discharged—maintain 70-80% charge for optimal battery health and longevity. Complete a full charge cycle before storing for extended periods, and always check charge status quarterly to ensure emergency readiness.
Follow Correct Charging Protocol to Avoid Damage
Use only the provided cable with a standard 5V/2A wall adapter—never use fast chargers (9V/12V) as they damage the battery management system. Charging from 0-100% takes 4-5 hours with the red LED indicating charging progress and solid green confirming completion. Wait at least 10 minutes after jump-starting before recharging to allow thermal stabilization.
Troubleshoot Common NEXPOW Jump Starter Problems
Fix “Device Won’t Power On” Issues Quickly
If your NEXPOW won’t activate, connect it to a wall charger for 5-10 minutes—the battery may be in deep discharge protection mode. Check for physical damage to the power button or charging port. If charging doesn’t restore functionality, the internal battery may require replacement. Never attempt to disassemble the unit yourself as this voids safety certifications and creates electrical hazards.
Resolve Slow Cranking or Failed Start Attempts
Verify your NEXPOW charge exceeds 50%—jump-starting requires substantial power. Inspect cable connections for corrosion or loose clamps. Ensure the black clamp connects to bare metal, not painted surfaces. For diesel engines, wait for the glow plug cycle completion before starting. If problems persist, your vehicle battery may be too far discharged for safe jump-starting.
Select the Right NEXPOW Model for Your Vehicle Type
Q10S: 1500A peak current handles gasoline engines up to 7.0L and diesels up to 5.5L—perfect for most passenger vehicles and smaller trucks.
Q9B: 2000A peak current supports larger engines (gas up to 8.0L, diesel up to 6.5L)—ideal for full-size trucks, SUVs, and cold-weather regions where extra cranking power is essential.
Store NEXPOW Properly for Year-Round Emergency Readiness
Keep your NEXPOW in the vehicle cabin (not trunk) during winter months to maintain operational temperature. In desert climates, use a reflective cover to prevent overheating. For coastal areas, wipe the unit monthly with a dry cloth to prevent salt corrosion. Before extended storage (6+ months), charge to 80% and include a desiccant packet to control humidity.
A dead battery no longer means disaster when you know how to use NEXPOW jump starter correctly. By following these precise steps for connection, starting, and maintenance, you’ll transform from helpless to hero in any roadside emergency. Store your unit charged, check it quarterly, and you’ll never be stranded by a dead battery again. Keep this guide in your glove box alongside your NEXPOW for instant reference when you need it most.