Your car won’t start. The engine clicks weakly, dashboard lights dim, and panic sets in. Whether you’re stranded in a parking lot or facing a dead battery in your driveway, a Schumacher jump starter can be your lifeline back to the road. These portable power banks pack serious punch, delivering the amps needed to revive your dead battery without another vehicle.
This guide walks you through every step of using your Schumacher jump starter safely and effectively. You’ll learn the exact connection sequence, how to read indicator lights, what those beeping sounds mean, and the critical safety steps that prevent damage to both your vehicle and the jump starter itself. Master these procedures now, and you’ll never be stranded by a dead battery again.
Verify Your Vehicle Matches Schumacher’s Voltage Requirements
Before connecting anything, confirm your Schumacher model is compatible with your vehicle’s electrical system. Most Schumacher jump starters support 12-volt systems found in standard passenger vehicles, but some commercial models handle 24-volt systems for larger trucks.
Check your vehicle’s battery case for its voltage rating—most cars display “12V” or “12.6V” clearly on the label. Attempting to jump a 6V or 24V system with an incompatible 12V Schumacher unit creates serious safety hazards and can permanently damage both devices. If you drive a diesel truck or commercial vehicle, double-check your owner’s manual for specific voltage requirements before proceeding.
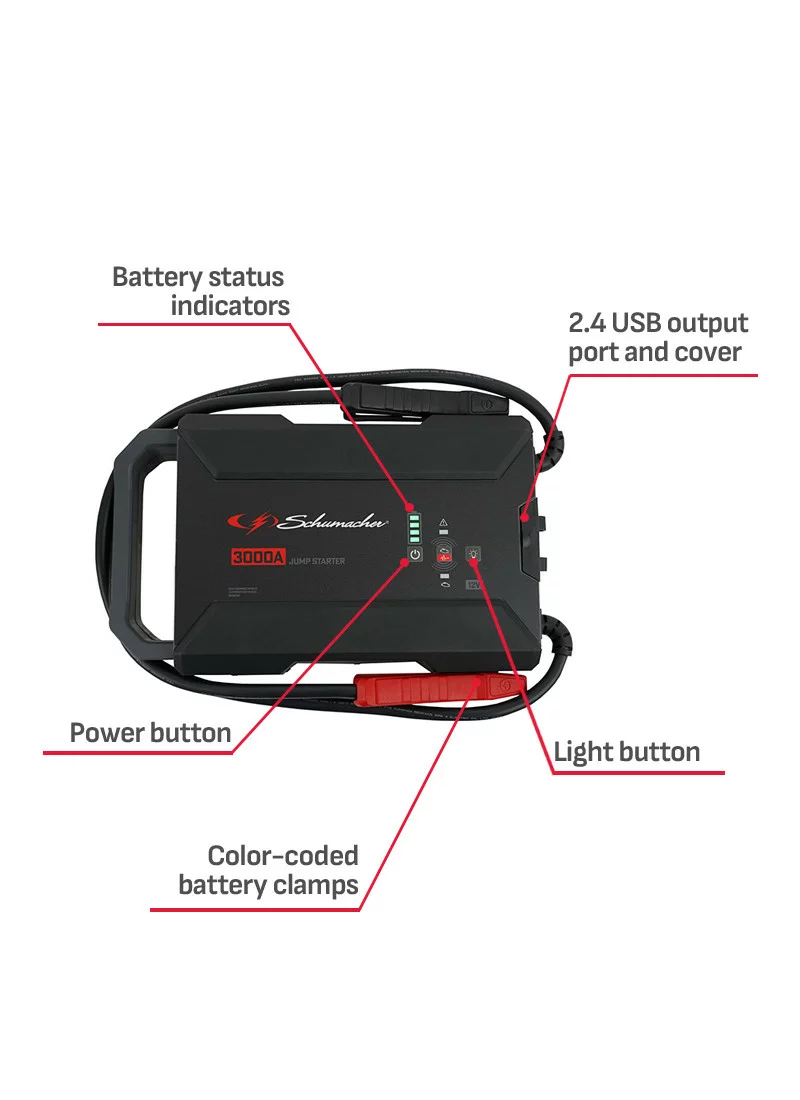
Conduct Pre-Use Equipment Inspection
Identify Damaged Cables Before Connection
Examine both jumper cables thoroughly for cuts, frays, or exposed copper wire. Damaged cables can arc or fail under load, creating dangerous electrical situations. Pay special attention to areas near the clamps where stress typically occurs. If you spot any damage, replace the cables immediately—never attempt temporary repairs with electrical tape as this creates fire hazards.
Confirm Adequate Jump Starter Charge Level
Press the power button on your Schumacher unit and check the LED indicators. For reliable starting power, you need at least 75% charge (three or four solid lights depending on your model). A partially charged unit may crank your engine once but fail on subsequent attempts. If the indicator shows below 50%, connect the wall adapter and charge for 2-4 hours before attempting any jump. Remember that Schumacher units lose charge over time, even when not used.
Evaluate Battery Terminal Condition
Look for white or green crusty buildup on your car battery terminals—this corrosion prevents proper electrical contact. Use a wire brush or battery terminal cleaner to remove corrosion before connecting jumper cables. While cleaning, ensure terminal connections are tight but don’t overtighten, as this can damage the battery posts. Wear gloves and eye protection during this step to protect against battery acid exposure.
Position Your Schumacher Unit for Maximum Safety
Place your jump starter on a stable, flat surface at least 12 inches away from the vehicle battery. The engine compartment is crowded—position the unit on the ground, fender, or another stable platform where it won’t roll or fall. Never place the jump starter directly on the battery or engine block as heat and vibrations can damage the unit.
Ensure the Schumacher sits level during operation—tilting can cause internal damage to the lithium battery. Keep the unit away from moving engine parts like belts and fans that could snag cables. Maintain clear visibility of the indicator lights throughout the jump process so you can monitor status changes immediately.
Execute Correct Cable Connection Sequence

Secure Positive Connection to Battery Terminal
Connect the red (positive) clamp to your battery’s positive terminal marked with a “+” symbol or red cover. The clamp should bite firmly onto the terminal post—not the cable connector. Wiggle it gently to verify solid contact; poor connections cause dangerous sparking and failed starts. If the terminal is corroded, clean it first as described earlier.
Establish Proper Ground Connection Away From Battery
Connect the black (negative) clamp to an unpainted metal surface on your engine block or vehicle frame—never directly to the battery’s negative terminal. This critical safety step reduces spark risk near potentially explosive battery gases. Look for clean, bare metal like a bolt head or bracket at least 18 inches from the battery. The engine block makes an excellent grounding point as long as it’s free of paint and grease.
Verify Connection Integrity Before Powering On
Both clamps should grip tightly with absolutely no wiggling. Loose clamps can arc, overheat dangerously, or fail to transfer sufficient power. Perform a final visual check of both connections before proceeding. If a clamp won’t grip firmly after cleaning the contact point, choose an alternative grounding location on the vehicle frame.
Start Your Vehicle Engine Without Damage
Turn your key to the “ON” position (don’t attempt starting yet). If your Schumacher model has a boost button, press and hold it while simultaneously turning the key to “START.” Wait 2-3 seconds for the unit to stabilize power delivery before cranking your engine.
Crank for no more than 5-6 seconds at a time. If the engine doesn’t start, wait 30 seconds between attempts to prevent overheating the jump starter. Most Schumacher units provide 15-20 jump attempts on a full charge, but repeated failed starts drain power quickly. Never crank continuously for more than 10 seconds as this can damage both your starter motor and the jump starter.
Interpret Indicator Lights for Successful Jumps
Recognize Full Readiness with Solid Green Light
When your Schumacher shows a solid green light, it confirms two critical conditions: the jump starter has sufficient charge and proper connections are established. This light means you’re ready to attempt starting your vehicle. If you see this indicator but your engine won’t turn over, check your vehicle’s other potential issues like fuel or spark problems.
Respond Immediately to Flashing Red Warning
A flashing red light indicates reverse polarity—your clamps are connected backwards. Disconnect both clamps immediately and recheck your connections. Reverse polarity can permanently damage both your vehicle’s electrical system and the jump starter. Double-check that red connects to positive (+) and black to ground (not negative terminal).
Diagnose No-Light Situations After Connection
If you see no lights when connected, first check your jump starter’s power level by pressing its main power button. If no lights appear, the unit needs charging. Also verify both clamps have solid metal-to-metal contact on clean surfaces—corrosion or paint can block electrical flow even when clamps appear connected.
Disconnect Components in Safe Order After Jump
Once your engine starts successfully, let it run for 2-3 minutes to stabilize the electrical system. Remove clamps in reverse order of connection: black clamp first, then red clamp. This sequence prevents dangerous sparking near the battery where explosive gases may be present.
Store clamps carefully after use, ensuring they don’t touch each other or metal surfaces. Coil cables loosely using the over-under technique—tight coils can damage internal wiring over time. Wipe any corrosion from clamps with a clean cloth before storing to prevent future connection issues.
Resolve Common Jump Starter Problems Quickly

Address Engine Cranking Failure Immediately
If your engine won’t turn over despite proper connections, first check your jump starter’s charge level—anything below 50% may not provide sufficient cranking power. Verify cable connections are tight and clean. Try a different grounding point for the black clamp on the engine block. If problems persist, your vehicle may have additional issues beyond a dead battery.
Diagnose Clicking Sounds Without Engine Turnover
Clicking sounds typically indicate either a severely depleted battery or poor electrical connections. Clean terminals thoroughly and ensure clamps bite firmly onto bare metal. If clicking continues after multiple connection attempts, your battery likely needs replacement rather than just a jump. Do not attempt more than three jump attempts in this scenario to avoid damaging the starter motor.
Handle Jump Starter Overheating Safely
If your Schumacher unit becomes hot to the touch during use, stop immediately and let it cool for 10-15 minutes. Overheating usually results from repeated failed starting attempts or extremely cold temperatures. Check for loose connections or a completely dead battery that requires professional service rather than jumping.
Maintain Your Schumacher Unit for Reliable Performance
Implement Monthly Charging Routine
Charge your jump starter every 30 days when not in use. Lithium-ion batteries self-discharge over time, and a fully charged unit ensures reliability when you need it most. For optimal battery longevity, store your Schumacher between 40-80% charge—completely drained or fully saturated batteries degrade faster.
Follow Cable Care Best Practices
Keep cables clean and dry after each use. Wipe clamps with a clean, dry cloth to remove corrosion or battery acid residue immediately after jumping. Store cables loosely coiled in the provided case or a cool, dry location away from direct sunlight and extreme temperatures. Never store cables tangled or compressed, as this damages internal conductors.
Your Schumacher jump starter can provide years of reliable service with proper use and maintenance. Practice these procedures now while you’re not in an emergency situation—familiarity prevents mistakes when you’re stranded with a dead battery. Keep your unit charged, store it properly, and periodically test its functionality to ensure it’s ready when you need it most. With these skills mastered, you’ll transform from helpless victim of dead batteries to confident automotive problem-solver.