
That urgent beep-beep-beep from your Schumacher jump starter isn’t just noise—it’s a critical warning you can’t ignore. When your Schumacher jump starter beeping won’t stop, it’s trying to tell you something important about your connection, battery status, or internal components. Whether you’re stranded on the side of the road or preparing for an emergency, understanding these beeping patterns can prevent permanent damage to your device and get you back on the road safely.
Most Schumacher jump starter beeping issues fall into three main categories: reverse polarity alerts, low battery warnings, and short circuit detection. This guide gives you immediate solutions for each scenario, with specific steps to diagnose and fix the problem in minutes. You’ll learn exactly what each beep pattern means and how to resolve it before attempting another jump start.
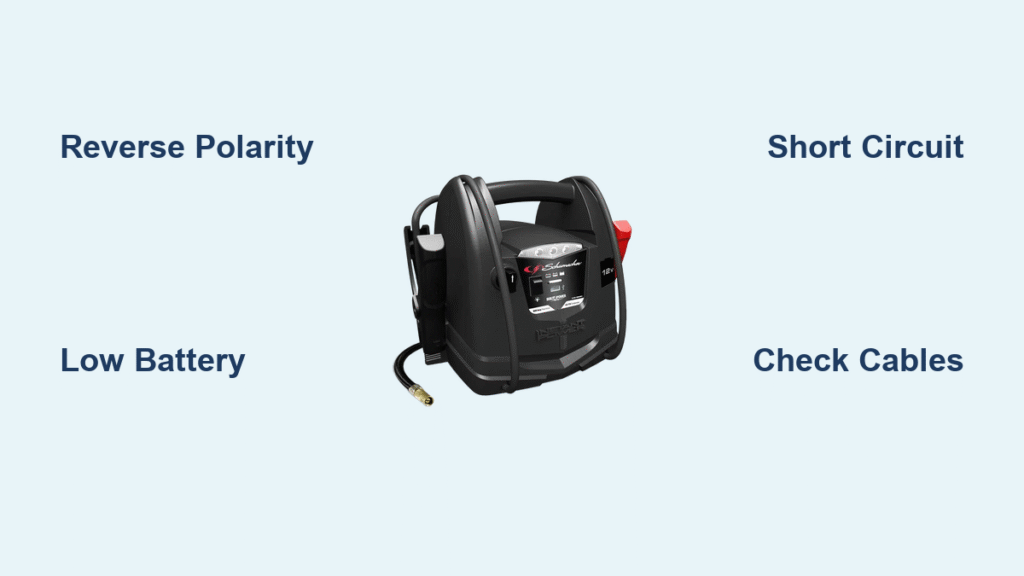
Identify Your Schumacher Beeping Pattern
Continuous Beeping: Reverse Polarity Emergency
When your Schumacher emits one long, continuous beep, you’ve connected the clamps backward. This reverse polarity situation occurs when the red clamp touches the negative terminal and the black clamp touches positive. Approximately 60% of all Schumacher jump starter beeping issues stem from this common mistake.
Take these immediate actions:
– Disconnect both clamps immediately—every second of reverse connection risks permanent damage
– Verify terminal markings—locate the “+” and “-” symbols on your car battery
– Confirm clamp colors—red always connects to positive, black to negative
Your Schumacher won’t deliver power during reverse polarity beeping. Before reconnecting, inspect your vehicle’s battery terminals for corrosion that might make identification difficult. A wire brush clean-up takes just 30 seconds but ensures proper connection.
Intermittent Beeping: Critical Low Battery Alert
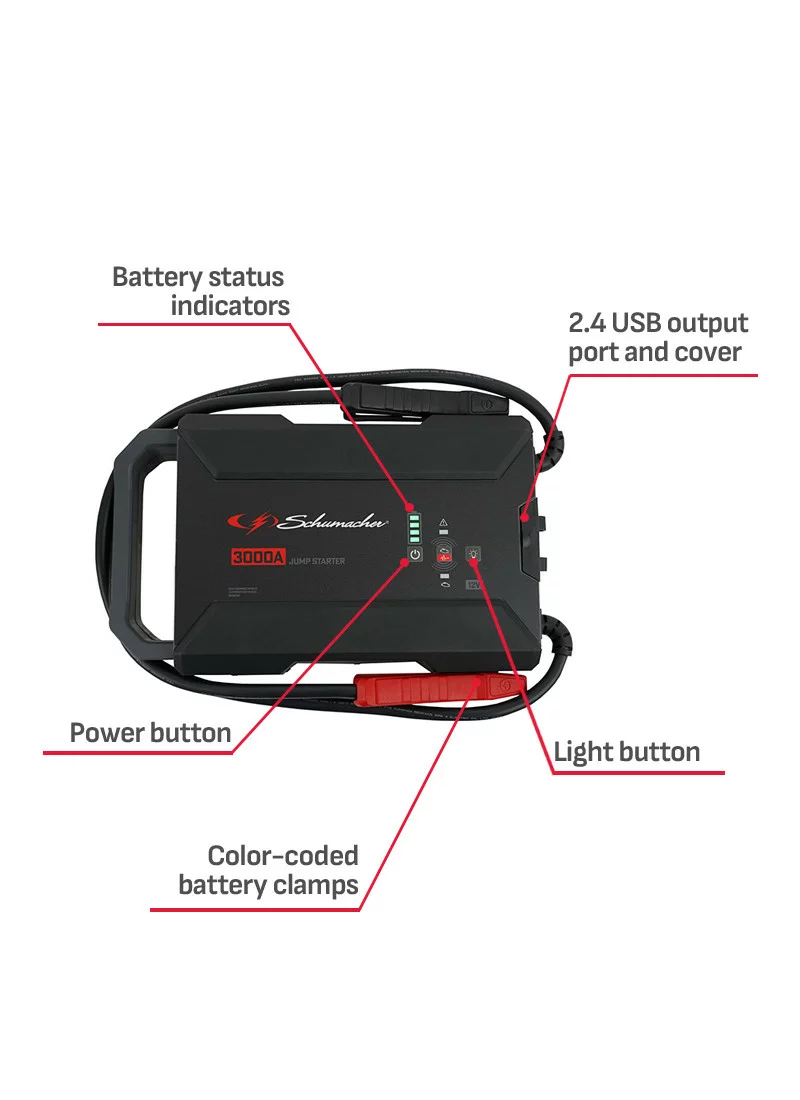
The beep-beep-pause pattern signals your Schumacher jump starter’s internal battery needs charging. This occurs when you attempt to jump a vehicle with less than 25% charge remaining. Check your LED indicators to confirm:
- 1 LED or less: Needs immediate charging (0-25% capacity)
- 2 LEDs: May work for small engines but requires charging
- 3-4 LEDs: Sufficient power for most jump starts
Never attempt to jump a car with a low-charge Schumacher jump starter—the unit simply won’t have enough power to turn over your engine. This intermittent beeping is your device protecting itself from complete discharge, which could permanently damage the lithium-ion battery.
Rapid Beeping: Short Circuit Warning
Fast, repetitive beeping indicates a potentially dangerous short circuit. This protective shutdown prevents damage to your Schumacher jump starter but requires immediate troubleshooting. Common culprits include:
- Damaged cable insulation exposing bare wires
- Clamps accidentally touching each other during connection
- Corroded battery terminals creating electrical resistance
- Internal component failure (less common)
Unlike reverse polarity alerts, rapid beeping may persist even after disconnecting from the vehicle. If your Schumacher continues beeping with no connections, internal damage may have occurred, requiring professional service.
Correct Reverse Polarity Connections Properly
Terminal Identification Protocol
Before reconnecting, follow this foolproof terminal identification process:
- Locate the positive terminal—marked with “+” symbol and typically has a thicker red cable
- Find the negative terminal—marked with “-” symbol and usually connected to the vehicle frame
- Remove protective covers—many modern batteries have plastic caps over terminals
- Clean corrosion—use a wire brush to expose clean metal surface
Take extra time with Asian vehicles, which sometimes position terminals differently than American or European models. If you’re unsure, consult your vehicle manual before proceeding.
Correct Connection Sequence
Follow these exact steps to avoid triggering reverse polarity beeping:
Step 1: Connect red clamp to positive terminal first
– Ensure the clamp teeth bite firmly into the metal
– Gently wiggle to confirm solid connection
– Verify no part of the clamp touches surrounding metal
Step 2: Connect black clamp to negative terminal or engine ground
– Preferred alternative: connect to an unpainted metal engine component
– This creates a safer ground connection away from battery gases
– Never connect both clamps directly to the battery terminals
Step 3: Final verification
– Confirm red clamp is on positive, black on negative/ground
– Ensure clamps aren’t touching any other metal surfaces
– Listen for a single confirmation beep (normal operation)
Resolve Low Battery Charging Issues
Accurate Charge Assessment
Before plugging in your Schumacher jump starter, interpret the LED indicators correctly:
- 4 green LEDs: 75-100% charged (ready for use)
- 3 LEDs: 50-75% (charge recommended)
- 2 LEDs: 25-50% (requires immediate charging)
- 1 LED: 0-25% (needs 3-4 hours minimum charging)
If your Schumacher shows no LEDs but still beeps intermittently, the battery has critically low charge. Plug it in immediately using the AC wall adapter for fastest results—car charging through the 12V outlet takes significantly longer.
Optimal Charging Procedure
AC Wall Charging (Recommended Method):
1. Disconnect all cables from your Schumacher jump starter
2. Plug the AC adapter into a wall outlet
3. Connect the adapter to the jump starter’s charging port
4. Watch LED indicators cycle through charging stages
5. All LEDs solid green indicates full charge (typically 3-4 hours)
Vehicle Charging Alternative:
– Only use if AC power unavailable
– Run vehicle engine during charging for adequate power
– Expect 4-6 hours for full charge (slower than wall charging)
– Never attempt to jump-start while charging—this damages both systems
Pro Tip: Set a timer when charging. Overcharging won’t harm modern Schumacher models, but knowing when your device is ready prevents unnecessary waiting.
Diagnose and Fix Short Circuit Problems
Comprehensive Cable Inspection
Perform this 90-second visual inspection to identify short circuit causes:
Cable Examination:
– Run fingers along entire cable length feeling for cuts
– Look for melted or discolored insulation sections
– Check stress points where cables enter clamps
– Inspect for exposed copper wires anywhere along the length
Clamp Assessment:
– Ensure jaws open and close smoothly without sticking
– Verify rubber insulation covers all metal except contact points
– Check for bent metal parts that might touch during use
– Clean corrosion from clamp surfaces with a wire brush
If you find any damage during inspection, discontinue use immediately. Continuing with damaged cables risks permanent Schumacher jump starter beeping issues and potential fire hazards.
Safe Testing Protocol
Before connecting to your vehicle, verify your Schumacher’s functionality:
- Power on the unit—should emit a single startup beep
- Briefly touch clamp tips together—should trigger rapid beeping (protection working)
- Separate clamps—beeping should stop instantly
- If beeping continues with no connections, seek professional service
This simple test confirms whether your Schumacher’s safety features function correctly. Persistent beeping after passing this test likely indicates vehicle-specific issues rather than jump starter problems.
Prevent Future Schumacher Beeping Problems
Essential Monthly Maintenance
Keep your Schumacher jump starter ready with these quick habits:
- Recharge monthly to maintain 75%+ capacity during storage
- Clean clamps with a wire brush to prevent corrosion buildup
- Check cable flexibility—stiff cables indicate aging insulation
- Verify LED indicators function properly during testing
Store your device between 32°F and 104°F in a dry location away from direct sunlight. Extreme temperatures trigger false beeping alerts and reduce battery lifespan.
Professional Connection Techniques
Master these expert practices to avoid 90% of beeping issues:
Before Jump Starting:
– Test vehicle battery voltage (should read 12.6V when healthy)
– Clean terminals thoroughly for optimal connection
– Confirm Schumacher has at least 2 LED indicators showing
During Connection:
– Connect positive clamp first, negative second
– Never let clamps touch during attachment
– Wait 2-3 minutes after connection before starting vehicle
– Remove clamps in reverse order (negative first, positive last)
When your Schumacher jump starter beeping won’t stop, remember this emergency protocol: disconnect immediately, identify the pattern using this guide, fix the specific issue, and test on a known good battery before retrying. Most beeping problems resolve with proper connection technique or a simple recharge. Keep this information handy in your glove compartment—you’ll never be confused by warning beeps again. If issues persist after following these steps, contact Schumacher support at 1-800-621-5485 for model-specific assistance with your jump starter.


